Dodge Journey: Removal
FOOT OPERATED PARKING BRAKE LEVER
1. Release the parking brake.
2. Raise and support the vehicle.
3. Manually release the parking brake cable tension.
4. Push the front cable strand into the housing until it bottoms.
5. Lower the vehicle.
6. Remove the left front door opening sill scuff plate.
7. Remove the lower cowl trim.
8. Remove the steering column opening cover.
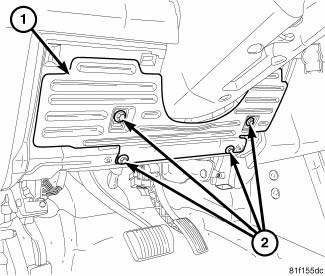
Fig. 225: STEERING COLUMN COVER REINFORCEMENT
9. Remove the steering column cover reinforcement mounting screws (2). Remove the steering column cover reinforcement (1).
10. Pull the parking brake lever pedal up and hold it in this position.

Fig. 226: CABLE BUTTON LOCATED IN LEVER
11. Rotate the cable strand around at the lever mechanism until the strand lines up with the slot, then remove the cable end button (2) from the lever mechanism (1).
NOTE: Prior to removing cable from lever, note cable routing through lever for ease in reassembly.
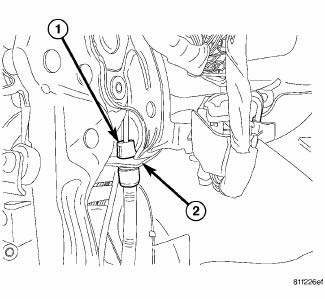
Fig. 227: CABLE HOUSING RETAINED IN LEVER
12. Collapse the front cable retainer fingers on the end of the cable housing (1) at the lever (2).
13. Remove the cable from the parking brake lever (3).
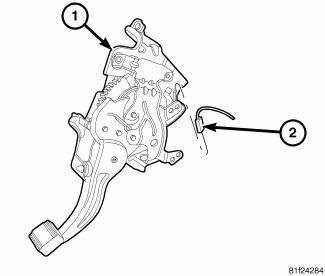
Fig. 228: WIRING AT PARKING BRAKE LEVER
14. Disconnect the wiring connector (2) at parking brake indicator lamp switch.
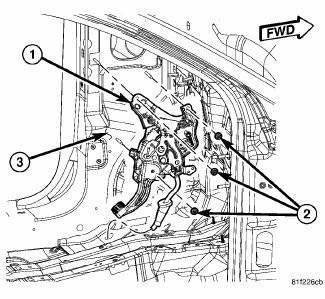
Fig. 229: FOOT LEVER MOUNTING
15. Remove the three mounting nuts (2), then remove the parking brake lever (1) from the cowl (3).
HAND OPERATED PARKING BRAKE LEVER
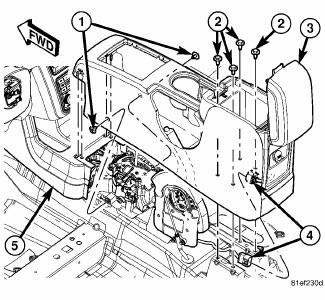
Fig. 230: CENTER CONSOLE
1. Remove the floor center console.
2. Manually release the parking brake cable tension.
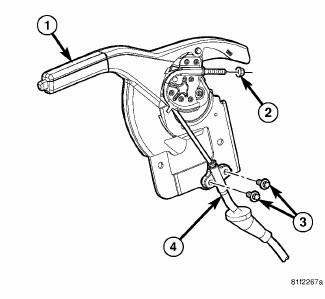
Fig. 231: CABLE MOUNTING TO HAND LEVER
3. Remove the mounting screws (3) fastening the front cable (4) to the side of the parking brake lever (1).
4. Remove the adjusting nut (2) from the end of the front parking brake cable.
5. Remove the cable strand from the lever.
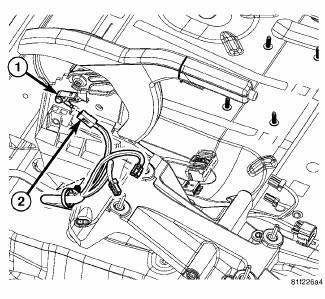
Fig. 232: HAND LEVER PARKING BRAKE SWITCH
6. Disconnect the wiring connector (2) at parking brake indicator lamp switch (1).
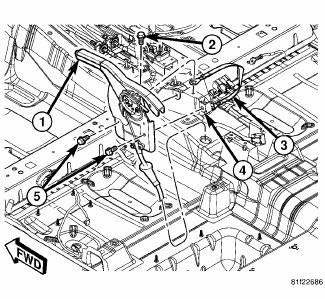
Fig. 233: HAND LEVER MOUNTING
7. Remove the two horizontal (5) and one vertical (2) mounting bolts, then remove the parking brake lever (1) from the shifter bracket (4).

 Installation
FOOT OPERATED PARKING BRAKE LEVER
Fig. 234: FOOT LEVER MOUNTING
1. Position the parking brake lever (1) over the mounting studs, against the
left lower cowl (3).
2. Install the three mounting ...
See also:
Ensioner, belt
Removal
2.4L ENGINE
Fig. 36: ACCESSORY DRIVE BELT - WORLD ENGINE
- POWER STEERING PUMP
- ACCESSORY DRIVE BELT
- GENERATOR
- CRANKSHAFT PULLEY
- LOWER IDLER PULLEY
- CRANKSHAFT PULLEY ...
Standard procedure, Removal
STANDARD PROCEDURE
FRONT LAMP UNIT MOISTURE CLEARING
Some occasional moisture accumulation inside a vented front lamp unit is
normal and appears as a fogging on
the inside of the lamp lens, simil ...
Disassembly
HOUSING-AIR DISTRIBUTION
NOTE: The air distribution housing must be removed from the HVAC
housing and
disassembled for service of the blend-air and mode-air doors.
NOTE: LHD model with A/C ...
