Dodge Journey: Description, Operation
DESCRIPTION

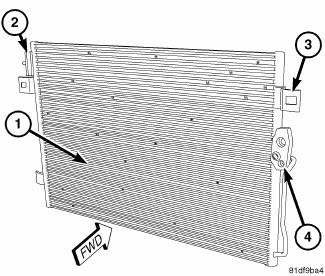
Fig. 221: Condenser Description
NOTE: A/C condenser with automatic transmission cooler shown. A/C Condenser without cooler similar.
The A/C condenser (1) is located in the front of the engine compartment behind the grille. The A/C condenser is a heat exchanger that allows the high-pressure refrigerant gas being discharged by the A/C compressor to give up its heat to the air passing over the condenser fins, which causes the refrigerant to cool and change to a liquid state.
The A/C condenser is equipped with mounting tabs (3), a tapping block for the A/C discharge and liquid lines (4) and a tapping block for the integral automatic transmission cooler (2), when equipped with an automatic transaxle.
OPERATION
When air passes through the fins of the A/C condenser, the high-pressure refrigerant gas within the A/C condenser gives up its heat. The refrigerant then condenses as it leaves the A/C condenser and becomes a highpressure liquid. The volume of air flowing over the condenser fins is critical to the proper cooling performance of the A/C system. Therefore, it is important that there are no objects placed in front of the radiator grille openings at the front of the vehicle or foreign material on the condenser fins that might obstruct proper air flow.
Also, any factory-installed air seals or shrouds must be properly reinstalled following radiator or A/C condenser service.
NOTE: Replacement of the refrigerant line O-ring seals and gaskets is required anytime a refrigerant line is disconnected. Failure to replace the rubber O-ring seals and metal gaskets could result in a refrigerant system leak.
The A/C condenser has no serviceable parts. The O-ring seals used on the connections are made from a special type of rubber not affected by R-134a refrigerant. The O-ring seals and gaskets must be replaced whenever a refrigerant line is disconnected from the A/C condenser.
The A/C condenser cannot be repaired and must be replaced if leaking or damaged.
 Condenser, A/C
...
 Removal
WARNING: Refer to the applicable warnings and cautions for this
system before
performing the following operation. Failure to follow the warnings and
cautions may result in possible se ...
See also:
Arm, lower control
Diagnosis and Testing
LOWER CONTROL ARM
Inspect the lower control arm for signs of damage from contact with the
ground or road debris. If the lower
control arm shows any sign of damage, look for ...
WARRANTY INFORMATION
See the Warranty Information Booklet, located on the
DVD, for the terms and provisions of Chrysler Group
LLC warranties applicable to this vehicle and market. ...
Damper, vibration
Removal
Fig. 196: Vibration Damper - Removal
- SPECIAL TOOL 8454 PULLER
- SPECIAL TOOL 8194 INSERT
1. Disconnect negative battery cable.
2. Remove right front wheel and belt splash shie ...
