Dodge Journey: Bottle, coolant recovery
Description
NON-PRESSURE
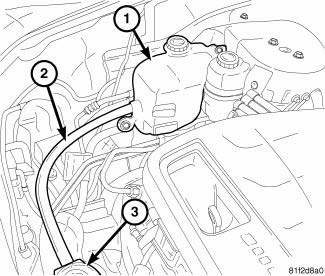
Fig. 52: NON-PRESSURE COOLANT RECOVERY CONTAINER
- - COOLANT RECOVERY CONTAINER
- - OVERFLOW HOSE
- - RADIATOR PRESSURE CAP
The coolant recovery system used on 2.4L engine consists of a coolant recovery container and an overflow hose that is connected to the radiator. The coolant recovery container is mounted in the right side engine compartment.
PRESSURE SYSTEM

Fig. 53: COOLANT RECOVER CONTAINER - PRESSURE SYSTEM
- - COOLANT RECOVERY CONTAINER - PRESSURE SYSTEM
- - SUPPLY HOSE
- - MOUNTING BOLT
- - COOLANT RECOVERY CONTAINER MOUNTING TABS
The coolant pressure container consists of a pressure chamber and a overflow chamber. The coolant pressure container is mounted in the right side engine compartment.
NOTE: Coolant will normally be in the pressure chamber side of the coolant bottle. The overflow chamber should normally be empty
Operation
NON-PRESSURE SYSTEM
This system works in conjunction with the pressure cap to utilize thermal expansion and contraction of the coolant to keep the coolant free of trapped air. It provides a volume for expansion and contraction, provides a convenient and safe method for checking coolant level, and adjusting level at atmospheric pressure without removing the pressure cap. It also provides some reserve coolant to cover minor leaks and evaporation or boiling losses.
PRESSURE SYSTEM
The pressure chamber keeps the coolant free of trapped air, provides a volume for expansion and contraction, and provides a convenient and safe method for checking and adjusting coolant level at atmospheric pressure. It also provides some reserve coolant to cover minor leaks, evaporation or boiling losses. The overflow chamber allows coolant recovery in case of an overheat.
Removal
NON-PRESSURE SYSTEM
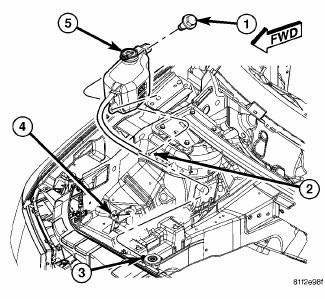
Fig. 54: COOLANT RECOVERY CONTAINER - NON-PRESSURE
- - BOLT
- - OVERFLOW TUBE
- - RADIATOR NIPPLE
- - MOUNTING TAB
- - COOLANT RECOVERY CONTAINER
1. Disconnect the over flow tube (2) from radiator nipple (3).
2. Remove coolant recovery container mounting bolts (1).
3. Remove coolant recovery container (5).
PRESSURE SYSTEM

Fig. 55: COOLANT RECOVER CONTAINER - PRESSURE SYSTEM
- - COOLANT RECOVERY CONTAINER - PRESSURE SYSTEM
- - SUPPLY HOSE
- - MOUNTING BOLT
- - COOLANT RECOVERY CONTAINER MOUNTING TABS
1. Drain coolant below the coolant recovery container level. 2. Disconnect the return hose from coolant recover container (1).
3. Remove coolant recovery container mounting bolts (3).
4. Disconnect supply hose (2) from the bottom of the coolant recovery container (1).
5. Remove coolant recovery container (1).
Installation
NON-PRESSURE SYSTEM

Fig. 56: COOLANT RECOVERY CONTAINER - NON-PRESSURE
- - BOLT
- - OVERFLOW TUBE
- - RADIATOR NIPPLE
- - MOUNTING TAB
- - COOLANT RECOVERY CONTAINER
1. Connect the overflow tube (2) to the radiator nipple (3).
2. Position coolant recovery container on mounting tab (4). Install mounting bolts (1).
3. Tighten mounting bolts to 10 N.m (89 in. lbs.).
4. Fill cooling system.
PRESSURIZED SYSTEM
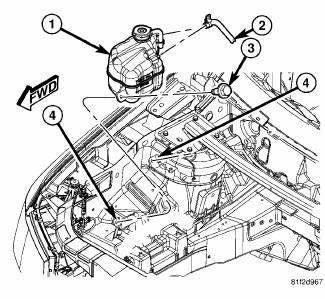
Fig. 57: COOLANT RECOVER CONTAINER - PRESSURE SYSTEM
- - COOLANT RECOVERY CONTAINER - PRESSURE SYSTEM
- - SUPPLY HOSE
- - MOUNTING BOLT
- - COOLANT RECOVERY CONTAINER MOUNTING TABS
1. Connect hose (3) to coolant recovery container (4).
2. Install coolant recovery container (4) in mounting position and install mounting bolts (1) Tighten bolts to 10 N.m (89 in. lbs.).
3. Connect return hose (2) to the coolant recovery container (4).
4. Fill cooling system.
 Engine
...
 Cap, radiator
Description
Fig. 58: Cooling System Pressure Cap
- OVERFLOW NIPPLE
- MAIN SPRING
- GASKET RETAINER
- STAINLESS-STEEL SWIVEL TOP
- RUBBER SEALS
- VENT VALVE
- COOLANT OUTLET CONNECTO ...
See also:
Disassembly, Assembly
Disassembly
NOTE: Before disassembling the brake caliper, remove it from the
vehicle.
NOTE: Before disassembling the brake caliper, clean and inspect it.
WARNING: Under no condition sh ...
SENTRY KEY
The Sentry Key Immobilizer system prevents unauthorized
vehicle operation by disabling the engine. The
system does not need to be armed or activated. Operation
is automatic, regardless of whether t ...
Sensor, exhaust temperature
REMOVAL
EXHAUST TEMPERATURE SENSOR
Fig. 44: Exhaust Temperature Sensor
- DPF TEMPERATURE SENSOR ELECTRICAL CONNECTOR
- DPF TEMPERATURE SENSOR
1. Remove engine cover.
2. Disconnect and ...
