Dodge Journey: Removal
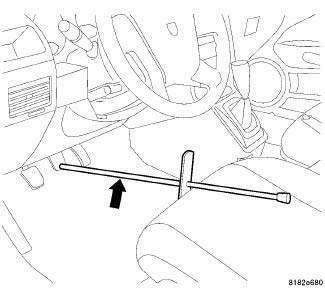
Fig. 56: BRAKE PEDAL HOLDING TOOL
1. Using a brake pedal holding tool as shown, depress the brake pedal past its first one inch (25 mm) of travel and hold it in this position. This will isolate the master cylinder from the brake hydraulic system and will not allow the brake fluid to drain out of the master cylinder reservoir when the lines are opened.
2. Raise and support the vehicle.
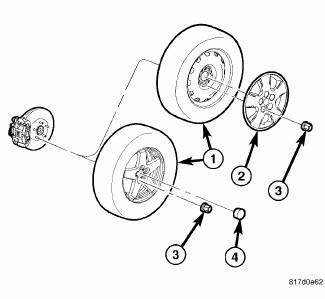
Fig. 57: TIRE AND WHEEL MOUNTING
3. Remove the wheel mounting nuts (3), then the tire and wheel assembly.

Fig. 58: BRAKE HOSE MOUNTING TO CALIPER
4. Remove the banjo bolt (3) connecting the brake flex hose (2) to the brake caliper (1). There are two washers (4) that will come off with the banjo bolt. Discard the washers. They should not be reused.
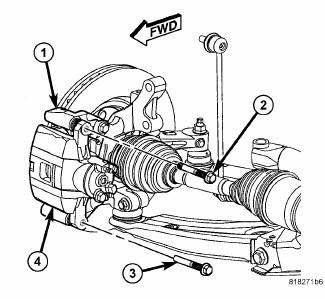
Fig. 59: CALIPER GUIDE PIN BOLTS
CAUTION: When removing or installing a caliper guide pin bolt, it is necessary to hold the guide pin stationary while turning the bolt. Hold the guide pin stationary using a wrench placed upon the pin's hex-shaped head.
5. Remove the two brake caliper guide pin bolts (2, 3).
6. Slide the disc brake caliper (4) from the disc brake adapter bracket (1) and brake pads and remove.

 Disassembly, Assembly
Disassembly
NOTE: Before disassembling the brake caliper, remove it from the
vehicle.
NOTE: Before disassembling the brake caliper, clean and inspect it.
WARNING: Under no condition sh ...
See also:
Diagnosis and testing
COMMON PROBLEM CAUSES
The majority of transaxle malfunctions are a result of:
Insufficient lubrication
Incorrect lubricant
Misassembled or damaged internal components
Improper operation
...
Assembly
Fig. 333: Identifying Thrust Washer
- THRUST WASHER
NOTE: The differential is serviced as an assembly. Differential
service is limited to
bearing cups and cones. Any other differentia ...
DEPARTMENT OF TRANSPORTATION UNIFORM TIRE QUALITY
GRADES
The following tire grading categories were established by
the National Highway Traffic Safety Administration. The
specific grade rating assigned by the tire’s manufacturer
in each category is sho ...
