Dodge Journey: Motor, headlamp leveling, export
DESCRIPTION
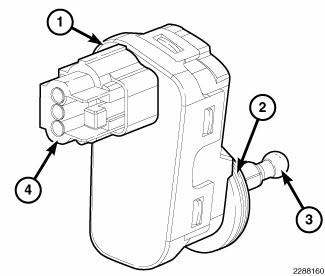
Fig. 37: Headlamp Leveling Motor
The headlamp leveling motor (1) is located on the rear surface of each front lamp unit on vehicles equipped with the headlamp leveling system, which is available only in certain export markets where it is required equipment. The motor is encased within a molded plastic housing and is secured by an integral wedge-type mounting flange (2) to a keyed flange on the back of the front lamp unit housing. A rubber seal around the circumference of the mounting boss seals the motor to the lamp housing.
The outside of the motor housing features an integral molded connector (4) on its upper rearward surface and a plastic pushrod with a ball formation (3) on its free end extends from the motor mounting flange. Within the motor housing is a 12-volt Direct Current (DC) servo motor, an electronic controller board that includes the motor logic circuits, and an integral screw-drive transmission. The headlamp leveling motor is connected to the vehicle electrical system through a dedicated take out and connector of the headlamp and dash wire harness.
The headlamp leveling motor cannot be repaired and, if ineffective or damaged, the entire motor unit must be replaced.
OPERATION
The controller board and logic circuitry of the headlamp leveling motor controls motor operation based upon a voltage signal input received from the Totally Integrated Power Module (TIPM). The TIPM uses electronic messages received over the Controller Area Network (CAN) data bus from the Electro Mechanical Instrument Cluster (EMIC) (also known as the Cab Compartment Node/CCN) to determine the correct voltage signal to provide the leveling motor, while the EMIC uses electronic messages received over the Local Interface Network (LIN) data bus from the instrument panel switch pod to monitor the headlamp leveling switch selection.
The headlamp leveling motors have a path to ground at all times. The motors operate on battery voltage received through the headlamp low beam feed circuits so that the system will only operate when the headlamp low beams are turned ON. When the motor is energized it will extend or retract the motor pushrod through an integral screw-drive transmission. The ball on the end of the pushrod is snapped into a saddle bracket on the back of the reflector within the front lamp unit housing, which will cause the reflector to move as the pushrod is extended or retracted, changing the angle at which the light is projected from the headlamp bulb filaments.
The hard wired circuits for the headlamp leveling motors may be diagnosed using conventional diagnostic tools and procedures. However, conventional diagnostic methods will not prove conclusive in the diagnosis of the active electronic elements within the headlamp leveling motors or the electronic controls and communication between other modules and devices that provide some features of the headlamp leveling system. The most reliable, efficient, and accurate means to diagnose the headlamp leveling motor or the electronic controls and communication related to headlamp leveling system operation requires the use of a diagnostic scan tool. Refer to the appropriate diagnostic information.
REMOVAL

Fig. 38: Headlamp Leveling Motor On Back Of Lamp Housing
NOTE: The graphic shows the right side front lamp unit as viewed from the back of the lamp with the housing removed. However, the housing cannot be removed from the lamp for service. This view was necessary in order to clearly illustrate the internal engagement of the headlamp leveling motor pushrod with the saddle bracket on the lamp reflector.
1. Disconnect and isolate the battery negative cable.
2. Remove front lamp unit from the vehicle. 3. Rotate the headlamp leveling motor (4) on the back of the lamp housing counterclockwise about 30 degrees to unlock it from the housing.
4. Grasp the motor firmly with one hand and twist it toward the inboard side of the lamp far enough to disengage the ball on the end of the motor pushrod (3) from the saddle bracket (1) secured to the reflector (2) within the lamp housing.
5. Pull the motor and pushrod straight back and out of the front lamp unit housing.
INSTALLATION
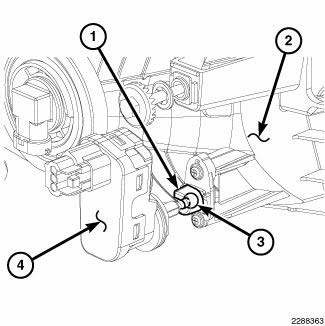
Fig. 39: Headlamp Leveling Motor On Back Of Lamp Housing
NOTE: The graphic shows the right side front lamp unit as viewed from the back of the lamp with the housing removed. However, the housing cannot be removed from the lamp for service. This view was necessary in order to clearly illustrate the internal engagement of the headlamp leveling motor pushrod with the saddle bracket on the lamp reflector.
1. Align and insert the headlamp leveling motor (4) and pushrod into the front lamp unit housing.
2. Grasp the motor firmly with one hand and twist it toward the inboard side of the lamp far enough to align the ball on the end of the motor pushrod (3) with the saddle bracket (1) secured to the reflector (2) within the lamp housing.
NOTE: It may be helpful to also remove a headlamp bulb from the lamp reflector and insert a finger through the bulb opening to move the reflector far enough to align the saddle bracket with the motor pushrod ball.
3. With the motor pushrod ball and reflector saddle bracket aligned, twist the motor back toward the outboard side of the lamp far enough to engage the pushrod ball into the reflector saddle bracket.
4. Insert the mounting flange of the headlamp leveling motor into the mounting boss on the back of the front lamp unit housing until the motor is firmly seated.
5. Rotate the motor clockwise about 30 degrees to lock it into place.
6. Reinstall the front lamp unit into the vehicle.
7. Reconnect the battery negative cable.
 Installation
BULB
Each rear lamp unit for this vehicle consists of two pieces. An outer rear
lamp unit that is secured at the rear of
each quarter panel includes bulbs for the park (or tail) lamps, the brake ( ...
 Relay, trailer tow
DESCRIPTION
Fig. 40: Identifying Relay & Terminals
Vehicles equipped with an optional trailer tow preparation package have four
trailer tow relays, one each for the
trailer tow stop/turn ri ...
See also:
Cover(s), cylinder head, right
REMOVAL
1. Disconnect negative battery cable.
Fig. 126: Engine Harness Retaining Clips
- Left cylinder head cover engine harness retainers
- Right cylinder head cover engine harness retainer ...
Sensor, transmission range
DESCRIPTION
Fig. 386: Locating Transmission Range Sensor (TRS)
- TRANSMISSION RANGE SENSOR
The Transmission Range Sensor (TRS) (1) is mounted to the top of the valve
body inside the transa ...
Antenna, satellite, audio, video
ANTENNA, SATELLITE, AUDIO
DESCRIPTION
Fig. 3: Satellite Audio
If the vehicle is equipped with satellite audio, a combined antenna for AM/FM
and satellite is used. For
removal. See Removal and ...
