Dodge Journey: Lens, instrument cluster
REMOVAL
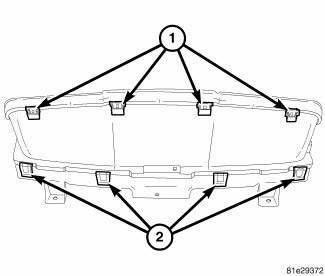
Fig. 8: Instrument Cluster Lens Locking Tabs
1. Remove instrument cluster from vehicle. See Removal .
2. Separate the lens from the cluster by gently prying on the locking clips (1) around the perimeter of the lens.
3. Separate lens from instrument cluster and remove.
INSTALLATION

Fig. 9: Instrument Cluster Lens Locking Tabs
1. Align lens locking tabs (1) with instrument cluster mask assembly and snap securely into place.
2. Install the instrument cluster into vehicle.
3. Connect battery negative cable.
 Diagnosis and Testing, Removal, Installation
DIAGNOSIS AND TESTING
INSTRUMENT CLUSTER
As a quick diagnosis, the cluster will perform a functional check of the
odometer display, transmission range
display and warning indicators after the ign ...
 Pod, switch
DESCRIPTION
Fig. 10: Accessory Switch Bank Module
The Accessory Switch Bank Module (ASBM) is located in the center stack area
of the instrument panel just
below the heater and air conditioner d ...
See also:
Installation
Fig. 51: Front Hub And Bearing Mounting
1. If required, install the hub and bearing (1) by sliding it into the
knuckle.
2. If installing hub and bearing, install the four bolts (2) fastening t ...
Actuator, mode door, front
DESCRIPTION
Fig. 12: Blend Door Actuators
The mode door actuator (1) for the heating-A/C system is a reversible,
12-volt Direct Current (DC) servo motor,
which is mechanically connected to the ...
Disassembly
NOTE: The rear heater-A/C housing must be removed from the vehicle for
service of
the mode door actuator and blend door actuator and it must be disassembled
for service of the A/C evaporator ...
