Dodge Journey: Removal, Installation
REMOVAL
REMOVAL - NGC CONTROLLER
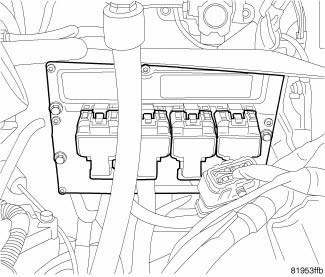
Fig. 39: Remove/Install PCM
NOTE: USE THE SCAN TOOL TO REPROGRAM THE NEW POWERTRAIN CONTROL MODULE (PCM) WITH THE VEHICLES ORIGINAL IDENTIFICATION NUMBER (VIN) AND THE VEHICLES ORIGINAL MILEAGE. IF THIS STEP IS NOT DONE, A DIAGNOSTIC TROUBLE CODE (DTC) MAY BE SET.
To avoid possible voltage spike damage to PCM, ignition key must be off, and the negative battery cable must be disconnected before unplugging the PCM connectors.
1. Disconnect and isolate the negative battery cable.
2. Unlock and disconnect the 4 electrical connectors at the PCM.
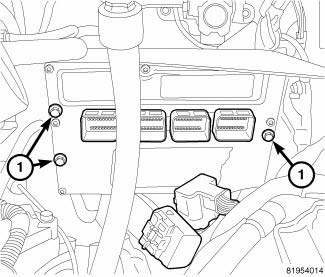
Fig. 40: Mounting Screws/Electrical Connectors
3. Remove the 3 fasteners (1) holding the PCM to the bracket.
REMOVAL - GPEC CONTROLLER (2.4L)

Fig. 41: GPEC Controller
- - Connectors
- - PCM
NOTE: USE THE SCAN TOOL TO REPROGRAM THE NEW POWERTRAIN CONTROL MODULE (PCM) WITH THE VEHICLES ORIGINAL IDENTIFICATION NUMBER (VIN) AND THE VEHICLES ORIGINAL MILEAGE. IF THIS STEP IS NOT DONE, A DIAGNOSTIC TROUBLE CODE (DTC) MAY BE SET.
To avoid possible voltage spike damage to PCM, ignition key must be off, and the negative battery cable must be disconnected before unplugging the PCM connectors.
1. Disconnect and isolate the negative battery cable.
2. Unlock and disconnect the 2 electrical connectors (1) at the PCM (2).

Fig. 42: GPEC Controller Mounting
- - Bracket
- - PCM
- - Bolts
3. Remove the 4 bolts (3) holding the PCM (2) to the bracket (1) and remove the PCM (2) from the vehicle.
INSTALLATION
INSTALLATION - NGC CONTROLLER

Fig. 43: Mounting Screws/Electrical Connectors
NOTE: USE THE SCAN TOOL TO REPROGRAM THE NEW POWERTRAIN CONTROL MODULE (PCM) WITH THE VEHICLES ORIGINAL IDENTIFICATION NUMBER (VIN) AND THE VEHICLES ORIGINAL MILEAGE. IF THIS STEP IS NOT DONE, A DIAGNOSTIC TROUBLE CODE (DTC) MAY BE SET.
1. Install PCM to bracket with 3 fasteners (1).

Fig. 44: Remove/Install PCM
2. Install and lock the 4 electrical connectors to the PCM.
3. Connect negative battery cable, tighten nut to 5 N.m (45 in. lbs.).
4. Use the scan tool to reprogram new PCM with vehicles original Identification Number (VIN) and original vehicle mileage.
INSTALLATION - GPEC CONTROLLER (2.4L)
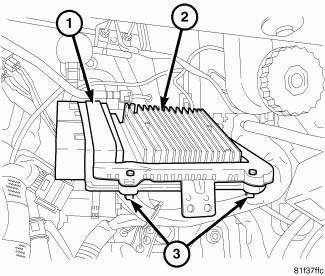
Fig. 45: GPEC Controller Mounting
- - Bracket
- - PCM
- - Bolts
NOTE: USE THE SCAN TOOL TO REPROGRAM THE NEW POWERTRAIN CONTROL MODULE (PCM) WITH THE VEHICLES ORIGINAL IDENTIFICATION NUMBER (VIN) AND THE VEHICLES ORIGINAL MILEAGE. IF THIS STEP IS NOT DONE, A DIAGNOSTIC TROUBLE CODE (DTC) MAY BE SET.
1. Install PCM (2) to bracket (1) with 4 bolts (3).
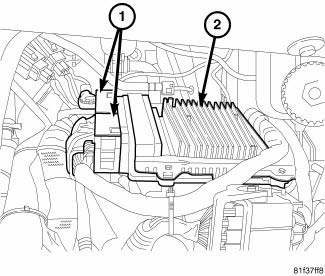
Fig. 46: GPEC Controller
- - Connectors
- - PCM
2. Install and lock the 2 electrical connectors (1) to the PCM (2).
3. Connect negative battery cable, tighten nut to 5 N.m (45 in. lbs.).
4. Use the scan tool to reprogram new PCM with vehicles original Identification Number (VIN) and original vehicle mileage.
 Standard procedure
PCM/ECM REPROGRAMMING - GAS
Follow the instructions in order.
OBTAINING DIAGNOSTIC TROUBLE CODES
BULB CHECK
Key on: Bulb illuminated until vehicle starts, as long as all once per trip
(readiness ...
 Module, steering column
DESCRIPTION
Fig. 47: Steering Control Module
This vehicle is equipped with a Steering Control Module (SCM) that is
internal to the left multi-function switch
housing (2). The left (lighting) mu ...
See also:
Tube, air pump, inlet
Description
The air pump inlet tube is located on the left side of the engine
compartment. The tube attaches to the air
injection pump using a quick connect style fitting. The other end of the tub ...
ENGINE BLOCK HEATER — IF EQUIPPED
The engine block heater warms engine coolant and
permits quicker starts in cold weather. Connect the cord
to a standard 110-115 Volt AC electrical outlet with a
grounded, three-wire extension cord. ...
Draincock, radiator
Removal
DRAINCOCK
Fig. 65: DRAINCOCK & RADIATOR TANK
CAUTION: Use of pliers on draincock is not recommended. Damage may
occur to
radiator or draincock.
NOTE: It is no ...
