Dodge Journey: Cover(s), engine timing
Removal

Fig. 349: FRONT SPLASH SHIELDS
1. Disconnect and isolate negative battery cable.
2. Drain cooling system.
3. Remove coolant pressure container.
4. Remove right front wheel and belt splash shield (2).

Fig. 350: Accessory Drive Belt System - 2.7L
- - GENERATOR
- - IDLER/TENSIONER
5. Remove accessory drive belts (2).
6. Remove crankshaft vibration damper.
7. Remove AC/Generator belt tensioner/bracket assembly.
8. Disconnect heater hose from tube at right front frame rail area.
9. Remove screws securing heater supply tube to right frame rail. Reposition heater supply tube.
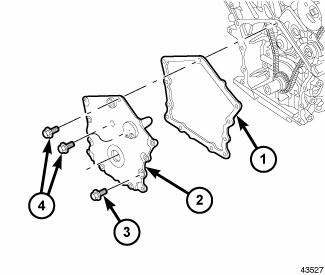
Fig. 351: TIMING CHAIN COVER
10. Place a floor jack with wooden block under oil pan to support engine.
11. Remove right engine mount.
12. Remove upper timing chain cover bolts.
13. Remove remaining bolts securing timing chain cover to engine.
14. Remove timing chain cover (2).
15. Discard timing chain cover gasket (1). Remove front crankshaft oil seal from cover.
Installation

Fig. 352: TIMING CHAIN COVER
1. Inspect and clean timing chain cover sealing surfaces.
2. Before installing timing cover gasket apply a 1/8 inch bead of Mopar Engine RTV GEN II to the parting lines between the oil pan and cylinder block.
3. Install timing cover (2) and gasket (1). Tighten M10 cover bolts to 54 N.m (40 ft. lbs.) and M6 bolts to 12 N.m (105 in. lbs.).
4. Install front crankshaft oil seal using Special Tool 6780-2 sleeve and 6780-1 installer.
5. Lower vehicle.
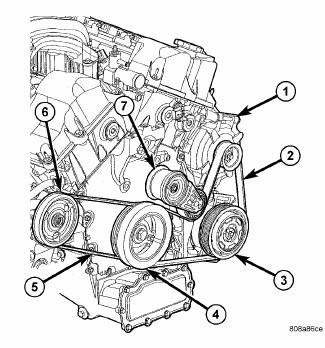
Fig. 353: Accessory Drive Belt System - 2.7L
6. Install right engine mount.
7. Install screws attaching heater supply tube to right front frame rail area.
8. Raise vehicle on hoist.
9. Connect heater hose to supply tube at right front frame rail area.
10. Install AC/Generator belt tensioner/bracket assembly.
11. Install crankshaft vibration damper.
12. Install accessory drive belts (2).
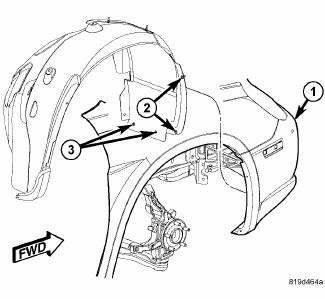
Fig. 354: Removing/Installing Front Splash Shields
13. Install belt splash shield and right front wheel.
14. Lower vehicle.
15. Install coolant pressure container.
16. Fill cooling system.
17. Connect negative battery cable.
 Chain and sprockets, timing
Removal
TIMING CHAIN AND CAM SPROCKETS
Fig. 334: TIMING MARK ALIGNMENT
- CAMSHAFT TIMING MARKS
- CRANKSHAFT TIMING MARKS
1. Disconnect negative battery cable.
2. Drain cooling system.
...
 Cooling
...
See also:
Removal
NOTE: The antenna cables are integrated into the body wiring
harnesses. New antenna
cables is overlaid on the body wiring harness.
SATELLITE AUDIO ONLY
1. Disconnect and isolate the batter ...
REPLACEMENT PARTS
Use of genuine MOPAR parts for normal/scheduled
maintenance and repairs is highly recommended to ensure
the designed performance. Damage or failures
caused by the use of non-MOPAR parts for mainten ...
Removal
FRONT
1. Raise and support the vehicle.
Fig. 163: TIRE AND WHEEL MOUNTING
2. Remove the wheel mounting nuts (3), then the tire and wheel assembly (1).
NOTE: In some cases, it may be necessary ...
