Dodge Journey: CARGO AREA FEATURES
Rechargeable Flashlight — If Equipped
The rechargeable LED flashlight stores in its charging station in the left rear quarter trim panel. To remove it, press on the indent on the side of the flashlight and release.
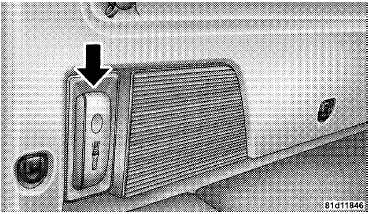
Rechargeable Flashlight
NOTE: Be sure to return the flashlight to its charging station when not in use to ensure it is ready for operation the next time you need it.
Cargo Management System
Five Passenger System Features
• A raised load floor that sits on top of a large built-in storage bin.
• Atri-fold door built into the load floor that allows easy access to items in the built-in storage bin.
• 60/40 split second-row passenger seats with fold flat feature, which allows for extended cargo space. Refer to “Seats” in “Understanding the Features of Your Vehicle” for further information.
• An optional front passenger seat with fold flat feature, which extends cargo space even further. Refer to “Seats” in “Understanding the Features of Your Vehicle” for further information.
• Cargo tie-downs.
• A retractable cargo area cover (if equipped).
Seven Passenger System Features
• A large built-in storage bin with a hinged hardcover located in the floor behind the third-row passenger seats.
• 60/40 split second-row passenger seats with fold flat feature, which allows for extended cargo space. Refer to “Seats” in “Understanding the Features of Your Vehicle” for further information.
• 50/50 split third-row passenger seats with fold flat feature, which allows for extended cargo space. Refer to “Seats” in “Understanding the Features of Your Vehicle” for further information.
• An optional front passenger seat with fold flat feature, which extends cargo space even further. Refer to “Seats” in “Understanding the Features of Your Vehicle” for further information.
• Cargo tie-downs.
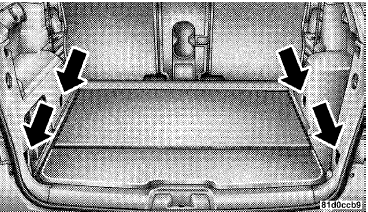
Cargo Tie-Downs
WARNING:
Cargo tie-downs are not safe anchors for a child seat
tether strap. In a sudden stop or collision, a tie-down
could pull loose and allow the child seat to come
loose. A child could be badly injured. Use only the
anchors provided for child seat tethers.
Cargo tie-downs are located on both rear trim panels.
These tie-downs should be used to secure loads safely when the vehicle is moving.
Cargo Tie-Downs
WARNING:
The weight and position of cargo and passengers can
change the vehicle center of gravity and vehicle
handling. To avoid loss of control resulting in personal
injury, follow these guidelines for loading your
vehicle:
• Do not carry loads that exceed the load limits described on the label attached to the left door or left door center pillar.
• Always place cargo evenly on the cargo floor. Put heavier objects as low and as far forward as possible.
• Place as much cargo as possible in front of the rear axle. Too much weight or improperly placed weight over or behind the rear axle can cause the vehicle to sway.
• Do not pile luggage or cargo higher than the top of the seatback. This could impair visibility or become a dangerous projectile in a sudden stop or collision.
• To help protect against personal injury, passengers should not be seated in the rear cargo area. The rear cargo space is intended for load carrying purposes only, not for passengers, who should sit in seats and use seat belts.
Retractable Cargo Area Cover (If Equipped) — Five Passenger Models
NOTE: The purpose of this cover is for privacy, not to secure loads. It will not prevent cargo from shifting or protect passengers from loose cargo.
The removable retractable cargo area cover mounts in the cargo area behind the top of the rear seats.
The cover, when extended, covers the cargo area to keep items out of sight. Notches in the trim panels near the liftgate opening secure the extended cover in place.
The cover rolls away neatly inside its housing when not in use. You can also remove the cover from the vehicle to make more room in the cargo area.
To install the cover, position it in the vehicle so that the flat side of the housing faces upward. Then, insert either the left or the right spring-loaded post (located on the ends of the cover housing) into the left attachment point or the right attachment point (shown).
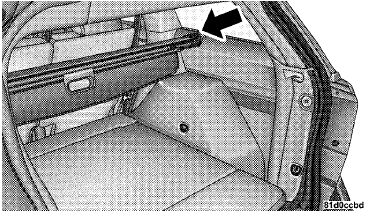
Installing Retractable Cargo Area Cover
Insert the spring-loaded post on the opposite end of the cover housing into the attachment point on the opposite side of the vehicle.
Grab the cover handle and pull it toward you. As the cover nears the liftgate opening, guide the rear attachment posts (on both ends of the cover) into the notches in the trim panels. Lower the cover to position the posts into the bottom of the notches and release the handle.
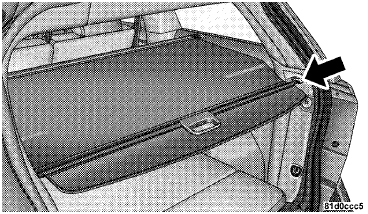
Positioning Retractable Cargo Area Cover
WARNING:
A cargo cover that is unsecured in the vehicle could
cause injury in an accident. It could become airborne
during a sudden stop and strike someone inside the
vehicle. Do not store the cargo cover on the cargo
floor or in the passenger compartment. Remove the
cover from the vehicle when taken from its mounting.
Do not store it in the vehicle.
 CHILL ZONE BEVERAGE COOLER STORAGE COMPARTMENT
The Chill Zone Beverage Cooler Storage Compartment
can keep chilled beverages cool depending on ambient
temperature and climate control setting. Chill Zone is
intended for nonperishable beverages o ...
 REAR WINDOW FEATURES
Rear Window Wiper/Washer
The rear window wiper/washer control is located on the
right side of the steering column.
Rear Window Wiper/Washer Control
Rotate the switch upward to the
“On” pos ...
See also:
IF YOU NEED ASSISTANCE
The manufacturer and its authorized dealers are vitally
interested in your satisfaction. We want you to be happy
with our products and services.
Warranty service must be done by an authorized deale ...
VIDEO ENTERTAINMENT SYSTEM (VES)™ — IF EQUIPPED
The optional Video Entertainment System (VES)™ includes
the following components for rear seat entertainment:
• A diagonal 8 in (20 cm) Liquid Crystal Display (LCD)
screen integrated into the c ...
Case assembly, differential
DESCRIPTION
The differential gear system divides the torque between the axle shafts. It
allows the axle shafts to rotate at
different speeds when turning corners.
Each differential side gear is s ...
