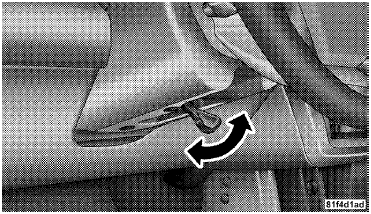
Dodge Journey: TILT/TELESCOPING STEERING COLUMN — IF EQUIPPED
This feature allows you to tilt the steering column upward or downward. It also allows you to lengthen or shorten the steering column. The tilt/telescoping control handle is located below the steering wheel at the end of the steering column.

Tilt/Telescoping Steering Control Handle
To unlock the steering column, push the control handle downward. To tilt the steering column, move the steering wheel upward or downward as desired. To lengthen or shorten the steering column, pull the steering wheel outward or push it inward as desired. To lock the steering column in position, pull the control handle upward until fully engaged.
WARNING:
Do not adjust the steering column while driving.
Adjusting the steering column while driving or driving with the steering column unlocked, could cause the driver to lose control of the vehicle. Be sure the steering column is locked before driving your vehicle.
Failure to follow this warning may result in serious injury or death.
 WINDSHIELD WIPERS AND WASHERS
The windshield wiper/washer control lever is located on
the right side of the steering column. The front wipers are
operated by rotating a switch, located at the end of the
lever. For information o ...
 ELECTRONIC SPEED CONTROL — IF EQUIPPED
When engaged, the Electronic Speed Control takes over
the accelerator operation at speeds greater than 25 mph
(40 km/h).
The Electronic Speed Control lever is located on the right
side of the stee ...
See also:
Removal
LEFT-HAND-DRIVE
1. Disconnect and isolate the battery negative cable from its post on the
battery.
2. If equipped, remove the silencer pad below the steering column opening cover.
Fig. 132: S ...
Description, Operation
DESCRIPTION
Fig. 2: Antilock Brake Module
- ANTILOCK BRAKE MODULE (ABM)
- HYDRAULIC CONTROL UNIT (HCU)
- PUMP/MOTOR
The Antilock Brake Module (ABM) is a microprocessor-based device which ...
Chain and sprockets, timing
Removal
TIMING CHAIN AND CAM SPROCKETS
Fig. 334: TIMING MARK ALIGNMENT
- CAMSHAFT TIMING MARKS
- CRANKSHAFT TIMING MARKS
1. Disconnect negative battery cable.
2. Drain cooling system.
...
