Dodge Journey: Description
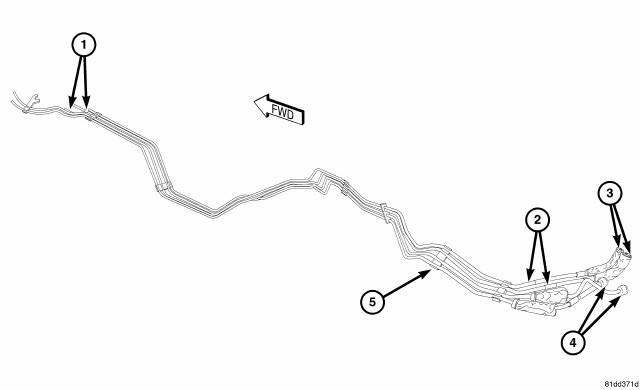
Fig. 297: Underbody Lines
Models equipped with the rear heating-A/C system use metal lines attached to the vehicle underbody to carry refrigerant and engine coolant to and from the rear A/C evaporator and heater core. The underbody A/C lines (1) are connected to the front A/C suction and liquid lines and to the rear A/C expansion valve extension tubes using nut type fittings (4) and O-ring seals. The underbody heater lines (2) are connected to the front heater hoses and the rear heater core using spring type clamps (3). The underbody lines are retained to the vehicle by seven plastic mounting brackets (5).
NOTE: Replacement of the refrigerant line O-ring seals is required anytime an underbody refrigerant line is disconnected. Failure to replace the rubber O-ring seals may result in a refrigerant system leak.
The underbody lines have no serviceable parts except for the refrigerant line rubber O-ring seals and metal spring clamps. The O-ring seals used on the refrigerant line connections are made from a special type of rubber not affected by R-134a refrigerant. The O-ring seals must be replaced whenever the underbody refrigerant lines are disconnected.
The underbody lines cannot be repaired and must be replaced if leaking or damaged.

 Removal
WARNING: Refer to the applicable warnings and cautions for this
system before
performing the following operation. Failure to follow these instructions
may
result in serious or fat ...
See also:
Description, Operation
DESCRIPTION
Fig. 1: COOLING SYSTEM - OVERVIEW
- WINDSHIELD WASHER RESERVOIR
- UPPER SUPPORT
- FAN SHROUD
- FAN MOTOR
- LOWER RADIATOR HOSE
The cooling system consists of an engine co ...
Diagnosis and Testing
LOWER BALL JOINT
1. Raise the vehicle allowing the front suspension to hang.
2. Remove the tire and wheel assembly.
3. Using Dial Indicator C-3339A, or equivalent, attach the dial indicator mou ...
Description, Operation
DESCRIPTION
Fig. 4: Rear View Camera
The Rear View Camera (RVC) (4) (also known as ParkView), is a camera on chip
device utilizing
Complementary Metal Oxide Semiconductor (CMOS) technology. CMO ...
