Dodge Journey: Duct, floor distribution, rear
REMOVAL
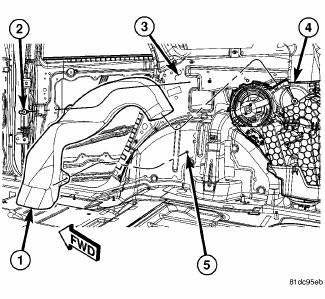
Fig. 159: Rear Floor Distribution Duct
1. Remove right quarter trim panel.
2. Remove the push-pin retainer (2) that secures the rear floor distribution duct (1) to the right inner quarter panel (3).
3. Disengage the rear floor distribution duct from the stud (5) located on the right inner quarter panel.
4. Disengage the rear floor distribution duct from the rear heater-A/C housing (4) and remove the duct.
INSTALLATION

Fig. 160: Rear Floor Distribution Duct
1. Install the rear floor distribution duct (1) onto rear heater-A/C housing (4). Make sure the duct is fully engaged to the housing.
2. Engage the rear floor distribution duct to the stud (5) located on the right inner quarter panel (3).
3. Install the push-pin retainer (2) that secures the rear floor distribution duct to the right inner quarter panel.
4. Install the right quarter panel trim.
 Duct, ceiling distribution
REMOVAL
WARNING: Disable the airbag system before attempting any steering
wheel, steering
column or instrument panel component diagnosis or service. Disconnect
and isolate the negati ...

See also:
Description
Vehicle wheel alignment is the positioning of all interrelated front and rear
suspension angles. These angles
affect the handling and steering of the vehicle when it is in motion. Proper
wheel al ...
Removal
Fig. 431: Identifying Battery Cables
- BATTERY POSITIVE CABLE
- THERMO-WRAP
- BATTERY NEGATIVE CABLE
NOTE: If valve body is replaced or reconditioned, the PCM Quick Learn
Procedure
...
Removal, Installation
REMOVAL
WARNING: Disable the airbag system before attempting any steering
wheel, steering
column, or instrument panel component diagnosis or service. Disconnect
and isolate the negat ...
