Dodge Journey: Duct, ceiling distribution
REMOVAL
WARNING: Disable the airbag system before attempting any steering wheel, steering column or instrument panel component diagnosis or service. Disconnect and isolate the negative battery (ground) cable, then wait two minutes for the airbag system capacitor to discharge before performing further diagnosis or service. This is the only sure way to disable the airbag system. Failure to follow these instructions may result in accidental airbag deployment and possible serious or fatal injury.
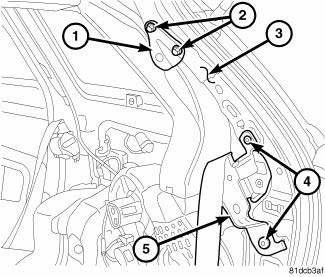
Fig. 155: D-Pillar Seat Belt Bracket
1. Disconnect and isolate the negative battery cable.
2. Remove the right D-pillar trim panel.
3. Remove right quarter trim panel.
4. Remove the two bolts (2) that secure the upper seat belt bracket (1) to the right D-pillar (3) and remove the bracket.
5. Remove the two bolts (4) that secure the right seat belt retractor (5) to the right D-pillar and remove the retractor.

Fig. 156: Rear Ceiling Duct
6. Remove the two retainers (4 and 5) that secure the rear ceiling distribution duct (3) to the right D-pillar (2).
7. Lift the rear ceiling distribution duct upward and disengage it from the rear heater-A/C housing (1).
CAUTION: Use care when removing the rear ceiling distribution duct from the heater-A/C housing to prevent damage to the molded plastic support brace located on the top of the housing outlet. Failure to follow this caution could result in part of, or all of the support brace falling into the rear housing, which may interfere with rear mode door operation.
8. Pull the bottom end of the rear ceiling distribution duct away from the rear heater-A/C housing and remove the duct.
INSTALLATION

Fig. 157: Rear Ceiling Duct
1. Position the rear ceiling distribution duct (3) to the right D-pillar (2).
CAUTION: Use care when installing the rear ceiling distribution duct onto the heater-A/C housing to prevent damage to the molded plastic support brace located on the top of the housing outlet. Failure to follow this caution could result in part of, or all of the support brace falling into the rear housing, which may interfere with rear mode door operation.
2. Install the rear ceiling distribution duct onto the top of the rear heater-A/C housing (1). Make sure the duct is fully engaged to the housing.
3. Install the two retainers (4 and 5) that secure the rear ceiling distribution duct to the right D-pillar.

Fig. 158: D-Pillar Seat Belt Bracket
4. Position the upper seat belt bracket (2) onto the D-pillar (3) and install the two retaining bolts (1). Tighten the bolts to 52 N.m (38.5 ft. lbs.).
5. Install the right seat belt retractor (5) and retaining bolts (4) onto the D-pillar. Tighten the bolts to 52 N.m (38.5 ft. lbs.).
6. Install the right quarter trim panel.
7. Install the right D-pillar trim panel.
8. Reconnect the negative battery cable.

 Duct, floor distribution, rear
REMOVAL
Fig. 159: Rear Floor Distribution Duct
1. Remove right quarter trim panel.
2. Remove the push-pin retainer (2) that secures the rear floor distribution
duct (1) to the right inner qu ...
See also:
ADDING FUEL
Fuel Filler Cap (Gas Cap)
The gas cap is located behind the fuel filler door on the
left side of the vehicle. If the gas cap is lost or damaged,
be sure the replacement cap has been designed for us ...
Valve, oil pressure relief
Removal
Fig. 285: Oil Pressure Relief Valve
- RELIEF VALVE
- SPRING
- RETAINER CAP
1. Remove the oil pan.
2. Remove the pressure relief valve (1) by remove the threaded retaining cap ...
POWER INVERTER — IF EQUIPPED
Your vehicle may be equipped with a 115 Volt AC (150
Watt maximum) power outlet located on the back of the
center console. This outlet can power cellular phones,
electronics and other low power dev ...
