Dodge Journey: Removal
BATTERY HARNESS
WARNING: To protect the hands from battery acid, a suitable pair of heavy duty rubber gloves should be worn when removing or servicing a battery.
Safety glasses also should be worn.
WARNING: Remove metallic jewelry to avoid injury by accidental arcing of battery current.
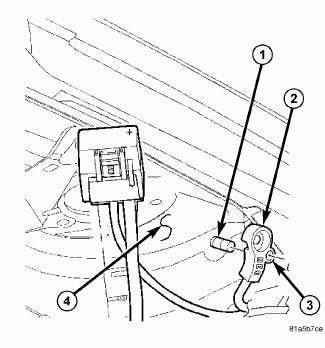
Fig. 28: Identifying Battery Cables & Terminals
CAUTION: The negative battery cable remote terminal (2) must be disconnected and isolated from the remote battery post (1) prior to service of the vehicle electrical systems. The negative battery cable remote terminal can be isolated by using the supplied isolation hole (3) in the terminal casing.
1. Disconnect and isolate the negative battery cable (2) remote terminal from the remote battery post (1).
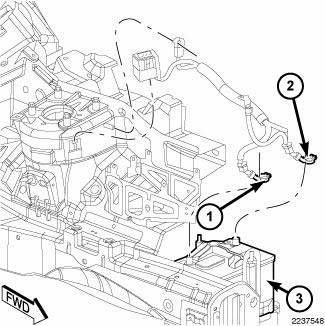
Fig. 29: Battery And Pinch Clamp Bolts
2. Raise vehicle on hoist.
3. Remove the battery and set aside.
4. On diesel engine equipped vehicles, disconnect the in-line connector to the instrument panel harness (2)
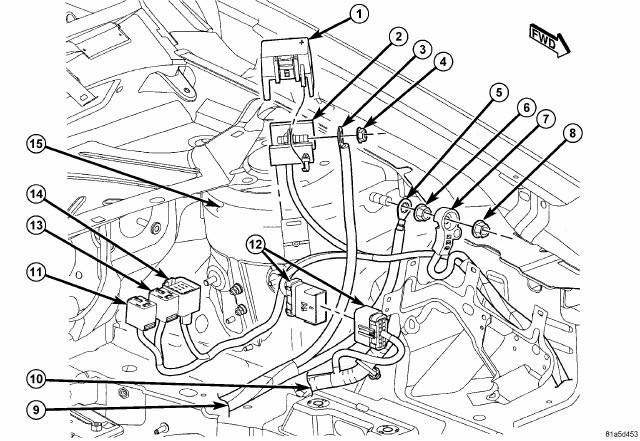
Fig. 30: View Of Battery Harness & Attachments - Diesel Shown, Gasoline
Similar
NOTE: Diesel battery harness shown in illustration, gasoline battery harness similar.
5. Lower the vehicle.
6. Remove the negative battery cable remote terminal nut (8) from the remote negative battery post. Remove the battery harness negative cable (7) from the remote negative battery post.
7. Remove the cover (1) from the remote positive battery terminal (2). Remove the starter harness positive cable retaining nut (4) and remove the cable (3) from the remote positive battery post.
8. Remove the remote positive battery terminal (2) from mounting bracket on the left strut tower (15) by lifting straight up.
9. On diesel engine equipped vehicles:
- Disconnect the glow plug module connector (14)
- Disconnect the cabin heater relay connectors (11 and 13)
- Disconnect the in-line connector to the instrument panel harness (12)
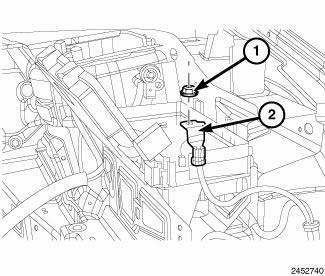
Fig. 31: Retaining Nut And Battery Harness Cable
10. Remove the retaining nut (1) and remove the battery harness cable (2) from the TIPM stud.
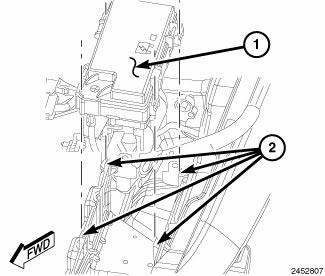
Fig. 32: Mounting Clips And TIPM Housing
11. Depress the four mounting clips (2) to disengage and remove the TIPM housing (1) from its mounting bracket, position aside to allow access to the battery harness.
12. One at a time, trace any remaining battery harness retaining push pins, fasteners and routing clips until the harness is free from the vehicle.
13. Remove the battery harness from the vehicle.
STARTER HARNESS
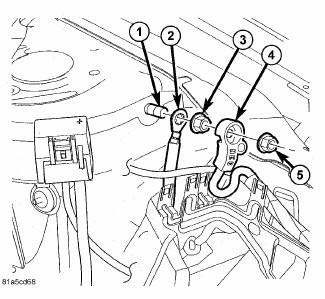
Fig. 33: Identifying Starter Harness Negative Cable Retaining Nut & Cable
1. Remove the negative battery cable remote terminal nut (5) from the remote negative battery post (1).
Remove and isolate the battery harness negative cable (4) on something other than the remote negative battery post (1).
2. Remove the starter harness negative cable retaining nut (3) and remove the cable (2) from the remote negative battery post (1).
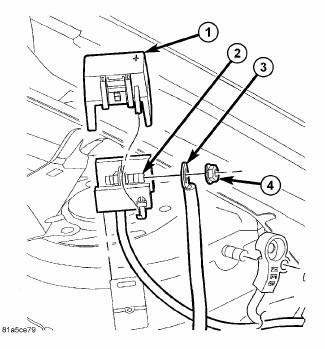
Fig. 34: Identifying Positive Cable Retaining Nut & Cable
3. Remove the cover (1) from the remote positive battery terminal. Remove the starter harness positive cable retaining nut (4) and remove the cable (3) from the remote positive battery post (2).
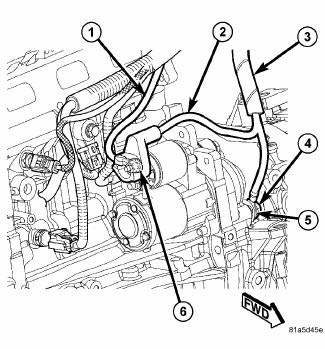
Fig. 35: Identifying Starter & Cables
4. Raise vehicle on hoist. 5. Remove the starter harness negative cable retaining bolt (4) and remove the cable (5) from the engine block.
6. Remove the starter harness positive cable retaining nut (6) and remove the cable (2) from the starter positive battery post.
7. One at a time, trace any remaining starter harness retaining pushpins, fasteners and routing clips until the harness is free from the vehicle.
8. Remove the starter harness (3) from the engine compartment.
 Diagnosis and testing
BATTERY CABLES
A voltage drop test will determine if there is excessive resistance in the
battery cable terminal connections or
the battery cable. If excessive resistance is found in the battery c ...
 Installation
BATTERY HARNESS
Fig. 36: Mounting Clips And TIPM Housing
1. Position the battery harness into the vehicle.
2. One at a time, install the battery harness retaining pushpins, fasteners and
rout ...
See also:
Installation
2.0L TURBO DIESEL
Fig. 19: Generator Bushing
1. If reinstalling the old generator, install a generator mounting bolt and
tap bushing out slightly to ease
mounting of generator.
Fig. 20: Remo ...
Diagnosis and Testing
Rear Camera
The hardwired circuits of the Rear View Camera (RVC) and those between the
RVC and the radio receiver may
be diagnosed using conventional diagnostic tools and procedures.
The wiring ...
Switch, defogger, rear
DESCRIPTION
Fig. 5: EBL Switch (MTC)
NOTE: Manual tri-zone temperature A/C-heater control shown in
illustration. Other A/Cheater
controls similar.
The momentary push-button swi ...
