Dodge Journey: Draincock, radiator
Removal
DRAINCOCK

Fig. 65: DRAINCOCK & RADIATOR TANK
CAUTION: Use of pliers on draincock is not recommended. Damage may occur to radiator or draincock.
NOTE: It is not necessary to remove draincock during a routine coolant drain.
1. Remove belly pan (if equipped).
2. Drain the cooling system.
3. Open the draincock (2) by turning it counterclockwise until it stops.
4. Turn the draincock (2) back (clockwise) 1/8 turn.
5. Pull the draincock (2) from the radiator tank (1).
Installation
DRAINCOCK
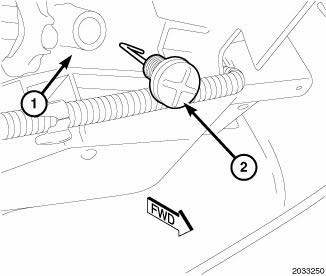
Fig. 66: DRAINCOCK & RADIATOR TANK
1. Align draincock (2) stem to radiator tank (1) opening.
2. Push draincock (2) into the radiator tank (1) opening.
3. Tighten the draincock (2) by turning clockwise until it stops.
4. Fill the cooling system.
5. Install belly pan (if equipped).
 Cooler, EGR
Description
Fig. 62: EGR COOLER
- EGR COOLER TO EGR VALVE TUBE
- MOUNTING SCREWS
- EGR COOLER MOUNTING SCREW
- MOUNTING SCREW
- EGR COOLER BODY
- EGR COOLER MOUNTING NUT
- EGR COOLE ...
 Fan, cooling
Description
Fig. 67: COOLING SYSTEM - OVERVIEW
- WINDSHIELD WASHER RESERVOIR
- UPPER SUPPORT
- FAN SHROUD
- FAN MOTOR
- LOWER RADIATOR HOSE
The radiator fan module includes a support ...
See also:
Valve, A/C expansion
DESCRIPTION
Fig. 315: A/C Expansion Valve Description KA
The rear A/C expansion valve controls the amount of refrigerant entering the
rear A/C evaporator. The rear A/C
expansion valve is of a t ...
Muffler, exhaust
REMOVAL
MUFFLER
Fig. 16: Muffler/Exhaust Pipe Assembly - Single Tail Pipe
- INSULATOR
- MUFFLER/EXHAUST PIPE ASSEMBLY
- BAND CLAMP
NOTE: Band clamps (3) are spot welded to exhaust sy ...
Installation
FOOT OPERATED PARKING BRAKE LEVER
Fig. 234: FOOT LEVER MOUNTING
1. Position the parking brake lever (1) over the mounting studs, against the
left lower cowl (3).
2. Install the three mounting ...
