Dodge Journey: Solenoid, pressure control
DESCRIPTION
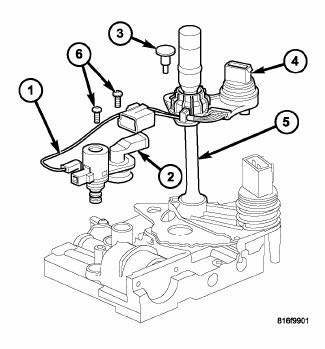
Fig. 415: Identifying Variable Line Pressure Components
- - PRESSURE CONTROL SOLENOID
- - LINE PRESSURE SENSOR
- - SHOULDER SCREW
- - VARIABLE LINE PRESSURE HEADER
- - MANUAL SHAFT
- - SCREWS
The pressure control solenoid (1) is mounted on the top of the valve body, next to the line pressure sensor (2).
The TCM utilizes a closed-loop system to control transmission line pressure. The system contains a variable force style solenoid, the Pressure Control Solenoid. The solenoid is duty cycle controlled by the TCM to vent the unnecessary line pressure supplied by the oil pump back to the sump. The system also contains a variable pressure style sensor, the Line Pressure Sensor, which is a direct input to the TCM. The line pressure solenoid monitors the transmission line pressure and completes the feedback loop to the TCM. The TCM uses this information to adjust its control of the pressure control solenoid to achieve the desired line pressure.
OPERATION The pressure control solenoid (PCS) is a variable force (VFS) style solenoid. A VFS solenoid is an electro-hydraulic actuator, combining a solenoid and a regulating valve.
The transmission control module varies the current for the PCS, which varies the pressure in the line pressure hydraulic circuit. When the current (duty cycle) of the PCS is low, the pressure in the circuit is higher. At 0 current (0% duty cycle), the pressure is at the maximum value. Conversely, when the current is maximized (100% duty cycle), the pressure in the circuit is at the lowest possible value.
REMOVAL

Fig. 416: Removing/Installing Pressure Control Solenoid & Line Pressure
Sensor
- - PRESSURE CONTROL SOLENOID
- - LINE PRESSURE SENSOR
- - SHOULDER SCREW
- - VARIABLE LINE PRESSURE HEADER
- - MANUAL SHAFT
- - SCREWS
1. Remove the valve body from the transmission.
2. Remove the electrical connectors from the pressure control solenoid (1) and the line pressure sensor (2).
3. Remove the screws (6) holding the pressure control solenoid (1) and line pressure sensor (2) to the valve body.
4. Remove the pressure control solenoid and line pressure sensor from the valve body.
INSTALLATION

Fig. 417: Removing/Installing Pressure Control Solenoid & Line Pressure
Sensor
- - PRESSURE CONTROL SOLENOID
- - LINE PRESSURE SENSOR
- - SHOULDER SCREW
- - VARIABLE LINE PRESSURE HEADER
- - MANUAL SHAFT
- - SCREWS
1. Install the pressure control solenoid (1) and line pressure sensor (2) into the valve body.
2. Install the screws (6) to hold the pressure control solenoid (1) and line pressure sensor (2) to the valve body.
3. Install the electrical connectors to the pressure control solenoid (1) and the line pressure sensor (2).
4. Install the valve body into the transmission.
Switch, autostick
DESCRIPTION
Autostick is a driver-interactive transmission feature that offers manual gear shifting capability to provide you with more control. Autostick allows you to maximize engine braking, eliminate undersirable upshifts and downshifts, and improve overall vehicle performance. This system can also provide you with more control during passing, city driving, cold slippery conditions, mountain driving, trailer towing, and many other situations.
OPERATION
Autostick is a driver interactive transaxle feature that offers manual gear shifting capability. When the shifter is moved into the Autostick position, the transaxle remains in whatever gear it was using before Autostick was activated. Moving the shifter to the left (towards the driver) causes a downshift and moving to the right (towards the passenger) causes an upshift. The instrument cluster will illuminate the selected gear. The vehicle can be launched in 1st, 2nd, or 3rd gear while in the Autostick mode. The speed control is operable in 3rd and 4th gear Autostick mode. Speed control will be deactivated if the transaxle is shifted to 2nd gear. Shifting into OD position cancels the Autostick mode, and the transaxle resumes the OD shift schedule.
 Installation
Fig. 404: Identifying Shifter Mounting Bolts
1. Install the shifter mounting bolts and tighten to 20 N.m (15 ft. lbs.) in
the proper sequence as indicated on
drawing.
Fig. 405: Identifying Sh ...

See also:
ENGINE BLOCK HEATER — IF EQUIPPED
The engine block heater warms engine coolant and
permits quicker starts in cold weather. Connect the cord
to a standard 110-115 Volt AC electrical outlet with a
grounded, three-wire extension cord. ...
VEHICLE STORAGE
If you will not be using your vehicle for more than
21 days you may want to take steps to preserve your
battery. You may:
• Remove the IOD (Ignition Off-Draw) mini-fuses from
the Totally Integra ...
Installation
Fig. 164: Removing/Installing Bellhousing Upper & Lower Bolts
NOTE: If transaxle assembly is being replaced or overhauled (clutch
and/or seal
replacement), it is necessary to perform th ...
