Dodge Journey: Sensor, variable line pressure
DESCRIPTION

Fig. 390: Identifying Variable Line Pressure Sensor
- - PRESSURE CONTROL SOLENOID
- - LINE PRESSURE SENSOR
- - SHOULDER SCREW
- - VARIABLE LINE PRESSURE HEADER
- - MANUAL SHAFT
- - SCREWS
The line pressure sensor (2) is mounted on the top of the valve body, next to the pressure control solenoid (1).
The TCM utilizes a closed-loop system to control transmission line pressure. The system contains a variable force style solenoid, the Pressure Control Solenoid. The solenoid is duty cycle controlled by the TCM to vent the unnecessary line pressure supplied by the oil pump back to the sump. The system also contains a variable pressure style sensor, the Line Pressure Sensor, which is a direct input to the TCM. The line pressure solenoid monitors the transmission line pressure and completes the feedback loop to the TCM. The TCM uses this information to adjust its control of the pressure control solenoid to achieve the desired line pressure.
OPERATION
The TCM calculates the desired line pressure based upon inputs from the transmission and engine. The TCM calculates the torque input to the transmission and uses that information as the primary input to the calculation.
The line pressure is set to a predetermined value during shifts and when the transmission is in the PARK and NEUTRAL positions. This is done to ensure consistent shift quality. During all other operation, the actual line pressure is compared to the desired line pressure and adjustments are made to the pressure control solenoid duty cycle.
REMOVAL

Fig. 391: Removing/Installing Variable Line Pressure Sensor
- - PRESSURE CONTROL SOLENOID
- - LINE PRESSURE SENSOR
- - SHOULDER SCREW
- - VARIABLE LINE PRESSURE HEADER
- - MANUAL SHAFT
- - SCREWS
1. Remove the valve body from the transmission. 2. Remove the electrical connectors from the pressure control solenoid (1) and the line pressure sensor (2).
3. Remove the screws (6) holding the pressure control solenoid (1) and line pressure sensor (2) to the valve body.
4. Remove the pressure control solenoid and line pressure sensor from the valve body.
INSTALLATION
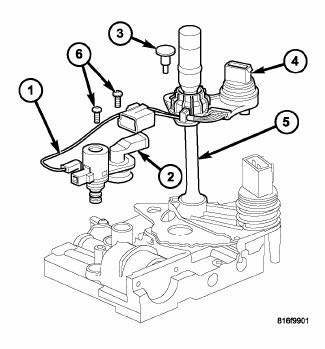
Fig. 392: Removing/Installing Variable Line Pressure Sensor
- - PRESSURE CONTROL SOLENOID
- - LINE PRESSURE SENSOR
- - SHOULDER SCREW
- - VARIABLE LINE PRESSURE HEADER
- - MANUAL SHAFT
- - SCREWS
1. Install the pressure control solenoid (1) and line pressure sensor (2) into the valve body.
2. Install the screws (6) to hold the pressure control solenoid (1) and line pressure sensor (2) to the valve body.
3. Install the electrical connectors to the pressure control solenoid (1) and the line pressure sensor (2).
4. Install the valve body into the transmission. S
 Sensor, transmission range
DESCRIPTION
Fig. 386: Locating Transmission Range Sensor (TRS)
- TRANSMISSION RANGE SENSOR
The Transmission Range Sensor (TRS) (1) is mounted to the top of the valve
body inside the transa ...

See also:
Removal
2.4L
Fig. 59: Identifying Ignition Coil Electrical Connectors
NOTE: Prior to removing coil, spray compressed air around coil top to
make sure no
dirt drops into the spark plug tube.
1. ...
Assembly
Fig. 214: First Gear Needle Bearing & Output Shaft
NOTE: Use ATF on all parts that are to be assembled in this procedure.
1. Install the first and first gear needle bearing (2) on the out ...
Bearing(s), crankshaft, main
Standard Procedure
CRANKSHAFT MAIN BEARING FITTING
Fig. 169: Cylinder Block Main Bore Grade Marking
The grade marks for the cylinder block main bearing bore grade is located on
the pan rail jus ...
