
Dodge Journey: 40/41TE Transaxle general diagnosis, road test
40/41TE TRANSAXLE GENERAL DIAGNOSIS
NOTE: Before attempting any repair on a 40/41TE four-speed automatic transaxle, check for Diagnostic Trouble Codes (DTC's) using the scan tool.
Transaxle malfunctions may be caused by these general conditions:
- Poor engine performance
- Improper adjustments
- Hydraulic malfunctions
- Mechanical malfunctions
- Electronic malfunctions
Diagnosis of these problems should always begin by checking the easily accessible variables: fluid level and condition, gearshift cable adjustment. Then perform a road test to determine if the problem has been corrected or that more diagnosis is necessary. If the problem persists after the preliminary tests and corrections are completed, hydraulic pressure checks should be performed.
ROAD TEST
Prior to performing a road test, verify that the fluid level, fluid condition, and linkage adjustment have been approved.
During the road test, the transaxle should be operated in each position to check for slipping and any variation in shifting.
If the vehicle operates properly at highway speeds, but has poor acceleration, the converter stator overrunning clutch may be slipping. If acceleration is normal, but high throttle opening is needed to maintain highway speeds, the converter stator clutch may have seized. Both of these stator defects require replacement of the torque converter and thorough transaxle cleaning.
Slipping clutches can be isolated by comparing the "Elements in Use" chart with clutch operation encountered on a road test. This chart identifies which clutches are applied at each position of the selector lever.
A slipping clutch may also set a DTC and can be determined by operating the transaxle in all selector positions.
ELEMENTS IN USE AT EACH POSITION OF SELECTOR LEVER

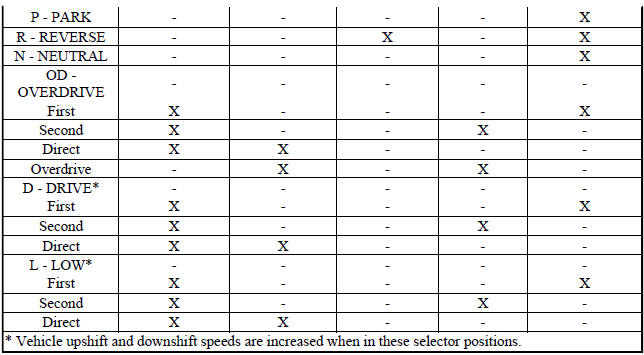
The process of elimination can be used to detect any unit which slips and to confirm proper operation of good units. Road test analysis can diagnose slipping units, but the cause of the malfunction cannot be determined.
Practically any condition can be caused by leaking hydraulic circuits or sticking valves.

 Hydraulic pressure tests
Fig. 4: Identifying Transmission Electrical Connectors
NOTE: Before preforming the hydraulic pressure tests be certain to
disconnect the
Variable Line Pressure (VLP) electrical connector (2 ...
See also:
Removal
1. Release the parking brake.
2. Manually release the parking brake cable tension.
3. Raise and support the vehicle.
Fig. 206: TIRE AND WHEEL MOUNTING
4. Remove wheel mounting nuts (3), t ...
Clutch air pressure tests
Fig. 6: Identifying Air Pressure Test Plate Tool 6056
- AIR PRESSURE TEST PLATE TOOL 6056
- ACCUMULATORS
Inoperative clutches can be located using a series of tests by substituting
air pr ...
Sensor, coolant temperature
Description
There are two Engine Coolant Temperature (ECT) Sensors. One of the sensors
threads into the block. The other
sensor is located at the top of the coolant adapter housing. The ECT Sensor ...
