Dodge Journey: Draincock, radiator
Removal
DRAINCOCK

Fig. 65: DRAINCOCK & RADIATOR TANK
CAUTION: Use of pliers on draincock is not recommended. Damage may occur to radiator or draincock.
NOTE: It is not necessary to remove draincock during a routine coolant drain.
1. Remove belly pan (if equipped).
2. Drain the cooling system.
3. Open the draincock (2) by turning it counterclockwise until it stops.
4. Turn the draincock (2) back (clockwise) 1/8 turn.
5. Pull the draincock (2) from the radiator tank (1).
Installation
DRAINCOCK
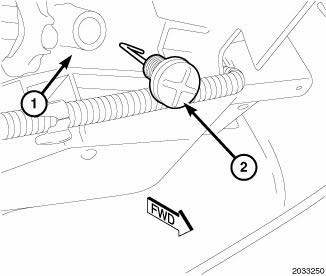
Fig. 66: DRAINCOCK & RADIATOR TANK
1. Align draincock (2) stem to radiator tank (1) opening.
2. Push draincock (2) into the radiator tank (1) opening.
3. Tighten the draincock (2) by turning clockwise until it stops.
4. Fill the cooling system.
5. Install belly pan (if equipped).
 Cooler, EGR
Description
Fig. 62: EGR COOLER
- EGR COOLER TO EGR VALVE TUBE
- MOUNTING SCREWS
- EGR COOLER MOUNTING SCREW
- MOUNTING SCREW
- EGR COOLER BODY
- EGR COOLER MOUNTING NUT
- EGR COOLE ...
 Fan, cooling
Description
Fig. 67: COOLING SYSTEM - OVERVIEW
- WINDSHIELD WASHER RESERVOIR
- UPPER SUPPORT
- FAN SHROUD
- FAN MOTOR
- LOWER RADIATOR HOSE
The radiator fan module includes a support ...
See also:
Standard procedure
BRAKE ROTOR MACHINING
NOTE: Refacing the rotor is not required each time the brake pads are
replaced, only
when the need is foreseen.
Any servicing of the rotor requires extreme care to ma ...
OCCUPANT RESTRAINTS
Some of the most important safety features in your
vehicle are the restraint systems:
• Three-point lap and shoulder belts for all seating
positions.
• Advanced Front Airbags for driver and fr ...
CHILL ZONE BEVERAGE COOLER STORAGE COMPARTMENT
The Chill Zone Beverage Cooler Storage Compartment
can keep chilled beverages cool depending on ambient
temperature and climate control setting. Chill Zone is
intended for nonperishable beverages o ...
