Dodge Journey: Bearing(s), connecting rod
Standard Procedure
CONNECTING ROD AND BEARING FITTING
CONNECTING ROD BEARING

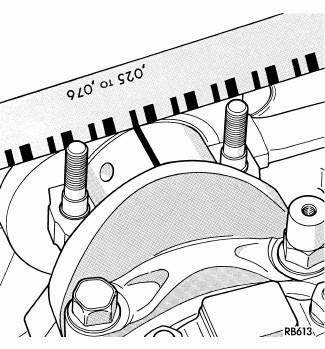
Fig. 166: Checking Connecting Rod Bearing Clearance-Typical
Fit all connecting rods on one bank until complete.
The bearing caps are not interchangeable and should be marked at removal to ensure correct assembly.
CAUTION: Care must be taken not to damage the fractured rod and cap joint face surfaces as engine damage may occur.
The bearing shells must be installed with the tangs inserted into the machined grooves in the rods and caps.
Also, assure that the hole in upper bearing half aligns with oil squirt hole in rod. Install cap with the tangs on the same side as the rod.
CAUTION: Assure that hole in upper bearing half aligns with hole in connecting rod as engine damage may occur.
Limits of taper or out-of-round on any crankshaft journals should be held to 0.015 mm (0.0006 in.). Bearings are available 0.025 mm (0.001 in.) and 0.250 mm (0.010 in.) undersize. Install the bearings in pairs. Do not use a new bearing half with an old bearing half. Do not file the rods or bearing caps.
1. For measuring Main Bearing Clearance and Connecting Rod Bearing Clearance use plastigage. For more information on using plastigage.
CONNECTING ROD BOLTS

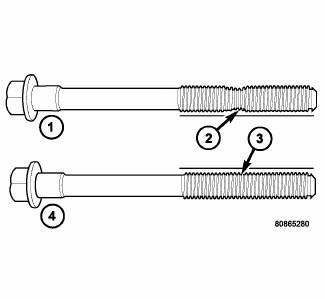
Fig. 167: Check For Stretched Bolts
- - STRETCHED BOLT
- - THREADS ARE NOT STRAIGHT ON LINE
- - THREADS ARE STRAIGHT ON LINE
- - UNSTRETCHED BOLT
NOTE: The connecting rod bearing cap bolts must be examined before reuse. If the threads are necked down (2) due to stretching, the bolt(s) must be replaced.
NOTE: Connecting rod bolts are retained in the rod cap with a light press fit. If bolts are to be removed, use a hammer and punch to drive bolts from connecting rod cap using care not to damage fractured cap surface.
1. Examine connecting rod bolt for stretching. Stretching can be checked by holding a scale or straight edge against the threads. If all the threads do not contact the scale the bolt should be replaced.
2. Before installing the bolts, lubricate the threads with engine oil.
3. Install bolts finger tight. Then alternately torque each nut to assemble the cap properly.
4. Tighten the nuts to specification.
CONNECTING ROD SIDE CLEARANCE

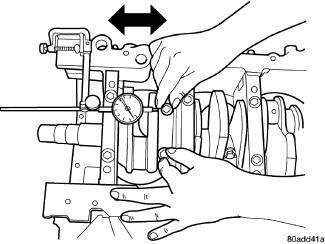
Fig. 168: Connecting Rod Side Clearance Measuring
1. Mount a dial indicator to a stationary point on engine. Locate probe perpendicular to and resting against the connecting rod cap being checked. Move connecting rod all the way to rear of its travel. Zero the dial indicator. Move connecting rod forward to limit of travel and read the dial indicator. Compare measurement to specification listed in engine specifications. Repeat procedure for each connecting rod. Turn crankshaft for connecting rod accessibility.
 Description, standard procedure
DESCRIPTION
Fig. 163: Engine Block & Crankshaft
- MAIN CAP BOLT-VERTICAL
- MAIN CAP
- MAIN BEARING-LOWER
- MAIN BEARING-UPPER
- MAIN CAP BOLT - HORIZONTAL
- CYLINDER BLOCK
- CRA ...
 Bearing(s), crankshaft, main
Standard Procedure
CRANKSHAFT MAIN BEARING FITTING
Fig. 169: Cylinder Block Main Bore Grade Marking
The grade marks for the cylinder block main bearing bore grade is located on
the pan rail jus ...
See also:
Intermediate shaft, diesel
REMOVAL
2.0L DIESEL
1. Remove the right half shaft.
Fig. 50: 2.0L Diesel Right Half Shaft Components
2. Remove the two intermediate shaft bolts (1).
3. Remove the intermediate shaft (2).
...
Manifold, exhaust, crossover
Removal
Fig. 287: Belly Pan
- belly pan fasteners
- belly pan
1. Remove the belly pan (2).
Fig. 288: Exhaust Extension Pipe
2. Remove the fasteners (1), and remove the exhaust extensio ...
Diagnosis and Testing
ELECTRIC BACKLIGHT (EBL) SYSTEM
NOTE: Illumination of the defogger switch indicator lamp does not
necessarily mean
that electrical current is reaching the rear window glass and/or the outside ...
