Dodge Journey: Description, Operation
DESCRIPTION
The charging system consists of:
- Generator
- Decoupler Pulley (2.4L and Diesel Only)
- Electronic Voltage Regulator (EVR) circuitry within the Powertrain Control Module (PCM)
- Ignition switch
- Battery
- Inlet Air Temperature (calculated battery temperature) (If equipped)
- Voltmeter
- Wiring harness and connections
- Accessory drive belt
OPERATION
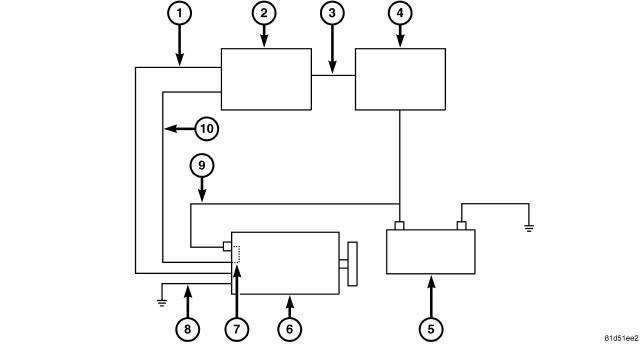
Fig. 1: Charging System Operation
- - Generator Field Circuit
- - Powertrain Control Module (PCM)
- - Battery Sense Input
- - Gateway (Totally Integrated Power Module, Integrated Power Module)
- - Battery
- - Generator
- - Resistor (Gasoline Engines Only)
- - Generator Case Ground
- - B+ Circuit (Generator Output)
- - B+ Sense Circuit
The charging system is turned on and off with the Powertrain Control Module (PCM) (2) and ignition switch with engine running. The field circuit will not be energized until engine is running and ignition switch is on.
This voltage is connected through the PCM (2) and supplied to the generator field circuit (1) at the back of the generator (6). The generator (6) is internally grounded through the generator case ground (8). The generator (6) regulates the field using Pin 1 of the field connector (High side driver).
The generator (6) is driven by the engine through a serpentine belt and pulley or decoupler pulley arrangement.
The PCM (2) receives a voltage input from the generator (6) via the B+ sense circuit (10) and also a battery sense input (3) from the Gateway (Totally Integrated Power Module, Integrated Power Module) (4), it then compares the voltages to the desired voltage programed in the Electronic Voltage Regulator (EVR) software and if there is a difference it sends a signal to the generator EVR circuit to increase or decrease output. It uses Pulse Width Modulation (PWM) to send signals to the generator circuitry to control the amount of output from the generator. The amount of DC current produced by the generator is controlled by the EVR circuitry contained within the PCM (2).
All vehicles are equipped with On-Board Diagnostics (OBD). All OBD-sensed systems, including EVR circuitry, are monitored by the PCM. Each monitored circuit is assigned a Diagnostic Trouble Code (DTC). The PCM will store a DTC in electronic memory for certain failures it detects.
The Check Gauges Lamp (if equipped) monitors: charging system voltage, engine coolant temperature and engine oil pressure. If an extreme condition is indicated, the lamp will be illuminated. This is done as reminder to check the three gauges. The lamp is located on the instrument panel. Voltage is monitored at B+ sense circuit (10) to insure the cable is connected. If the B+ circuit (generator output) (9) cable is loose anywhere in the circuit the B+ sense circuit (10) will show high voltage. This condition causes the PCM (2) to shut down the generator field circuit (1). Because of this feature, pin 2 of the field connector is internally connected to the B+ circuit (9).
The diesel generator is internally regulated. The generator and PCM communicate for diagnostics, etc. If the generator regulator becomes disconnected from the PCM it will operate, but in a default mode.
 Charging
...
 Diagnosis and testing
ON-BOARD DIAGNOSTIC SYSTEM
The Powertrain Control Module (PCM) monitors critical input and output
circuits of the charging system,
making sure they are operational. A Diagnostic Trouble Code (DTC) ...
See also:
Relay, heater unit
DESCRIPTION
Fig. 320: Standard ISO-Type Relay
Three relays (1) are used for the electric positive temperature coefficient (PTC)
heater system when equipped
with the 2.0L diesel engine. The rela ...
Description
Fig. 1: Exterior Lighting System
The exterior lighting system for this vehicle includes the following exterior
lamp units:
Center High Mounted Stop Lamp (3) - A standard equipment Center High ...
Bottle, coolant recovery
Description
NON-PRESSURE
Fig. 52: NON-PRESSURE COOLANT RECOVERY CONTAINER
- COOLANT RECOVERY CONTAINER
- OVERFLOW HOSE
- RADIATOR PRESSURE CAP
The coolant recovery system used on 2.4L e ...
