Dodge Journey: Lens, instrument cluster
REMOVAL
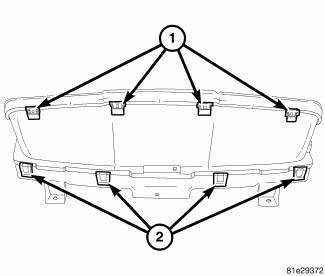
Fig. 8: Instrument Cluster Lens Locking Tabs
1. Remove instrument cluster from vehicle. See Removal .
2. Separate the lens from the cluster by gently prying on the locking clips (1) around the perimeter of the lens.
3. Separate lens from instrument cluster and remove.
INSTALLATION

Fig. 9: Instrument Cluster Lens Locking Tabs
1. Align lens locking tabs (1) with instrument cluster mask assembly and snap securely into place.
2. Install the instrument cluster into vehicle.
3. Connect battery negative cable.
 Diagnosis and Testing, Removal, Installation
DIAGNOSIS AND TESTING
INSTRUMENT CLUSTER
As a quick diagnosis, the cluster will perform a functional check of the
odometer display, transmission range
display and warning indicators after the ign ...
 Pod, switch
DESCRIPTION
Fig. 10: Accessory Switch Bank Module
The Accessory Switch Bank Module (ASBM) is located in the center stack area
of the instrument panel just
below the heater and air conditioner d ...
See also:
Speaker
OPERATION
Two wires connected to each speaker, one feed circuit (+) and one return
circuit (-), allow the audio output signal electrical current to flow through
the voice coil. The wiring informa ...
Removal, Installation
Removal
WARNING: Refer to the applicable warnings and cautions for this
system before
performing the following operation. Failure to follow the warnings and
cautions may result in po ...
Fascia, front
REMOVAL
Fig. 1: Pushpins
1. Release hood latch and open hood.
2. Remove the pushpins for the fascia (2) at the radiator support.
Fig. 2: Pop Rivets
3. Hoist and support vehicle on safety st ...
