Dodge Journey: Reinforcement, bumper, rear
REMOVAL
Fig. 25: Rear Bumper Reinforcement
1. Remove rear fascia. See Removal .
2. Support bumper reinforcement (1) on a suitable lifting device.
3. Mark position of bolts (2) on frame rail to aid in installation.
4. Remove bolts (2) attaching rear bumper reinforcement (1) to frame rail.
5. Remove bumper reinforcement (1) from vehicle.
INSTALLATION

Fig. 26: Rear Bumper Reinforcement
1. Position rear bumper reinforcement (1) on vehicle.
2. Install bolts (2) attaching bumper reinforcement to frame rail. Use marks made previously to properly position bumper reinforcement.
3. Tighten bolts (2) to 28 N.m (250 in. lbs.).
4. Install rear fascia.
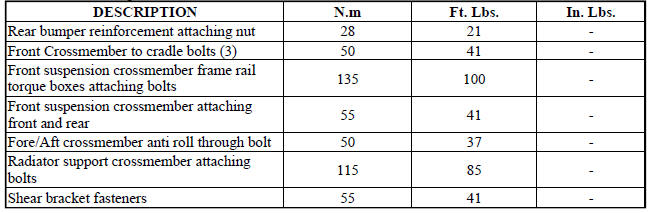
SPECIFICATIONS
FASTENER TORQUE
 Reinforcement, bumper, front
REMOVAL
Fig. 23: Front Bumper Reinforcement
1. Remove the front fascia. See Removal .
2. Support bumper reinforcement (3) on a suitable lifting device.
3. Mark the position of the bolts (1) ...
 Frame
Frame
SPECIFICATIONS
FRAME DIMENSIONS
Frame dimensions are listed in metric scale. All dimensions are from center
to center of Principal Locating
Point (PLP), or from center to center of PLP and fasten ...
See also:
Installation
2.4L
Fig. 52: 2.4L Knock Sensor
CAUTION: Always torque knock sensors to the correct torque
specification. Over or
under tightening effects knock sensor performance. Ensure the electr ...
Switch, evaporative emissions system monitor
Operation
Fig. 29: Evaporative Emissions System Monitor Switch
- Intake Manifold
- Throttle Body
- Purge Solenoid
- Filter
- ESIM
- Vapor Canister
- Control Valve
- Fuel Tank
- ...
Seal, output flange
REMOVAL
Fig. 93: Axle Seal Removal
- SEAL
- SCREWDRIVER
1. Raise vehicle on hoist.
2. Remove rear driveline module.
3. Use suitable screwdriver (2) to remove output seal (1).
INSTA ...
