Dodge Journey: Fascia, rear
REMOVAL

Fig. 15: Push Pins
1. Open the hatch.
2. Remove the 6 pushpins (1) securing the fascia (2).

Fig. 16: Rivets
3. Remove the rivets (2) and the Torx screw (3) around the wheel well for the fascia (1).

Fig. 17: Tabs, Fascia & Bracket
4. Separate the tabs (2) securing the fascia (3) to the bracket (1).

Fig. 18: Tail Light Push Pin
5. Remove the push pin (2) under the taillight (1) to the fascia (3).
6. Remove fascia (3) from vehicle.
INSTALLATION
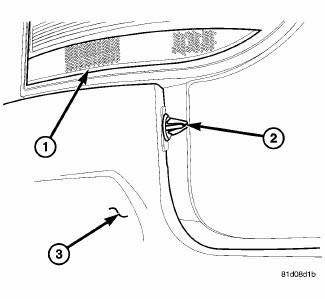
Fig. 19: Tail Light Push Pin
1. Install the fascia (3) to the vehicle and install the pushpin (2) at the tailight (1) to the body.
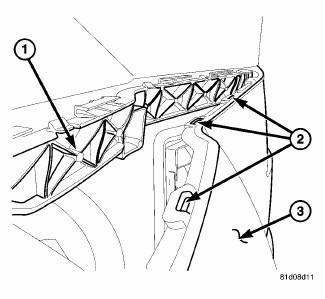
Fig. 20: Tabs, Fascia & Bracket
2. Clip the fascia (3) into the tabs (2) to the bracket (1).
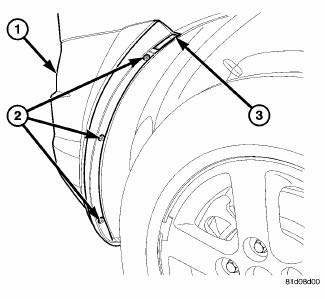
Fig. 21: Rivets
3. Install the Torx screw (3) for the fascia top the wheel opening and then install the pop rivets (2).
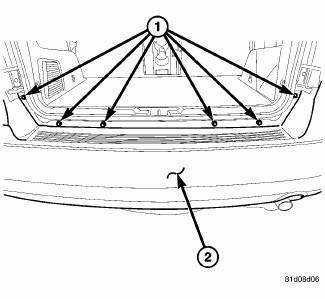
Fig. 22: Push Pins
4. Install the 6 push pins (1) to secure the fascia (2) to the body.
5. Close the hatch and check for fit.
 Fascia, front lower, closeout
REMOVAL
Fig. 11: Lower Fascia
1. Remove fasteners (5) to lower closeout.
Fig. 12: Push Pins - Front Lower Fascia
2. Remove push pins (1) to lower closeout.
3. Remove the front lower fascia.
...
 Reinforcement, bumper, front
REMOVAL
Fig. 23: Front Bumper Reinforcement
1. Remove the front fascia. See Removal .
2. Support bumper reinforcement (3) on a suitable lifting device.
3. Mark the position of the bolts (1) ...
See also:
Description, Operation
DESCRIPTION
The generator is belt-driven by the engine. It is serviced only as a complete
assembly. If the generator fails for
any reason, the entire assembly must be replaced. The generator produ ...
SUGGESTIONS FOR OBTAINING SERVICE FOR YOUR VEHICLE
Prepare For The Appointment
If you’re having warranty work done, be sure to have the
right papers with you. Take your warranty folder. All
work to be performed may not be covered by the
warranty ...
Diagnosis and testing
COMMON PROBLEM CAUSES
The majority of transaxle malfunctions are a result of:
Insufficient lubrication
Incorrect lubricant
Misassembled or damaged internal components
Improper operation
...
