Dodge Journey: Duct, floor distribution, rear
REMOVAL

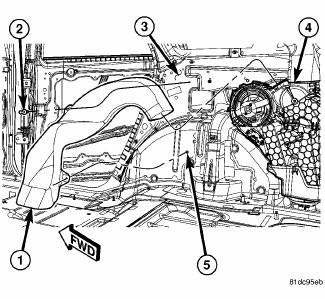
Fig. 159: Rear Floor Distribution Duct
1. Remove right quarter trim panel.
2. Remove the push-pin retainer (2) that secures the rear floor distribution duct (1) to the right inner quarter panel (3).
3. Disengage the rear floor distribution duct from the stud (5) located on the right inner quarter panel.
4. Disengage the rear floor distribution duct from the rear heater-A/C housing (4) and remove the duct.
INSTALLATION

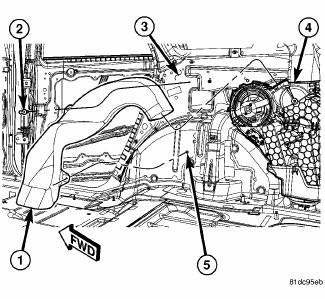
Fig. 160: Rear Floor Distribution Duct
1. Install the rear floor distribution duct (1) onto rear heater-A/C housing (4). Make sure the duct is fully engaged to the housing.
2. Engage the rear floor distribution duct to the stud (5) located on the right inner quarter panel (3).
3. Install the push-pin retainer (2) that secures the rear floor distribution duct to the right inner quarter panel.
4. Install the right quarter panel trim.
 Duct, ceiling distribution
REMOVAL
WARNING: Disable the airbag system before attempting any steering
wheel, steering
column or instrument panel component diagnosis or service. Disconnect
and isolate the negati ...
See also:
Valve, one way check
Description
Fig. 16: AIR INJECTION CHECK VALVE
The air injection check valve (1) is a one-valve check valve that allows air
to flow in one direction only. The
valve is located at exhaust side o ...
Description
Fig. 1: Muffler/Exhaust Pipe Assembly - Single Tail Pipe
- INSULATOR
- MUFFLER/EXHAUST PIPE ASSEMBLY
- BAND CLAMP
The exhaust system on the 2.4L and 2.7L engine models consists of a front ...
Insulator, engine mount, rear
Removal
Fig. 234: Belly Pan
1. Remove throttle body air inlet hose and air cleaner housing assembly.
2. Raise the vehicle.
3. Remove the belly pan (2).
Fig. 235: Identifying Rear Mount B ...

