Dodge Journey: Sensor, exhaust pressure
REMOVAL
EXHAUST PRESSURE SENSOR
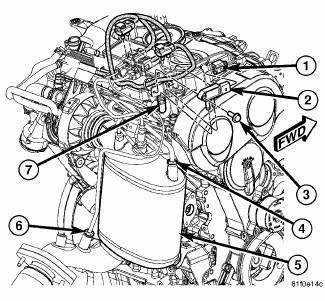
Fig. 42: DPF Components
- - ELECTRICAL CONNECTOR
- - PRESSURE DIFFERENTIAL SENSOR
- - MOUNTING BOLT
- - UPSTREAM PRESSURE TUBE
- - DPF
- - DOWNSTREAM PRESSURE TUBE
- - TUBING
INSTALLATION
EXHAUST PRESSURE SENSOR

Fig. 43: DPF Components
- - ELECTRICAL CONNECTOR
- - PRESSURE DIFFERENTIAL SENSOR
- - MOUNTING BOLT
- - UPSTREAM PRESSURE TUBE
- - DPF
- - DOWNSTREAM PRESSURE TUBE
- - TUBING
1. Install tubing (7) on pressure differential sensor (2).
2. Position pressure differential sensor (2) and tubing (7).
3. Install pressure differential sensor mounting bolt (3). Tighten to 10 N.m (89 in. lbs.).
4. Install downstream pressure tube (6) into catalytic converter. Tighten the fitting to 10 N.m (89 in. lbs.).
5. Install upstream pressure tube (4) into catalytic converter. Tighten the fitting to 10 N.m (89 in. lbs.)
6. Position electrical connector (1) into bracket.
7. Connect negative battery cable.
 Installation
2.7L ENGINE
Fig. 32: Maniverter To Cross Under Fasteners
1. Install the cross under pipe (3). and the front maniverter-to-cross under
fasteners (1) and (2). Tighten to
27 Nm (20 ft. lb.).
Fi ...
 Sensor, exhaust temperature
REMOVAL
EXHAUST TEMPERATURE SENSOR
Fig. 44: Exhaust Temperature Sensor
- DPF TEMPERATURE SENSOR ELECTRICAL CONNECTOR
- DPF TEMPERATURE SENSOR
1. Remove engine cover.
2. Disconnect and ...
See also:
REPLACEMENT BULBS
All the inside bulbs are brass or glass wedge base.
Aluminum base bulbs are not approved and should not
be used for replacement.
LIGHT BULBS – Interior Bulb Number
Courtesy/Reading Lamps (Incand ...
Rod, piston and connecting
Description
Fig. 206: Piston & Connecting Rod
- "F" TOWARD FRONT OF ENGINE
- RING COMPRESSOR
- SPECIAL TOOL 8189
- OIL SQUIRT HOLE
The pistons (1) are made of a high stre ...
Mechanism, gearshift
REMOVAL
Fig. 193: Shift Cables To Shifter
1. Detach gear shift boot from console.
2. Remove the center console assembly.
3. Remove rear power window switch (if equipped) and disconnect ha ...
