Dodge Journey: Insulator, engine mount, right
Removal

Fig. 243: Belly Pan
1. Remove the belly pan (2).

Fig. 244: Right Engine Mount
2. Lower vehicle. Remove the load on the engine motor mounts by carefully supporting the engine assembly from below.
3. Remove coolant recovery container.
4. Disconnect the ground strap.
5. Remove the right engine support bracket vertical fasteners (1) and (2) and remove support bracket (3).
6. Remove the bolts (5) attaching the right isolator (4) to the frame rail.
7. Remove right isolator (4).
Installation
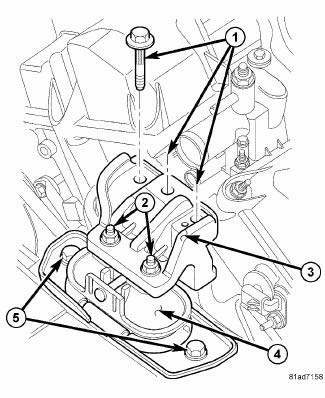
Fig. 245: Right Engine Mount
1. Position right isolator (4) and install the isolator to frame rail bolts (5). Tighten bolts to 55 N.m (40 ft.lbs.).
2. Install the engine support bracket (3) and bolts (1). Tighten bolts to 50 N.m (37 ft. lbs).
3. Install the support bracket to isolator nuts (2) and tighten to 30 N.m (22 ft. lbs).
4. Reconnect the ground strap.
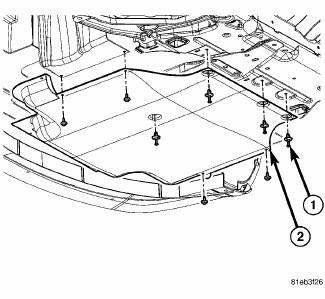
Fig. 246: Belly Pan
5. Raise vehicle on a hoist.
6. Install the belly pan (2).
7. Install coolant recovery container.
 Insulator, engine mount, rear
Removal
Fig. 234: Belly Pan
1. Remove throttle body air inlet hose and air cleaner housing assembly.
2. Raise the vehicle.
3. Remove the belly pan (2).
Fig. 235: Identifying Rear Mount B ...
 Lubrication
...
See also:
Cap, radiator
Description
Fig. 58: Cooling System Pressure Cap
- OVERFLOW NIPPLE
- MAIN SPRING
- GASKET RETAINER
- STAINLESS-STEEL SWIVEL TOP
- RUBBER SEALS
- VENT VALVE
- COOLANT OUTLET CONNECTO ...
Removal, Installation
REMOVAL
WARNING: To avoid serious or fatal injury on vehicles equipped
with airbags, disable
the Supplemental Restraint System (SRS) before attempting any steering
wheel, steering co ...
VEHICLE IDENTIFICATION NUMBER
The Vehicle Identification Number (VIN) is on the left
front corner of the instrument panel and is visible from
outside of the vehicle through the windshield. This
number also appears on the Automo ...
