Dodge Journey: Installation
CAUTION: When installing a NEW brake caliper it is necessary to bleed the brakes using a special procedure which has been integrated to this installation procedure.

Fig. 76: REAR BRAKE PADS
1. Remove the outboard pad (5) from the adapter bracket.

Fig. 77: REAR CALIPER MOUNTING
CAUTION: Use care when installing the caliper (2) onto the adapter bracket to avoid damaging the guide pin boots.
2. Install the disc brake caliper (2) over the inboard brake pad on the brake caliper adapter bracket and the brake rotor.
CAUTION: When removing or installing a caliper guide pin bolt, it is necessary to hold the guide pin stationary while turning the bolt. Hold the guide pin stationary using a wrench placed upon the pin's hex-shaped head.
3. Align the caliper guide pin bolt holes with the adapter bracket. Install the upper and lower caliper guide pin bolts (1). Lightly tighten the guide pin bolts at this time.
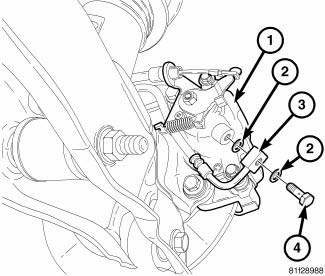
Fig. 78: BRAKE HOSE MOUNTING TO CALIPER
4. Install the banjo bolt (4) connecting the brake flex hose (3) to the brake caliper (1). Be sure to install a NEW brake hose washer (2) on each side of the hose fitting as the banjo bolt is guided through the fitting. Thread the banjo bolt into the caliper and tighten it to 26 N.m (19 ft. lbs.).

Fig. 79: BRAKE PEDAL HOLDING TOOL
5. Access the interior of the vehicle, remove the brake pedal holder, then slowly pump the brake pedal until the rear caliper fingers touch the outboard surface of the brake rotor where the brake pad was removed.
Release the pedal.

Fig. 80: REAR CALIPER MOUNTING
CAUTION: When removing or installing a caliper guide pin bolt, it is necessary to hold the guide pin stationary while turning the bolt. Hold the guide pin stationary using a wrench placed upon the pin's hex-shaped head.
6. Remove two caliper guide pin bolts (1).
7. Slide the disc brake caliper (2) from the disc brake adapter bracket (3).
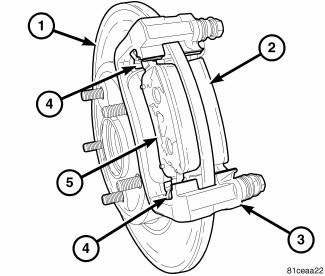
Fig. 81: REAR BRAKE PADS
8. Reinstall the outboard pad (5) in the adapter bracket (3).
9. Open the caliper bleeder screw at least one full turn.
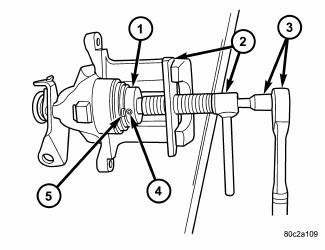
Fig. 82: SEATING PISTON WITH SPECIAL TOOL
10. Seat (bottom) the caliper piston in the bore as follows:
- Assemble a 3/8 in. drive ratchet handle and an extension (3).
- Insert the extension through Special Tool 8807-1 (2).
- Place Special Tool 8807-2 (1) on the end of the extension.
- Insert lugs on Special Tool 8807-2 into notches in face of caliper piston (5).
- Thread the screw drive on 8807-1 down until it contacts the top of 8807-2 which is against the caliper piston. Do not over tighten the screw-drive. Damage to the piston can occur.
- Turn 8807-2 with the ratchet, rotating the piston in a clockwise direction until fully seated (bottomed) in the bore. It may be necessary to turn 8807-1 with 8807-2 to start the process of piston retraction.
11. Close the bleeder screw.
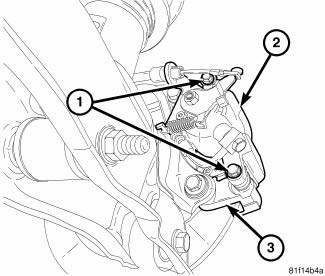
Fig. 83: REAR CALIPER MOUNTING
CAUTION: Use care when installing the caliper onto the adapter bracket to avoid damaging the guide pin boots.
CAUTION: When removing or installing a caliper guide pin bolt, it is necessary to hold the guide pin stationary while turning the bolt. Hold the guide pin stationary using a wrench placed upon the pin's hex-shaped head.
12. Return the brake caliper back down over the adapter bracket into mounted position and install the guide pin bolts (1). Tighten both guide pin bolts to 35 N.m (26 ft. lbs.).
NOTE: While bleeding air from the brake caliper in the following steps, be sure to monitor the fluid level in the master cylinder reservoir making sure it does not go dry.
13. Have a helper pump the brake pedal three or four times and hold it in the down position.
14. With the pedal in the down position, open the bleeder screw at least one full turn and let out fluid and air, if any.
15. Once the brake pedal has dropped, close the bleeder screw. Once the bleeder screw is closed, release the brake pedal.
16. Repeat the previous three steps as necessary until all trapped air is removed.
17. If necessary, bleed remaining wheel circuits as necessary using normal bleeding procedure.
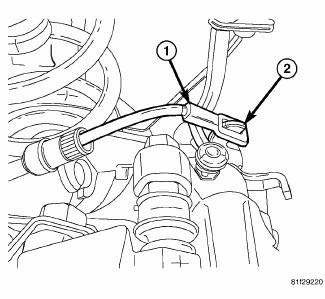
Fig. 84: PARKING BRAKE CABLE AT LEVER
18. Pull the parking brake cable strand (1) outward from the cable housing and hook it onto the caliper lever (2).
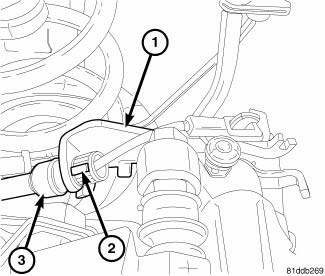
Fig. 85: PARKING BRAKE CABLE AT BRACKET
19. Push the excess cable strand back into the cable housing, then insert the cable housing (3) into the mounting bracket (1) until the retainer fingers (2) lock into place. Make sure both fingers are engaged preventing removal of the cable from the bracket.
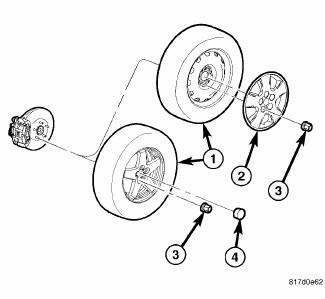
Fig. 86: TIRE AND WHEEL MOUNTING
20. Install tire and wheel assembly (1). Install and tighten wheel mounting nuts (3) to 135 N.m (100 ft. lbs.).
21. Reconnect the parking brake cable equalizer and reset the cable tension. 22. Lower vehicle.
23. Connect battery negative (-) cable to battery post.
24. Road test vehicle making several stops to wear off any foreign material on brakes and to seat brake pads.
 Removal
1. Disconnect and isolate battery negative cable from battery post.
Fig. 70: BRAKE PEDAL HOLDING TOOL
2. Using a brake pedal holding tool as shown, depress brake pedal past its
first inch of tra ...
 Fluid
Fluid
Diagnosis and Testing
BRAKE FLUID CONTAMINATION
Indications of fluid contamination are swollen or deteriorated rubber parts.
Swelling indicates the presence of
petroleum in the brake fluid.
To ...
See also:
Insulator, engine mount, left
Removal
Fig. 228: Belly Pan
1. Disconnect and isolate the negative battery cable.
2. Remove throttle body air inlet hose and air cleaner housing assembly.
3. Remove the belly pan (2).
...
Removal
WARNING: Refer to the applicable warnings and cautions for this
system before
performing the following operation. Failure to follow the warnings and
cautions may result in possible se ...
Installation
LEFT-HAND-DRIVE
NOTE: The master cylinder must be bled before installing it on the
vehicle.
1. Bench bleed the master cylinder.
2. Wipe the face of the power brake booster clean where the ...
