Dodge Journey: Removal
LEFT-HAND-DRIVE
CAUTION: The vacuum in the power brake booster must be pumped down before removing the master cylinder to prevent the booster from sucking in any contamination. This can be done by pumping the brake pedal while the engine is not running until a firm brake pedal is achieved.
1. With the engine not running, pump the brake pedal 4-5 strokes until the pedal feel is firm.
2. Disconnect the negative (ground) cable from the battery and isolate the cable.

Fig. 18: COWL TOP SCREEN
3. Remove the two push-pins (1) securing the cowl top screen at the ends. Remove the remaining push-pins (2). Remove the cowl top screen (3).
4. Remove the wiper arms.
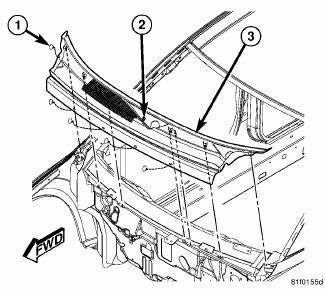
Fig. 19: COWL SCREEN
5. Remove the push-pins (1) securing the cowl screen to the wheelhouse brace and cowl. Rotate the screw (2) in the center of the cowl screen 90º clockwise to release the screen. Remove the cowl screen (3).
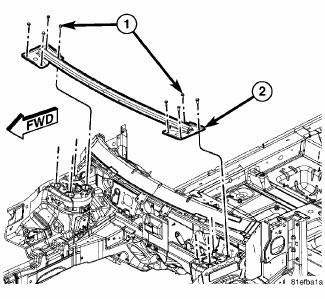
Fig. 20: WHEELHOUSE BRACE
6. Remove the eight mounting bolts (four each side) (1) securing the wheel house brace to the strut towers.
7. Remove the wheelhouse brace (2).
8. Remove the master cylinder.
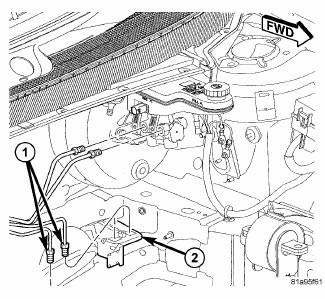
Fig. 21: REAR BRAKE TUBES AT JUNCTION BLOCK
9. Disconnect the rear brake tubes (1) at the junction block (2). Install plugs at all of the open brake tubes.
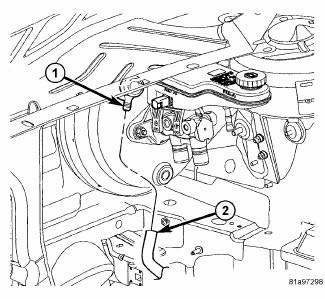
Fig. 22: VACUUM HOSE AT BOOSTER - LHD
10. Disconnect the vacuum hose (2) from the check valve (1) on the power brake booster. Do not remove the check valve from power brake booster.
11. If equipped, remove the silencer pad below the steering column opening cover.
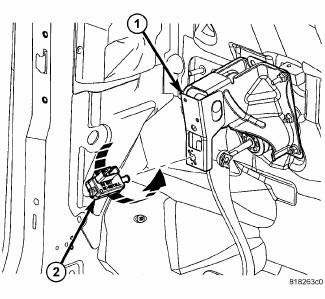
Fig. 23: STOP LAMP SWITCH REMOVAL
12. Remove the stop lamp switch (2). Do not reuse the stop lamp switch on vehicles built prior to July 21, 2008.
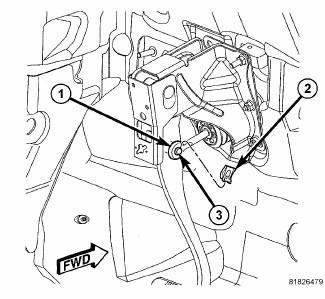
Fig. 24: BRAKE PEDAL CLIP
13. Remove the retaining clip (2) securing the power brake booster push rod (1) to the brake pedal. To do so, position a small screwdriver under the center tang of the retaining clip, then rotate the screwdriver enough to allow the retaining clip tang to pass over the end of the brake pedal pin (3). Remove and discard the clip. Do not reuse the clip.
14. Slide the booster push rod (1) off the brake pedal pin (3).
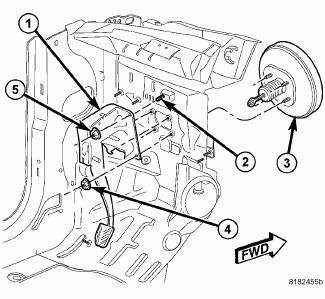
Fig. 25: PEDAL AND BOOSTER MOUNTING - LHD
15. Remove the four nuts (4) attaching the power brake booster (3) to the dash panel.
16. Slide the power brake booster (3) forward until its mounting studs clear the dash panel, then remove it through the engine compartment.
RIGHT-HAND-DRIVE
CAUTION: The vacuum in the power brake booster must be pumped down before removing the master cylinder to prevent the booster from sucking in any contamination. This can be done by pumping the brake pedal while the engine is not running until a firm brake pedal is achieved.
1. With the engine not running, pump the brake pedal 4-5 strokes until the pedal feel is firm.
2. Disconnect the negative (ground) cable from the battery and isolate the cable.
3. Remove the engine appearance cover.
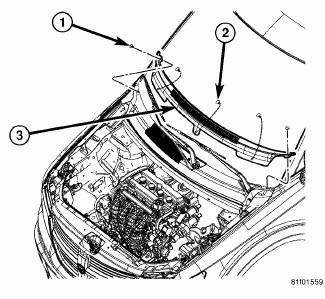
Fig. 26: COWL TOP SCREEN
4. Remove the two push-pins (1) securing the cowl top screen at the ends. Remove the remaining push-pins (2). Remove the cowl top screen (3).
5. Remove the wiper arms.

Fig. 27: COWL SCREEN
6. Remove the push-pins (1) securing the cowl screen to the wheelhouse brace and cowl. Rotate the screw (2) in the center of the cowl screen 90º clockwise to release the screen. Remove the cowl screen (3).

Fig. 28: WHEELHOUSE BRACE
7. Remove the eight mounting bolts (four each side) (1) securing the wheel house brace to the strut towers.
8. Remove the wheelhouse brace (2).
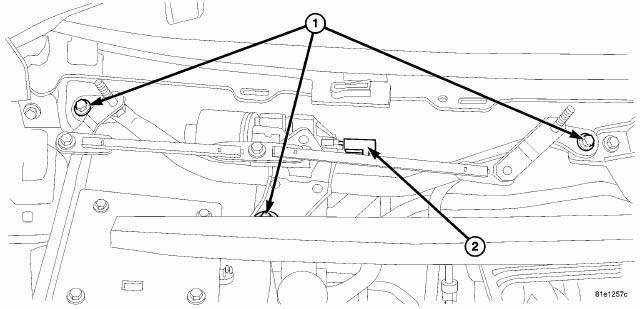
Fig. 29: MODULE -WIPER
9. Disconnect the electrical connector (2) from the wiper motor.
10. Remove three bolts (1) from the wiper module.
11. Remove the wiper module from the vehicle.

Fig. 30: VACUUM HOSE AT BOOSTER - RHD
12. Remove the booster vacuum hose routing clip (4) from the master cylinder mounting stud.
13. Remove the vacuum hose routing clip (3) from the stud on the dash panel.
14. Remove the master cylinder.
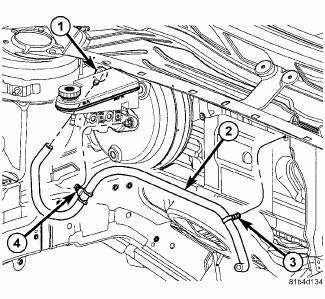
Fig. 31: VACUUM HOSE AT BOOSTER - RHD
15. Disconnect the vacuum hose (2) from the check valve (1) on the power brake booster. Do not remove the check valve from the power brake booster.
16. Remove both brake tube routing clips with tubes from the studs on the dash panel. Do not bend the brake tubes.

Fig. 32: STOP LAMP SWITCH REMOVAL
17. Remove the stop lamp switch (2).Do not reuse the stop lamp switch on vehicles built prior to July 21, 2008.
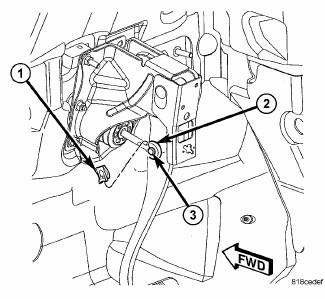
Fig. 33: BRAKE PEDAL CLIP - RHD
18. Remove the retaining clip (1) securing the power brake booster push rod (2) to the brake pedal. To do so, position a small screwdriver under the center tang of the retaining clip, then rotate the screwdriver enough to allow the retaining clip tang to pass over the end of the brake pedal pin (3). Remove and discard the clip. Do not reuse the clip.
19. Slide the booster push rod (2) off the brake pedal pin (3).
20. If equipped with a manual transaxle, remove the clutch master cylinder from the pedal bracket assembly and dash panel.
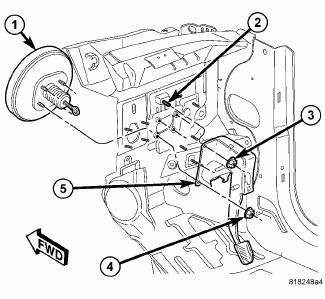
Fig. 34: PEDAL AND BOOSTER MOUNTING - RHD
21. Remove the four nuts (4) attaching the power brake booster (1) to the dash panel.
22. Slide the power brake booster (1) forward clearing the dash panel, then remove it from the vehicle.
 Description, Diagnosis and Testing
Description
Fig. 17: PEDAL AND BOOSTER MOUNTING - LHD
The power brake booster (3) is mounted to the engine side of the dash panel.
The master cylinder is bolted to
the front of the booster. A v ...
 Installation
LEFT-HAND-DRIVE
Fig. 35: BOOSTER SEAL
NOTE: Before power brake booster (1) installation, be certain a NEW
dash seal (2) is
installed on the booster mounting studs.
Fig. 36: PEDAL AND ...
See also:
Schematics and diagrams
40/41TE - WITH VARIABLE LINE PRESSURE
Fig. 181: Identifying Line Pressure - Park & Neutral
Fig. 182: Identifying Line Pressure - Reverse
Fig. 183: Identifying Line Pressure - First Gear ( ...
Heater, engine block
Description
2.4L
Fig. 70: BLOCK HEATER 2.4L ENGINE
- RETAINING CLIP
- BLOCK HEATER
CAUTION: The power cord must be secured in its retainer clips, and
not positioned
so it co ...
Removal, Installation
REMOVAL
Fig. 54: Removing /Installing Propeller Shaft
CAUTION: Propeller shaft removal is a two-man operation. Never
allow propeller shaft
to hang from the center bearing, or while o ...
