Dodge Journey: Description, Diagnosis and Testing
Description

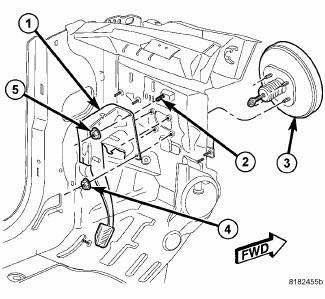
Fig. 17: PEDAL AND BOOSTER MOUNTING - LHD
The power brake booster (3) is mounted to the engine side of the dash panel. The master cylinder is bolted to the front of the booster. A vacuum check valve is also mounted on the front of the booster. A vacuum line connects the check valve to engine source vacuum. The booster input rod extends through the dash panel and connects to the brake pedal.
This vehicle uses a tandem diaphragm, single rate vacuum power brake booster with 203 and 229 mm (8 and 9 in.) diaphragms. Power brake boosters are internally tuned differently depending on whether the vehicle is equipped with ABS or without ABS. If the power brake booster requires replacement, be sure it is replaced with the correct part.
The power brake booster can be identified by the tag attached to the body of the booster. This tag contains the following information:
- The production part number
- The date it was built, and
- The booster manufacturer.
Diagnosis and Testing
POWER BRAKE BOOSTER
BASIC TEST
1. With engine off, depress and release the brake pedal several times to purge all vacuum from the power brake booster.
2. Depress and hold the pedal with light effort (15 to 25 lbs. (6.8 to 11.3 kg) pressure), then start the engine.
The pedal should fall slightly, then hold. Less effort should be needed to apply the pedal at this time. If the pedal fell as indicated, perform the VACUUM LEAK TEST listed after the BASIC TEST. If the pedal did not fall, continue on with this BASIC TEST.
3. Disconnect the vacuum hose at the vacuum check and tee-in a vacuum gauge.
4. Start the engine.
5. When the engine is at warm operating temperature, allow it to idle and check the vacuum at the gauge.
If the vacuum supply is 12 inches Hg (40.5 kPa) or more, the power brake booster is defective and must be replaced. If the vacuum supply is below 12 inches Hg, continue on with this BASIC TEST.
6. Shut off the engine.
7. Connect the vacuum gauge to the vacuum reference port on the engine intake manifold.
8. Start the engine and observe the vacuum gauge.
If the vacuum is still low, check the engine tune and repair as necessary. If the vacuum is above 12 inches, the hose or check to the booster has a restriction or leak.
Once an adequate vacuum supply is obtained, repeat the BASIC TEST.
VACUUM LEAK TEST
1. Disconnect the vacuum hose at the vacuum check and tee-in a vacuum gauge.
2. Start the engine.
3. Allow the engine to warm up to normal operating temperature and engine idle.
4. Using vacuum line pliers, close off the vacuum supply hose near the booster and observe the vacuum gauge.
If the vacuum drop exceeds 1.0 inch Hg (3.3 kPa) in one minute, repeat the above steps to confirm the reading. The vacuum loss should be less than 1.0 inch Hg in one minute time span. If the loss is more than 1.0 inch Hg, replace the power brake booster. If it is not, continue on with this test.
5. Remove the pliers from the hose temporarily.
6. Apply light effort (approximately 15 lbs. (6.8 kg) of force) to the brake pedal and hold the pedal steady.
Do not move the pedal once the pressure is applied or the test results may vary.
7. Have an assistant reattach the pliers to the vacuum supply hose.
8. Allow 5 seconds for stabilization, then observe the vacuum gauge.
If the vacuum drop exceeds 3.0 inches Hg (10 kPa) in 15 seconds, repeat the above steps to confirm the reading.
The vacuum loss should be less than 3.0 inches Hg in 15 seconds time span. If the loss is more than 3.0 inches Hg, replace the power brake booster. If it is not, the booster is not defective.
 Removal
LEFT-HAND-DRIVE
CAUTION: The vacuum in the power brake booster must be pumped down
before
removing the master cylinder to prevent the booster from sucking in any
contamination. This ...
See also:
Description
The base brake system consists of the following components:
Brake pedal
Power brake booster
Master cylinder
Brake tubes and hoses
Disc brakes (four-wheel)
Brake lamp switch
Brake fluid ...
Ensioner, belt
Removal
2.4L ENGINE
Fig. 36: ACCESSORY DRIVE BELT - WORLD ENGINE
- POWER STEERING PUMP
- ACCESSORY DRIVE BELT
- GENERATOR
- CRANKSHAFT PULLEY
- LOWER IDLER PULLEY
- CRANKSHAFT PULLEY ...
Sensor, transmission range
DESCRIPTION
Fig. 386: Locating Transmission Range Sensor (TRS)
- TRANSMISSION RANGE SENSOR
The Transmission Range Sensor (TRS) (1) is mounted to the top of the valve
body inside the transa ...

