Dodge Journey: Wiring, trailer tow
DESCRIPTION

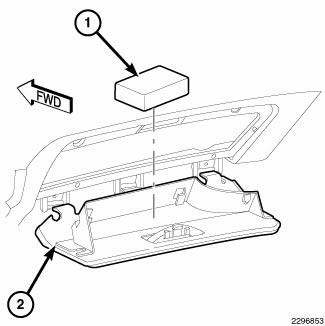
Fig. 73: Instruction Sheet Are Placed In Glove Box
Vehicles equipped with an optional Trailer Tow Preparation package have a trailer tow wiring harness and an instruction sheet (1) that are placed in the glove box (2) of the vehicle when it is shipped from the factory. This package also includes four relays to isolate the trailer lighting from the vehicle lighting and a four-way trailer tow wiring connector that are all concealed behind the rear bumper fascia after installation is complete.
OPERATION
The trailer tow preparation wiring harness is connected to the body wire harness at the right and left outer rear lamp unit connections. After installation is complete, a trailer tow stop/turn relay is secured to the harness behind the rear bumper fascia just below each outer rear lamp unit, while a trailer tow stop lamp relay is located on the underside of each outboard end of the rear bumper reinforcement behind the rear fascia. The four-way trailer tow connector is located near the center of the rear fascia. The wiring information includes wiring diagrams, proper wire and connector repair procedures, further details on wire harness routing and retention, as well as pin-out and location views for the various wire harness connectors, splices and grounds. Also refer to the Instruction Sheet packaged with the harness for additional details.
 Installation
BULBS
HEADLAMP HIGH BEAM
CAUTION: Always use the correct bulb size and type for
replacement. An incorrect
bulb size or type may overheat and cause damage to the lamp, the socket
or ...
 Speed Control
SWITCH, SPEED CONTROL
REMOVAL
Fig. 1: Removing/Installing Horn Switch
WARNING: Disconnect and isolate the battery negative (ground)
cable before
beginning steering wheel removal or ...
See also:
JACKING AND TIRE CHANGING
WARNING:
• Do not attempt to change a tire on the side of the
vehicle close to moving traffic. Pull far enough off
the road to avoid the danger of being hit when
operating the jack or changing t ...
Cleaning, inspection
CLEANING
To ensure engine gasket sealing, proper surface preparation must be
performed, especially with the use of
aluminum engine components and multi-layer steel cylinder head gaskets.
NOTE: ...
Description, Operation, Specifications
DESCRIPTION
NOTE: All engines use a fixed ignition timing system. Basic ignition
timing is not
adjustable. All spark advance is determined by the Powertrain Control Module
(PCM).
The ign ...
