Dodge Journey: Diagnosis and Testing
BRAKE LAMP SWITCH
WARNING: To avoid serious or fatal injury on vehicles equipped with airbags, disable the Supplemental Restraint System (SRS) before attempting any steering wheel, steering column, airbag, seat belt tensioner, impact sensor, or instrument panel component diagnosis or service. Disconnect and isolate the battery negative (ground) cable, then wait two minutes for the system capacitor to discharge before performing further diagnosis or service.
This is the only sure way to disable the SRS. Failure to take the proper precautions could result in accidental airbag deployment.
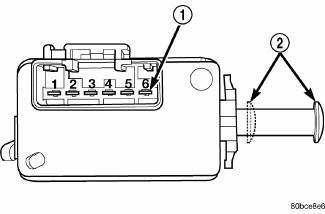
Fig. 60: Brake Lamp Switch - Early Production
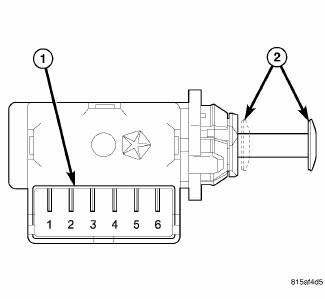
Fig. 61: Brake Lamp Switch - Late Production
1. Disconnect and isolate the battery negative cable.
CAUTION: Do not remove the Eary Production-type brake lamp switch from the mounting bracket. The self-adjusting plunger of this switch is a one time only feature. If the switch is removed from the mounting bracket, it MUST be replaced with a new switch.
2. Disconnect the wire harness connector from the brake lamp switch.
3. Using an ohmmeter, perform the continuity tests at the terminal pins (1) in the brake lamp switch connector receptacle as shown in the Brake Lamp Switch Tests table below.
|
BRAKE LAMP SWITCH TESTS |
|
| PLUNGER POSITION (2) | CONTINUITY BETWEEN |
| Released (Extended) | Pins 1 and 2 |
| Compressed (Depressed | Pins 3 and 4, 5 and 6 |
4. If the switch fails any of the continuity tests, replace the ineffective brake lamp switch as required.
 Description, Operation
DESCRIPTION
Two unique brake lamp switches are used in this vehicle, depending upon
whether the vehicle was built during
early or late production. These switches are not interchangeable and both a ...
 Removal
Two unique brake lamp switches are used in this vehicle, depending upon
whether the vehicle was built during
early or late production. These switches are not interchangeable. Both switches
are il ...
See also:
Crankshaft
Description
The crankshaft is constructed of a forged micro alloy steel. The six throw,
nine counterweight crankshaft is
supported by four select fit main bearings with the number three serving as ...
Removal, Installation
REMOVAL
1. Remove transmission and torque converter from vehicle.
2. Place a suitable drain pan under the converter housing end of the
transmission.
CAUTION: Verify that transmission is ...
Without intermediate shaft
NOTE: Never grasp the halfshaft assembly by the inner or outer boots
doing so may
damage to the boot.
NOTE: The inner tripod joints are designed with a retention feature that
prevents t ...
