Dodge Journey: Lens, instrument cluster
REMOVAL

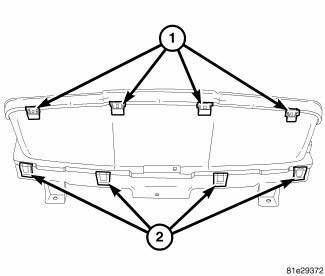
Fig. 8: Instrument Cluster Lens Locking Tabs
1. Remove instrument cluster from vehicle. See Removal .
2. Separate the lens from the cluster by gently prying on the locking clips (1) around the perimeter of the lens.
3. Separate lens from instrument cluster and remove.
INSTALLATION

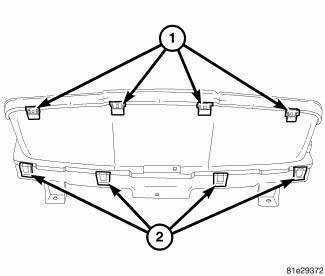
Fig. 9: Instrument Cluster Lens Locking Tabs
1. Align lens locking tabs (1) with instrument cluster mask assembly and snap securely into place.
2. Install the instrument cluster into vehicle.
3. Connect battery negative cable.
 Diagnosis and Testing, Removal, Installation
DIAGNOSIS AND TESTING
INSTRUMENT CLUSTER
As a quick diagnosis, the cluster will perform a functional check of the
odometer display, transmission range
display and warning indicators after the ign ...
 Pod, switch
DESCRIPTION
Fig. 10: Accessory Switch Bank Module
The Accessory Switch Bank Module (ASBM) is located in the center stack area
of the instrument panel just
below the heater and air conditioner d ...
See also:
Plug, glow
DESCRIPTION
Fig. 26: Glow Plug
Glow plugs are used to help start a cold or cool engine. The glow plugs will
heat up and glow to heat the
combustion chamber of each cylinder. An individual glow ...
Lamp, license plate
REMOVAL
BULB
Fig. 16: License Plate Lamp Bulb Socket
1. Disconnect and isolate the battery negative cable.
2. Remove the license plate lamp from the underside of the liftgate handle and
ligh ...
Installation
FOOT OPERATED PARKING BRAKE LEVER
Fig. 234: FOOT LEVER MOUNTING
1. Position the parking brake lever (1) over the mounting studs, against the
left lower cowl (3).
2. Install the three mounting ...
