Dodge Journey: Reinforcement, bumper, front
REMOVAL

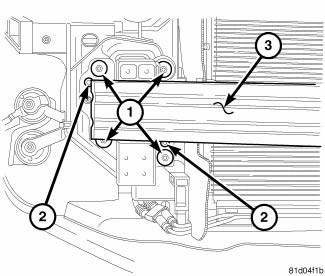
Fig. 23: Front Bumper Reinforcement
1. Remove the front fascia. See Removal .
2. Support bumper reinforcement (3) on a suitable lifting device.
3. Mark the position of the bolts (1) on frame rail to aid in installation.
4. Remove the smaller bolts (2) attaching bumper reinforcement (3) to frame rail.
5. Remove the larger bolts (1) attaching bumper reinforcement (3) to frame rail.
6. Remove bumper reinforcement (3) from vehicle.
INSTALLATION

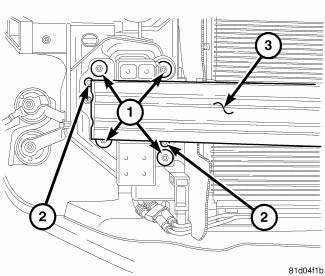
Fig. 24: Front Bumper Reinforcement
1. Position the bumper reinforcement (3) on vehicle.
NOTE: Use marks made previously to properly position bumper reinforcement
2. Install the larger bolts (1) attaching bumper reinforcement (3) to frame rail. Tighten bolts (1) to 28 N.m (250 in. lbs.).
3. Install the smaller bolts (2) attaching bumper reinforcement (3) to frame rail.
4. Install front fascia.
 Fascia, rear
REMOVAL
Fig. 15: Push Pins
1. Open the hatch.
2. Remove the 6 pushpins (1) securing the fascia (2).
Fig. 16: Rivets
3. Remove the rivets (2) and the Torx screw (3) around the wheel well for ...
 Reinforcement, bumper, rear
REMOVAL
Fig. 25: Rear Bumper Reinforcement
1. Remove rear fascia. See Removal .
2. Support bumper reinforcement (1) on a suitable lifting device.
3. Mark position of bolts (2) on frame rail ...
See also:
Diagnosis and testing
ON-BOARD DIAGNOSTIC SYSTEM
The Powertrain Control Module (PCM) monitors critical input and output
circuits of the charging system,
making sure they are operational. A Diagnostic Trouble Code (DTC) ...
CHILL ZONE BEVERAGE COOLER STORAGE COMPARTMENT
The Chill Zone Beverage Cooler Storage Compartment
can keep chilled beverages cool depending on ambient
temperature and climate control setting. Chill Zone is
intended for nonperishable beverages o ...
IF YOUR ENGINE OVERHEATS
In any of the following situations, you can reduce the
potential for overheating by taking the appropriate action.
• On the highways — Slow down.
• In city traffic — While stopped, put the ...
