Dodge Journey: Fascia, rear
REMOVAL

Fig. 15: Push Pins
1. Open the hatch.
2. Remove the 6 pushpins (1) securing the fascia (2).

Fig. 16: Rivets
3. Remove the rivets (2) and the Torx screw (3) around the wheel well for the fascia (1).

Fig. 17: Tabs, Fascia & Bracket
4. Separate the tabs (2) securing the fascia (3) to the bracket (1).

Fig. 18: Tail Light Push Pin
5. Remove the push pin (2) under the taillight (1) to the fascia (3).
6. Remove fascia (3) from vehicle.
INSTALLATION
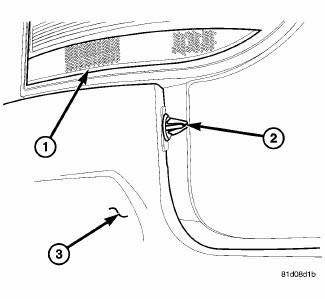
Fig. 19: Tail Light Push Pin
1. Install the fascia (3) to the vehicle and install the pushpin (2) at the tailight (1) to the body.
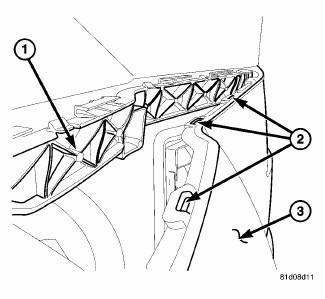
Fig. 20: Tabs, Fascia & Bracket
2. Clip the fascia (3) into the tabs (2) to the bracket (1).
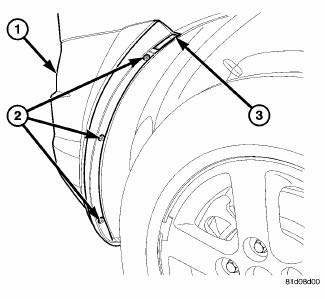
Fig. 21: Rivets
3. Install the Torx screw (3) for the fascia top the wheel opening and then install the pop rivets (2).
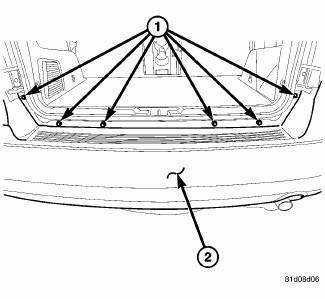
Fig. 22: Push Pins
4. Install the 6 push pins (1) to secure the fascia (2) to the body.
5. Close the hatch and check for fit.
 Fascia, front lower, closeout
REMOVAL
Fig. 11: Lower Fascia
1. Remove fasteners (5) to lower closeout.
Fig. 12: Push Pins - Front Lower Fascia
2. Remove push pins (1) to lower closeout.
3. Remove the front lower fascia.
...
 Reinforcement, bumper, front
REMOVAL
Fig. 23: Front Bumper Reinforcement
1. Remove the front fascia. See Removal .
2. Support bumper reinforcement (3) on a suitable lifting device.
3. Mark the position of the bolts (1) ...
See also:
Module, heated seat
DESCRIPTION
Fig. 35: Locating Heated Seat Module
The heated seat module (2) is located under the driver front seat. It has a
single electrical connector (1) and a
push pin style retainer that s ...
Reinforcement, bumper, front
REMOVAL
Fig. 23: Front Bumper Reinforcement
1. Remove the front fascia. See Removal .
2. Support bumper reinforcement (3) on a suitable lifting device.
3. Mark the position of the bolts (1) ...
Non-monitored circuits
The PCM does not monitor all circuits, systems and conditions that could have
malfunctions causing
driveability problems. However, problems with these systems may cause the PCM to
store diagnosti ...
