Dodge Journey: Monitor, media system
REMOVAL

Fig. 14: Removing / Installing Mounting Fasteners
1. Disconnect and isolate the battery negative cable.
2. Open the video screen to access the mounting fasteners.
3. Remove the mounting fasteners.

Fig. 15: Removing/Installing Video Monitor Connectors
4. If equipped, disconnect the rear heat control connector (1).
5. Disconnect the video monitor connectors (2) and remove the assembly from the vehicle.
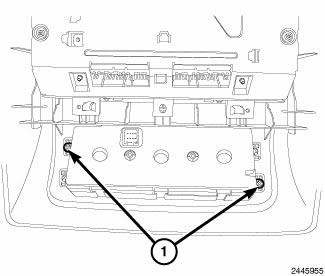
Fig. 16: Fasteners
6. Remove the fasteners (1) and remove the rear A/C and heater control.
INSTALLATION

Fig. 17: Fasteners
1. Install the rear A/C and heater control and the fasteners (1).
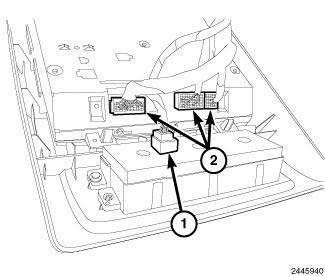
Fig. 18: Removing/Installing Video Monitor Connectors
2. If equipped, connect the rear A/C and heater control connector (1).
3. Connect the video monitor connectors (2).
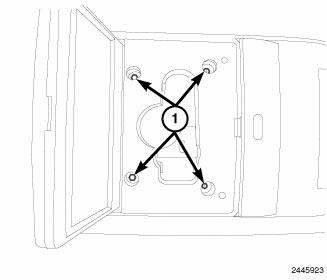
Fig. 19: Removing / Installing Mounting Fasteners
4. Install the mounting fasteners.
5. Connect the battery negative cable.
 Module, satellite video
REMOVAL
1. Disconnect and isolate the negative battery cable.
2. Move the front passenger seat to the most forward position.
Fig. 8: Antenna & Electrical Connectors
3. Disconnect the three ...
 Radio
Radio
STANDARD PROCEDURE
RADIO BACKUP
The radio hard disk drive (HDD) can be backed up to save customer data in the
event that a radio replacement is
required. This procedure can only be done with all ...
See also:
Flexplate
Removal
Fig. 198: Flex Plate
1. Remove transmission.
2. Remove flex plate attaching bolts (2).
3. Remove backing plate (3) and flex plate (1).
Installation
Fig. 199: FLEX PLATE
1. Posit ...
HAZARD WARNING FLASHER
The Hazard Warning flasher
switch is located in the
instrument panel switch bank, above the climate controls.
Press the switch to turn on the Hazard Warning
flasher. When the switch is activated, ...
Disassembly, Assembly
DISASSEMBLY
NOTE: If the reservoir is being replaced, the new reservoir will come
with a brake fluid
level switch installed. The old fluid switch does not need to be transferred
from
the ...
