Dodge Journey: CLIMATE CONTROLS
The Climate Control System allows you to regulate the temperature, amount, and direction of air circulating throughout the vehicle. The controls are located in the center stack of the instrument panel.
Manual Heating and Air Conditioning System
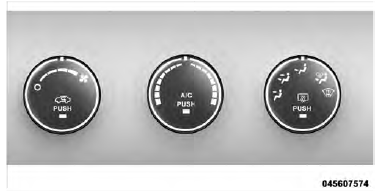
Single-Zone Manual Climate Control
Blower Control
There are four blower speeds. Use this control to regulate the amount of air forced through the system in any mode you select. The blower speed increases as you move the control clockwise from the off position.
NOTE: For vehicles equipped with Remote Start, the climate controls will not function during Remote Start operation if the blower control is left in the “O” (Off) position.
Temperature Control
Use this control to regulate the temperature of the air inside the passenger compartment. Rotating the knob counterclockwise, from top center into the blue area indicates cooler temperatures.
Rotating the knob clockwise, into the red area, indicates warmer temperatures.
NOTE: If your air conditioning performance seems lower than expected, check the front of the A/C condenser (located in front of the radiator), for an accumulation of dirt or insects. Clean with a gentle water spray from behind the radiator and through the condenser.
Fabric front fascia protectors may reduce airflow to the condenser, reducing air conditioning performance.

Mode Control
Mode control allows you to choose from several selections of air distribution.
You can select either a primary mode, as identified by the symbols, or a blend of two of these modes. The closer the control is to a particular mode, the more air distribution you receive from that mode.
Panel Mode
 Air is directed through the
outlets in the instrument
panel. These outlets can be adjusted for direction,
and turned on or off to control airflow.
NOTE: For maximum airflow to the rear, the center instrument panel outlets can be directed toward the rear seat passengers.
Bi-Level Mode
 Air is directed through the
panel and floor outlets.
NOTE: There is a difference in temperature (in any conditions other than full cold or full hot), between the upper and lower outlets for added comfort. The warmer air goes to the floor outlets. This feature gives improved comfort during sunny but cool conditions.
Floor Mode
 Air is directed through the
floor outlets with a
small amount through the defrost and side window
demist outlets.
Mix Mode
 Air is directed through the
floor, defrost and side
window demist outlets. This setting works best in
cold or snowy conditions that require extra heat at
the windshield. This setting is good for maintaining
comfort, while reducing moisture on the windshield.
Defrost Mode
 Air is directed through the
windshield and side
window demist outlets. Use DEFROST mode with
maximum blower and temperature settings for best
windshield and side window defrosting.
NOTE: The air conditioning compressor operates in MIX and DEFROST, or a blend of these modes even if the A/C button is not pressed. This dehumidifies the air to help dry the windshield. To improve fuel economy, use these modes only when necessary.
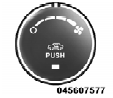
Recirculation Control
 Press this button to choose
between outside air
intake or recirculation of the air inside the
vehicle.Alamp will illuminate when you are in
RECIRCULATION mode. Only use the RECIRCULATION
mode to temporarily block out any outside
odors, smoke, or dust, and to cool the interior rapidly
upon initial start-up in very hot or humid weather.
NOTE:
• If the RECIRCULATION button is pressed when the
system is in MIX, DEFROST, or FLOOR mode the
RECIRCULATION LED indicator will flash 3 times
and then turn off to indicate RECIRCULATION mode
is not allowed.
• Continuous use of the RECIRCULATION mode may make the inside air stuffy and window fogging may occur. Extended use of this mode is not recommended.
• In cold or damp weather, the use of the RECIRCULATION mode will cause windows to fog on the inside because of moisture buildup inside the vehicle. For maximum defogging, select the outside air position.
• In order to prevent fogging, when the RECIRCULATION button is pressed and the mode control is set to PANEL, the A/C will engage automatically.
• The A/C can be deselected manually without disturbing the mode control selection.
Economy Mode
If ECONOMY mode is desired, press the A/C button to
turn off the indicator light and the A/C compressor.
Rotate the temperature control knob to the desired temperature.
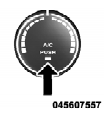
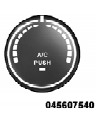
Air Conditioning Operation
Push on this button to engage the Air Conditioning (A/C). A light will illuminate when the A/C System is engaged.
NOTE: The air conditioning compressor will not engage until the engine has been running for about 10 seconds.
Max A/C
For maximum cooling use the A/C and RECIRCULATION mode buttons at the same time.
Three-Zone Manual Air Conditioning and Heating Systems — If Equipped
With the Three-Zone Temperature Control System, each front seat occupant can independently control the Heating, Ventilation, and Air Conditioning operations coming from the outlets on their side of the vehicle.
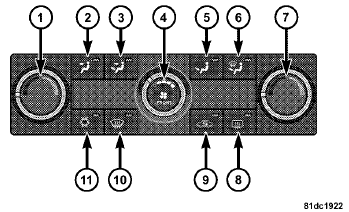
Three-Zone Manual Climate Control
1 — Left Temperature.
7 — Right Temperature.
2 — PANEL.
8 — Rear DEFROST.
3 — BI-LEVEL.
9 — RECIRCULATION.
4 — Front Blower.
10 — Front DEFROST.
5 — FLOOR.
11 — Air Conditioning (A/C).
6 — MIX
The Three-Zone Temperature Control bottom panel controls rear Heating, Ventilation, and Air Conditioning operations.
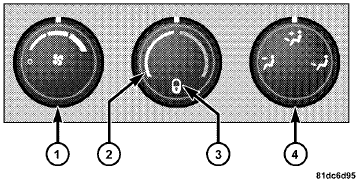
Three-Zone Manual Lower Climate Control (Rear - Zone
Instrument Panel Control)
1 — RR Rear Control ON.
3 — Rear Blower Speed.
2 — Rear Blower OFF.
4 — Rear Temperature.
The primary control for the rear blower is on the front climate control unit located on the instrument panel.
Rear Manual Climate Control (Overhead)
The Three-Zone Temperature Control bottom panel has five positions; off, rear, and a range of blower speeds.
Only when the primary control for the rear blower is in the rear (RR) position do the second row seat occupants have control of the rear blower speed.
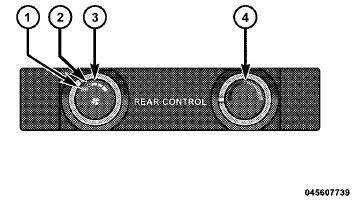
Rear Manual Climate Control (Overhead)
1 — Rear Blower.
3 — Rear Climate Control Lock.
2 — Rear Temperature.
4 — Rear MODE.
Rear Blower Control
The primary control for the rear blower is on the front climate control unit, located on the instrument panel.
Only when the front control for the rear blower is in the RR position do the second row seat occupants have control of the rear blower speed.
The rear blower control, located in the rear overhead console, has an off position and a range of blower speeds.
This allows the second row seat occupants to control the volume of air circulated in the rear of the vehicle.
When the blower knob on the Three-Zone Manual lower Climate Control (Instrument Panel control) is set to any position other than the RR, settings will be controlled by the Instrument Panel lower control.
Rear Temperature Control
To change the temperature in the rear of the vehicle, rotate the temperature control knob counterclockwise for cold air, and clockwise for heated air.
When rear controls are locked by the front system, the lock symbol on the temperature knob is illuminated, and the rear overhead adjustments are inoperable.
The rear airflow modes will mirror the front unit operation.
Rear PANEL mode is automatically selected when the front control is in the PANEL mode. When the front unit is in BI-LEVEL mode, airflow will be emitted from both the upper and lower rear outlets. When the front control is in FLOOR, DEFROST, or MIX modes, airflow will be directed out of the rear floor outlets.
Rear Mode Control
Headliner Mode
 Air comes from the outlets in
the headliner. Each of
these outlets can be individually adjusted to direct
the flow of air. Moving the air vanes of the outlets to one
side will shut off the airflow.
Bi-Level Mode
 Air comes from both the
headliner outlets and the
floor outlets.
NOTE: In many temperature positions, the BI-LEVEL mode is designed to provide cooler air out of the headliner outlets and warmer air from the floor outlets.
Floor Mode
 Air comes from the floor
outlets.
Two- and Three-Zone Automatic Temperature Control (ATC) Systems — If Equipped
• Front Two-and Three-Zone ATC allows both driver and front passenger seat occupant, and rear seat occupants to select individual comfort settings.
• Occupants in the vehicle select AUTO mode operation by a button press on the right rotary knob and a comfort temperature setting using rotary knobs on the control unit.
• The system can be controlled manually, if desired.
• SYNC feature links the controls for all three zones, allowing one comfort setting for the cabin, if desired.
The Two- and Three-Zone ATC System automatically maintain the interior comfort level desired by the driver and all passengers. The system automatically adjusts the air temperature, the airflow volume, amount of outside air recirculation and the airflow direction. This maintains a comfortable temperature, even under changing conditions.
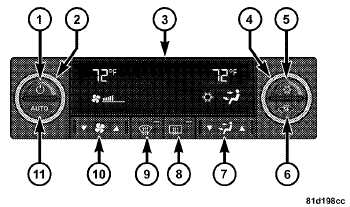
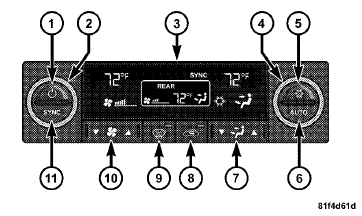
Two-Zone ATC
1 — System On/Off.
7 — Front MODE.
2 — Left Front Temperature.
8 — Electric Rear Window Defroster Button.
3 — Display Screen.
9 — Front DEFROST.
4 — Right Front Temperature.
10 — Front Blower Speed.
5 — Air Conditioning (A/C) On/Off.
11 — AUTO Mode / Blower.
6 — RECIRCULATE.
Three-Zone ATC
1 — System On/Off.
7 — Front MODE.
2 — Left Front Temperature.
8 — RECIRCULATE.
3 — Display Screen.
9 — Front DEFROST.
4 — Right Front Temperature.
10 — Front Blower Speed.
5 — Air Conditioning (A/C) On/Off.
11 — SYNC.
6 — AUTO Mode / Blower.
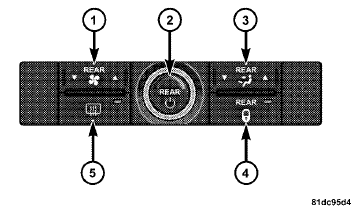
Three-Zone ATC Lower Control Panel
1 — Rear Blower Speed.
4 — Rear ATC Lock.
2 — Rear Temperature / Rear System On/Off.
5 — Rear DEFROST.
3 — Rear MODE.
Automatic Operation
1. Press the AUTO button on the Front Upper ATC Panel and the word AUTO will illuminate in the front ATC display, along with three temperatures for driver, front passenger, and rear seats. The system will then automatically regulate the amount of airflow.
2. Next, adjust the temperature you would like the system to maintain, by adjusting the driver, front passenger, and rear seat rotary temperature knobs. Once the desired temperature is displayed, the system will achieve and automatically maintain that comfort level.
3. When the system is set up for your comfort level, it is not necessary to change the settings. You will experience the greatest efficiency by simply allowing the system to function automatically.
NOTE:
• It is not necessary to move the temperature settings for
cold or hot vehicles. The system automatically adjusts
the temperature, mode and fan speed to provide
comfort as quickly as possible.
• The temperature can be displayed in English or Metric units by selecting the “Display Units of Measure in” customer-programmable feature. Refer to the “Electronic Vehicle Information Center (EVIC)—Customer- Programmable Features” in this Section.
To provide you with maximum comfort in the automatic mode, during cold start-ups, the blower fan will remain on low and the DELAY symbol will appear in the front ATC display, until the engine warms up. The fan will engage immediately if the DEFROST mode is selected, or by pressing the Front Upper ATC Panel blower rocker button and setting the fan to any fixed blower speed.
Manual Operation
This system offers a full complement of manual override features. The AUTO symbol in the front ATC display will be turned off when the system is being used in the manual mode.
NOTE: Each of these features operate independently from each other. If any one feature is controlled manually, the temperature doors will continue to operate automatically.
The blower fan speed can be set to any fixed speed by pressing the Front Upper ATC Panel blower rocker button. The fan will now operate at a fixed speed until additional speeds are selected. This allows the front occupants to control the volume of air circulated in the vehicle and cancel the AUTO mode.
The operator can also select the direction of the airflow by selecting one of the following positions.
Panel Mode
 Air is directed through the
outlets in the instrument
panel. These outlets can be adjusted for direction,
and turned on or off to control airflow.
NOTE: For maximum airflow to the rear, the center instrument panel outlets can be directed toward the rear seat passengers.
Bi-Level Mode
 Air comes from the instrument
panel outlets, floor
outlets and defrost outlets. A slight amount of air is
also directed through the side window demister outlets.
NOTE: In many temperature positions, the BI-LEVEL mode is designed to provide cooler air out of the panel outlets and warmer air from the floor outlets.
Floor Mode
 Air comes from the floor
outlets. Aslight amount of
air is directed through the defrost and side window
demister outlets.
Mix Mode
 Air comes from the floor,
defrost and side window
demist outlets. This mode works best in cold or
snowy conditions. It allows you to stay comfortable,
while keeping the windshield clear.
Defrost Mode
 Air comes from the windshield
and side window
demist outlets. Use DEFROST mode with maximum
blower and temperature settings for best windshield
and side window defrosting.
NOTE: While operating in the other modes, the system will not automatically sense the presence of fog, mist or ice on the windshield. DEFROST mode must be manually selected to clear the windshield and side glass.
 The SNOWFLAKE button, or A/C
button, allows
the operator to manually activate or deactivate the
air conditioning system. When in SNOWFLAKE
mode, and the ATC display is on cool, dehumidified air
flows through the air outlets. If ECONOMY mode is
desired, press the SNOWFLAKE button to turn off the
SNOWFLAKE mode in the ATC display, and deactivate
the A/C system.
NOTE:
• If the system is in Mix or Defrost Mode, the SNOWFLAKE
can be turned off, but the A/C system shall
remain active to prevent fogging of the windows.
• If fog or mist appears on the windshield or side glass, select DEFROST mode and increase blower speed.
Recirculation Control
 When outside air contains smoke,
odors, or
high humidity, or if rapid cooling is desired,
you may wish to recirculate interior air by
pressing the RECIRCULATION mode control
button. RECIRCULATION mode should only be used
temporarily. The recirculation symbol will illuminate in
the display when this button is selected. Push the button
a second time to turn off the RECIRCULATION mode
LED and allow outside air into the vehicle.
NOTE: In cold weather, use of the RECIRCULATION mode may lead to excessive window fogging. The RECIRCULATION mode is not allowed in the FLOOR, MIX and DEFROST modes to improve window clearing operation.
Recirculation will be disabled automatically if these modes are selected.
Rear Automatic Temperature Control (ATC) — If Equipped
The Rear ATC System has floor air outlets at the rear of the right side sliding door, and overhead outlets at each outboard rear seating position. The system provides heated air through the floor outlets or cool, dehumidified air through the headliner outlets.
The Three-Zone ATC Climate control for the Rear ATC System is on the front lower ATC panel located on the instrument panel.
Pressing the REAR LOCK button for the Rear ATC System from the Three-Zone ATC Climate control, illuminates a LOCK symbol in the rear display. The rear temperature and air source are controlled from the Three- Zone ATC Climate control.
Rear second row occupants can only adjust the rear ATC control when the REAR LOCK button is turned off.
The Three-Zone ATC Climate control is located in the headliner, near the center of the vehicle.
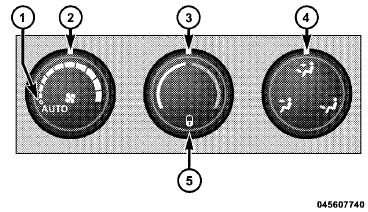
Rear-Zone ATC
1 — AUTO.
4 — Rear MODE.
2 — Blower Speed.
5 — REAR LOCK.
3 — Rear Temperature.
The Rear-Zone ATC for the rear passengers is in the overhead console above the second row passenger seats.
1. Press the REAR LOCK button on the front lower ATC panel. This turns off the REAR LOCK icon in the rear temperature knob.
2. Rotate the Rear Blower, Rear Temperature and the Rear Mode Control knobs to suit your comfort needs.
3. ATC is selected by adjusting the rear blower knob counterclockwise to AUTO.
Once the desired temperature is displayed, the ATC System will automatically achieve and maintain that comfort level. When the system is set up for your comfort level, it is not necessary to change the settings. You will experience the greatest efficiency by simply allowing the system to function automatically.
NOTE:
• It is not necessary to move the temperature settings for
cold or hot vehicles. The system automatically adjusts
the temperature, mode and fan speed to provide
comfort as quickly as possible.
• The temperature can be displayed in English or Metric units by selecting the “Display Units of Measure in” customer-programmable feature. Refer to the “Electronic Vehicle Information Center (EVIC)—Customer- Programmable Features” in this Section.
Rear Blower Control
The rear blower control knob can be manually set to off, or any fixed blower speed, by rotating the knob from low to high. This allows the rear seat occupants to control the volume of air circulated in the rear of the vehicle.
CAUTION:
Interior air enters the Rear Automatic Temperature
Control System through an intake grille, located in
the passenger side trim panel behind the third row
seats. The heater outlets are located in the passenger
side trim panel, just behind the sliding door. Do not
block or place objects directly in front of the inlet
grille or heater outlets. The electrical system could
overload causing damage to the blower motor.
Rear Temperature Control
To change the temperature in the rear of the vehicle, rotate the temperature knob counterclockwise to lower the temperature, and clockwise to increase the temperature.
The REAR temperature settings are displayed in the front upper ATC panel.
When rear controls are locked by the front system, the LOCK symbol on the temperature knob is illuminated and any rear overhead adjustments are ignored.
Rear Mode Control
Auto Mode
The rear system automatically maintains the correct mode and comfort level desired by the rear seat occupants.
Headliner Mode
 Air comes from the outlets in
the headliner. Each of
these outlets can be individually adjusted to direct
the flow of air. Moving the air vanes of the outlets to one
side will shut off the airflow.
Bi-Level Mode
 Air comes from both the
headliner outlets and the
floor outlets.
NOTE: In many temperature positions, the BI-LEVEL mode is designed to provide cooler air out of the headliner outlets and warmer air from the floor outlets.
Floor Mode
 Air comes from the floor
outlets.
Operating Tips
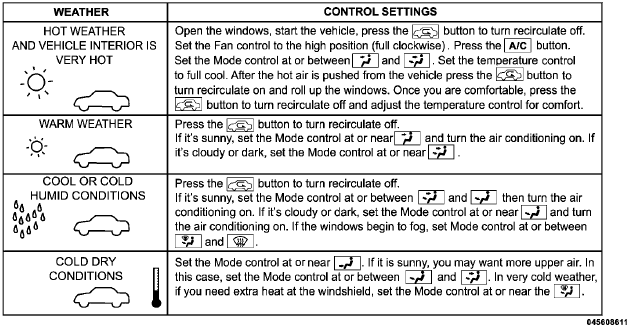
NOTE: Refer to the chart at the end of this section for suggested control settings for various weather conditions.
Summer Operation
The engine cooling system in air-conditioned vehicles must be protected with a high-quality antifreeze coolant to provide proper corrosion protection and to protect against engine overheating. Refer to “Cooling System” under “Maintenance Procedures” and to “Fluids, Lubricants, and Genuine Parts” in “Maintaining Your Vehicle” for information pertaining to the cooling system and coolant selection.
Winter Operation
Use of the air Recirculation mode during Winter months is not recommended because it may cause window fogging.
Vacation Storage
Anytime you store your vehicle, or keep it out of service (i.e., vacation) for two weeks or more, run the air conditioning system at idle for about five minutes in the fresh air and high blower settings. This will ensure adequate system lubrication to minimize the possibility of compressor damage when the system is started again.
Window Fogging
Interior fogging on the windshield can be quickly removed by turning the mode selector to Defrost. The Defrost/Floor mode can be used to maintain a clear windshield and provide sufficient heating. If side window fogging becomes a problem, increase blower speed.
Vehicle windows tend to fog on the inside in mild but rainy or humid weather.
NOTE: Recirculate without A/C should not be used for long periods as fogging may occur.
Side Window Demisters
A side window demister outlet is located at each end of the instrument panel. These non-adjustable outlets direct air toward the side windows when the system is in the Floor, Mix, or Defrost mode. The air is directed at the area of the windows through which you view the outside mirrors.
Outside Air Intake
Make sure the air intake, located directly in front of the windshield, is free of obstructions such as leaves. Leaves collected in the air intake may reduce airflow, and if they enter the plenum, they could plug the water drains. In Winter months, make sure the air intake is clear of ice, slush, and snow.
A/C Air Filter — If Equipped
The A/C Air Filter will reduce, but not eliminate, diesel and agricultural smells. The filter acts on air coming from outside the vehicle and recirculated air within the passenger compartment. Refer to “Maintenance Procedures” in “Maintaining Your Vehicle” for A/C Air Filter service information or see your authorized dealer for service.
Refer to “Maintenance Schedules” for filter service intervals.
Control Setting Suggestions for Various Weather Conditions
 RADIO OPERATION AND CELLULAR PHONES
Under certain conditions, the cellular phone being on in
your vehicle can cause erratic or noisy performance from
your radio. This condition may be lessened or eliminated
by relocating the cellular ...

See also:
Diagnosis and Testing
LAMPS/LIGHTING - EXTERIOR
WARNING: To avoid serious or fatal injury on vehicles equipped
with airbags, disable
the Supplemental Restraint System (SRS) before attempting any steering
...
Module, glow plug
DESCRIPTION
Fig. 23: Locating Diesel Glow Plug Control Module
The glow plug control module is mounted to the fuel filter/water separator
bracket, and is controlled by the
engine control module. ...
Standard procedure
MODULE/PROGRAMMING ORDER REPLACEMENT GUIDE
MODULE PROGRAMMING
The Wireless Ignition Node (WIN) controls the Vehicle Theft Security System (VTSS),
Remote Keyless Entry
(RKE). When a Powertrain ...
