Dodge Journey: OVERHEAD CONSOLE
The overhead console contains courtesy/reading lights, storage for sunglasses, an interior observation mirror and an optional power sunroof switch.
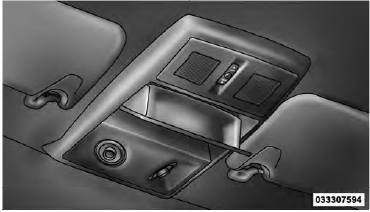
Overhead Console
Courtesy/Reading Lights
Refer to “Lights/Courtesy/Reading Lights” in “Understanding the Features of Your Vehicle” for further information.
Sunglasses Storage
To access the storage compartment, press on the raised bars on the compartment door in the center of the console and release and the door will swing downward.
Interior Observation Mirror
The convex interior observation mirror provides the driver and front seat passenger a wide field of view to conveniently view passengers sitting in the rear passenger seats. To use the interior observation mirror, press on the raised bars on the compartment door and release (the door will swing downward), then raise the door until it is almost closed and release. The door will latch in position to use the interior observation mirror.
Power Sunroof Switch — If Equipped
Refer to “Power Sunroof” in “Understanding the Features of Your Vehicle” for further information.
 PARKVIEW REAR BACK UP CAMERA — IF
EQUIPPED
PARKVIEW REAR BACK UP CAMERA — IF
EQUIPPED
Your vehicle may be equipped with the ParkView Rear
Back Up Camera that allows you to see an on-screen
image of the rear of your vehicle whenever the shift lever
is put into REVERSE. The image will ...
 GARAGE DOOR OPENER — IF EQUIPPED
HomeLink replaces up to three remote controls (handheld
transmitters) that operate devices such as garage
door openers, motorized gates, lighting or home security
systems. The HomeLink unit operate ...
See also:
Relay, heater unit
DESCRIPTION
Fig. 320: Standard ISO-Type Relay
Three relays (1) are used for the electric positive temperature coefficient (PTC)
heater system when equipped
with the 2.0L diesel engine. The rela ...
Disassembly
Fig. 10: Drain Plug
1. Remove drain plug (1) and allow transmission oil to drain.
Fig. 11: Back-Up Lamp Switch
2. Remove backup lamp switch (1).
Fig. 12: Shift Cable Bracket
3. Remove the b ...
Installation
CAUTION: To prevent damage to the plastic evaporator tube bracket,
carefully guide
the heater core tubes past the bracket during installation of the heater
core.
Fig. 278: Re ...
