Dodge Journey: Mechanism, gearshift
REMOVAL

Fig. 193: Shift Cables To Shifter
1. Detach gear shift boot from console.
2. Remove the center console assembly.
3. Remove rear power window switch (if equipped) and disconnect harness from console.
4. Remove cables (2) from shift levers (3).
5. Remove the cables (1) from the bracket (5).

Fig. 194: Manual Transaxle Shifter
6. Remove the shifter assembly nuts (2) and remove shifter (3) from vehicle.
INSTALLATION
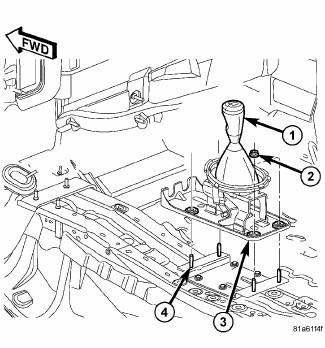
Fig. 195: Manual Transaxle Shifter
1. Install shifter assembly (3), Install and tighten nuts (2) to 7 N.m (61 in. lbs.).
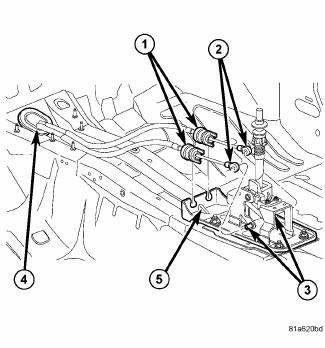
Fig. 196: Shift Cables To Shifter
2. Install cables (2) to shifter levers (3) and secure cable to shifter bracket (5).
3. Install center console assembly.
4. Install rear power window switch (if equipped) and fasten harness to console
5. Attach gearshift boot to center console assembly.
6. Verify that shift pattern is aligned properly.
 Lever, shift
REMOVAL
Fig. 183: Air Cleaner And Inlet Tube
Remove the engine cover.
1. Disconnect battery negative cable.
2. Remove air inlet tube (2) and air cleaner assembly (4).
Fig. 184: Nut Crosso ...
 Seal, axle drive shaft
REMOVAL
Fig. 197: Axle Shaft Seal Removal
1. Remove axle shaft.
2. Insert a flat-blade pry tool (2) at outer edge of axle shaft seal (1).
3. Tap on the pry tool (2) with a small hammer and ...
See also:
Disassembly
Fig. 200: Snap Ring At Output Shaft Case Bearing
1. Remove the snap ring (2) from the output shaft.
Fig. 201: Output Shaft Case Bearing And Gear
2. Use Bearing Splitter P-334 (3), Cage 8925-3 ( ...
Grid, defogger, rear
STANDARD PROCEDURE
GRID LINE AND TERMINAL REPAIR
WARNING: Materials contained in the Repair Kit (Part Number
04549275) may cause
skin or eye irritation. The kit contains epoxy resin an ...
Link, stabilizer bar
REMOVAL
1. Raise and support the vehicle.
Fig. 60: TIRE AND WHEEL MOUNTING
2. Remove the wheel mounting nuts (3), then the tire and wheel assembly (1).
Fig. 61: Strut Mounting To Knuckle
3. W ...
