Dodge Journey: Input shaft, transmission
DISASSEMBLY
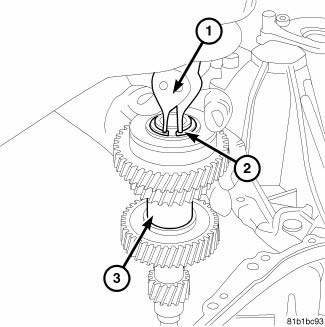
Fig. 175: Snap Ring At Input Shaft
1. Remove the snap ring (2) that retains the input shaft bearing and sixth gear to the shaft.
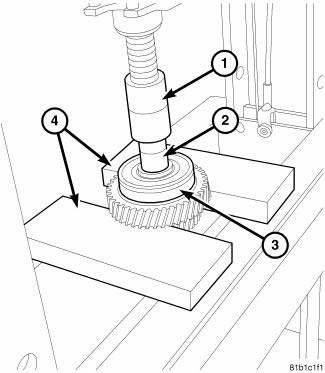
Fig. 176: Press Bearing From Input Shaft
2. Using a press (1) and steel blocks (4) remove sixth gear and the bearing (3) from the shaft.
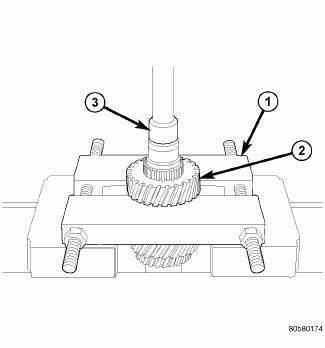
Fig. 177: Input 3rd Gear
3. Using a Press (3) and the Bearing Splitter 1130 (1) remove third gear (2) from shaft.
4. Remove the spacer.
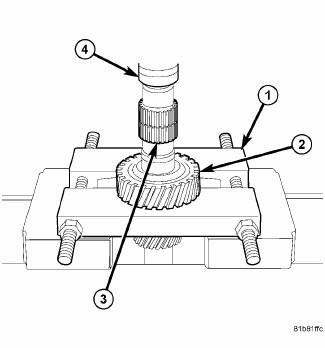
Fig. 178: Fourth Gear Off Input Shaft
5. Using a Press (3) and the Bearing Splitter 1130 (1) remove forth gear (2) from shaft.
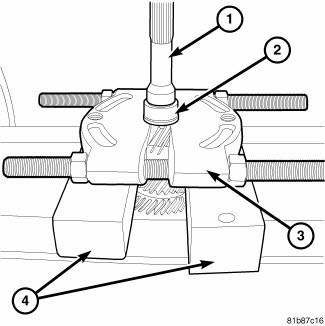
Fig. 179: Input Shaft Bearing Race
6. Using a Press and the Bearing Splitter 1130 (3) remove the input shaft bearing race (2).
ASSEMBLY
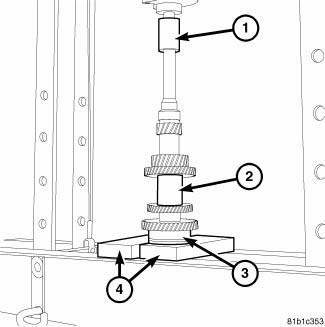
Fig. 180: Bearing On Input Shaft
1. Using a press (1) and steel blocks (4) install third gear and the bearing (3) onto the shaft.
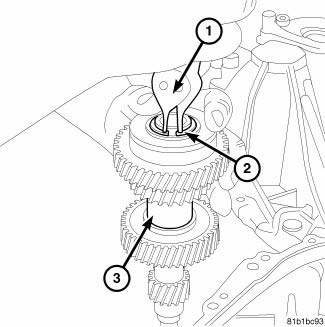
Fig. 181: Snap Ring At Input Shaft
2. Install the new snap ring (2) that retains the input shaft bearing and third gear to the shaft.
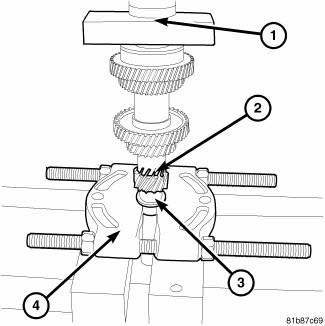
Fig. 182: Install Input Shaft Bearing Race
3. Using Bearing Splitter 1130 (4) and a Press (1) install the input shaft bearing race (3) onto the input shaft (2).
 Fluid
Fluid
STANDARD PROCEDURE
FLUID LEVEL CHECKING
The fluid required for this transaxle is Mopar ATF+4 (Automatic Transmission
Fluid). Use of improper or
substitute fluids can cause shift problems and/or t ...
 Lever, shift
REMOVAL
Fig. 183: Air Cleaner And Inlet Tube
Remove the engine cover.
1. Disconnect battery negative cable.
2. Remove air inlet tube (2) and air cleaner assembly (4).
Fig. 184: Nut Crosso ...
See also:
Switch, horn
REMOVAL
WARNING: On vehicles equipped with an airbag, refer to Restraint
SERVICE
INFORMATION article for warnings and cautions before servicing the horn
switch.
Fig. 3: Remov ...
TO OPEN AND CLOSE THE HOOD
Two latches must be released to open the hood.
1. Pull the hood release lever located under the left side
of the instrument panel.
Hood Release
2. Outside of the vehicle, locate the safety latch ...
Adjustments
NOTE: Perform all differential bearing preload measurements with the
transfer shaft
and gear removed.
DIFFERENTIAL BEARING PRELOAD ADJUSTMENT USING EXISTING SHIM
Fig. 348: Installing Too ...
