Dodge Journey: Assembly
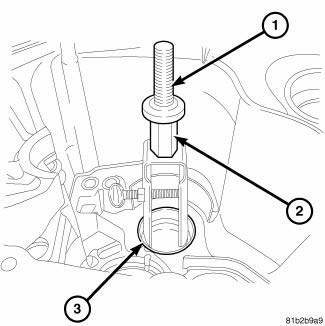
Fig. 65: Remove Input Shaft Bearing Cup
NOTE: Always use ATF on all moving parts during this assembly procedure.
1. Use Bearing Cup Remover 9664 (2) and appropriate Slide Hammer (1) to remove the output shaft #2 tapered bearing cup (3) from the transmission rear case.
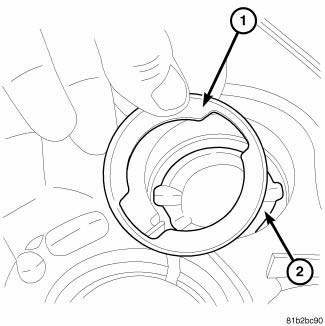
Fig. 66: Compounder Shaft Bearing Cup Shim
2. Remove the output shaft #2 bearing cup shim (1) from the transmission rear case (2).
NOTE: A turning torque will determine the correct shim to be installed. This can be found at the end of the assembly procedure.
3. Install the correct output shaft #2 bearing cup shim into the transmission case.
Fig. 67: Installing Output Shaft #2 Bearing Cup
4. Install the output shaft #2 bearing cup (3) into the transmission rear case using Handle C-4171 and Seal/Cup Installer L-4520.
Fig. 68: Bearing Cup Remover & Output Shaft #2 Bearing Cup
5. Remove the output shaft #2 bearing cup (3) using Bearing Cup Remover 9664 (2) and appropriate slide hammer (1).
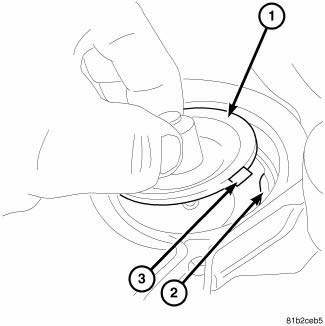
Fig. 69: Input Shaft Oil Slinger
6. Remove the oil slinger (1) under the output shaft # 2 cup on the bellhousing side.
7. Install the oil slinger (1) in the case (2) for the compounder shaft bearing cup on the bellhousing side, insure the tab (3) is lined up with cutout in case (2).
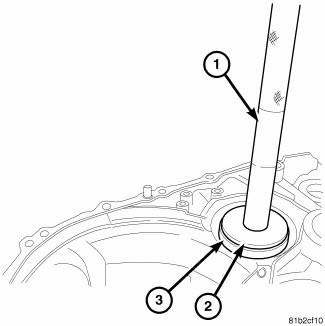
Fig. 70: Compounder Shaft Bearing Cup
8. Use Handle C-4171 and Bearing Cup Installer D-144, inverted to install the compounder shaft cup on the bellhousing side case.
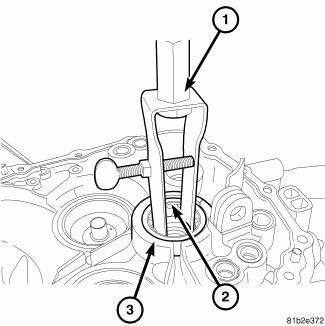
Fig. 71: Input Shaft Case Bearing & Bearing Cup Remover
9. Remove the input shaft case bearing (3) (bellhousing side) using Bearing Cup Remover 7794-A (1) and appropriate slide hammer.
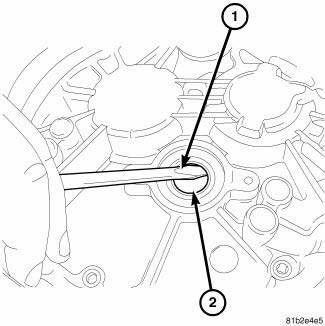
Fig. 72: Remove Input Shaft Seal
10. Using a screwdriver (1) remove the input shaft seal (2).
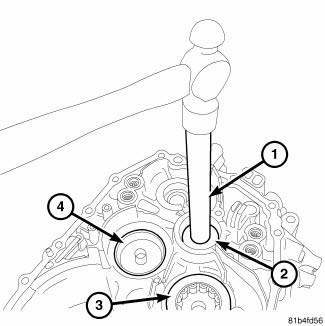
Fig. 73: Install Input Shaft Oil Seal
11. Using handle C-4171 and Installer 9935 (2) install the new input shaft oil seal.
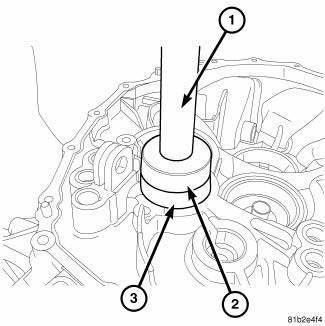
Fig. 74: Install Input Shaft Case Bearing
12. Install the input shaft case bearing (2) using Handle C-4171 (1) and Bearing Installer C-4657 (2).

Fig. 75: Remove Output Shaft Bearing From Case
13. Using Bearing Cup Remover 7794-A (2) and appropriate slide hammer (1) remove the output shaft #1 bearing (3) from the case (1).
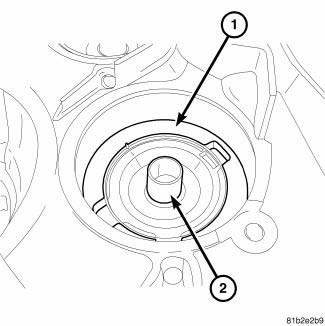
Fig. 76: Output Shaft Oil Slinger
14. Remove the output shaft oil slinger (2) from case.
15. Install the output shaft oil slinger (2) into the case , insure the tab (3) is lined up with cutout in case (2).
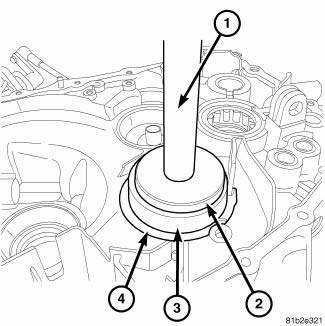
Fig. 77: Install Output Bearing To Case
16. Using Handle C-4171 (1) and Bearing Installer C- 4308 inverted (2) install output bearing (3) to case (4).
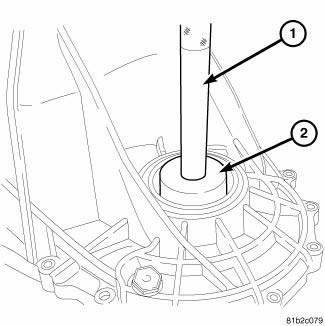
Fig. 78: Handle & Bearing Cup Installer
17. Remove the case side differential bearing cup using Handle C-4171 (1) and Bearing Cup Installer 9589 (2), inverted.
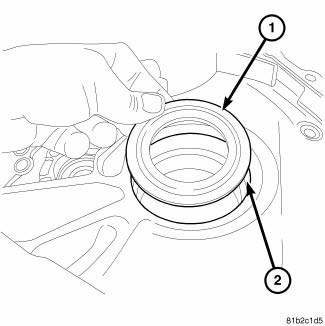
Fig. 79: Differential Bearing Cup Shim
18. Remove the case side differential bearing cup shim (1).
NOTE: The case side differential bearing cup shim (1) will be left out to find end play then installed to check turning torque later in the assembly procedure. DIFFERENTIAL BEARING PRELOAD ADJUSTMENT
19. Install the correct case side differential bearing cup shim (1).
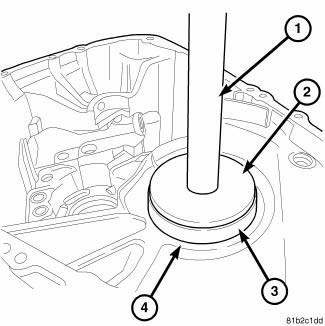
Fig. 80: Install Differential Bearing Cup
20. Install the case side differential bearing cup (3) using Handle C-4171 (1) and Bearing Cup Installer D-111 (2).
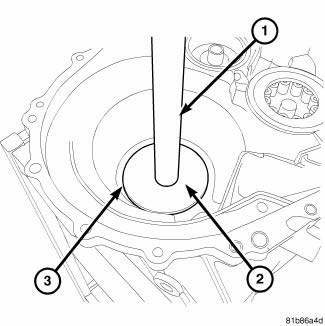
Fig. 81: Bell Housing Side Differential Bearing Cup
21. Install the bellhousing side differential bearing cup (3) using Handle C-4171 (1) and Bearing Cup Installer D-111 (2) on FWD transmissions and Bearing Cup Installer 8151 (2) on AWD transmissions.
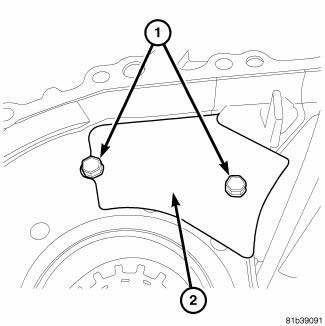
Fig. 82: Oil Baffle
22. Install oil baffle (2) and bolts (1), tighten bolts to 9 N.m (80 in. lbs.).
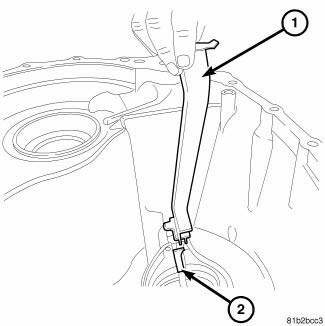
Fig. 83: Oil Feed Trough
23. Install the oil feed trough (1) into the case (2).
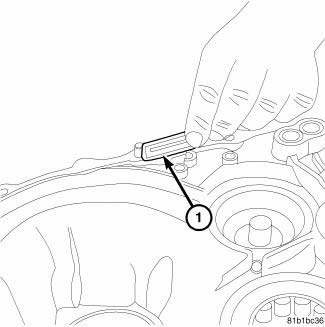
Fig. 84: Magnet
24. Install the magnet (1) into the case.

Fig. 85: Differential
25. Install the differential (1) into the case (5).
26. Verify differential bearing preload and turning torque.
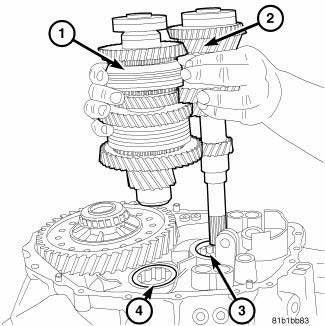
Fig. 86: Output & Input Shafts
27. Install the output # 1 (1) and input shaft (2) into case together.
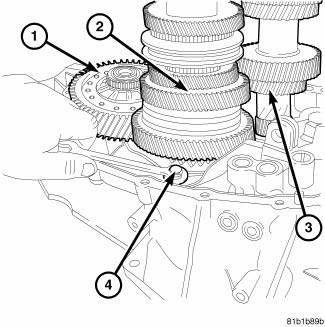
Fig. 87: Bolt At Output Shaft
28. Install the output shaft (2) hold down bolt (4) and tighten to 11 N.m (97 in. lbs.).
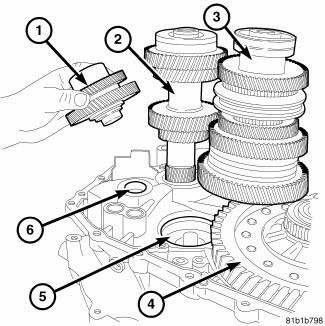
Fig. 88: Reverse Idler Gear
29. Install the reverse idler gear assembly (1) into the case (2).
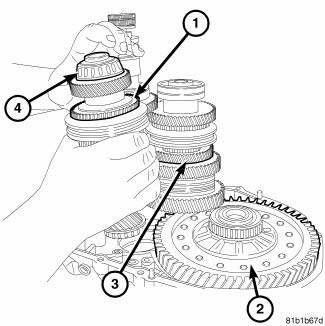
Fig. 89: Output Shaft #2
30. Install the output shaft # 2 (4) into case.
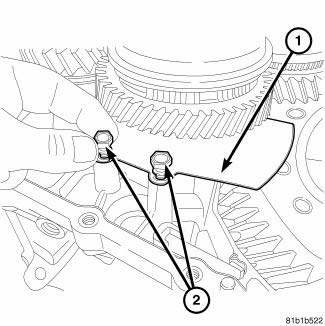
Fig. 90: Oil Slinger
31. Install the oil slinger (1) and bolts (2) tighten the bolts to 9 N.m (80 in. lbs.).
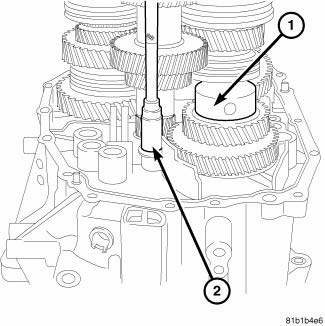
Fig. 91: Bolt At Reverse Idler Gear
NOTE: Clock the reverse idler (1) with hole as shown in illustration for installation of anti-rotation bolt.
32. Install the reverse idler gear (1) hold down bolt (2) and tighten to 11 N.m (97 in. lbs.).
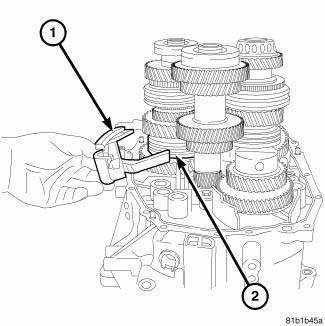
Fig. 92: First & Second Gear Shift Fork & Synchronizer
33. Install the first and second gear shift fork (1) onto the first and second gear synchronizer (2).

Fig. 93: Third & Fourth Gear Shift Fork & Synchronizer
34. Install the third and fourth gear shift fork (1) onto the third and fourth gear synchronizer.
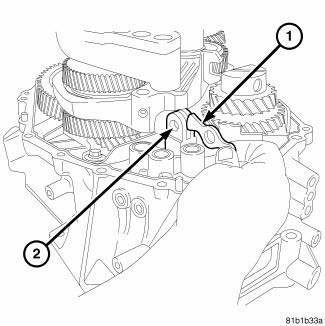
Fig. 94: Shift Rail Pivot Bracket
35. Install the shift rail arm (1) onto the stand (2).
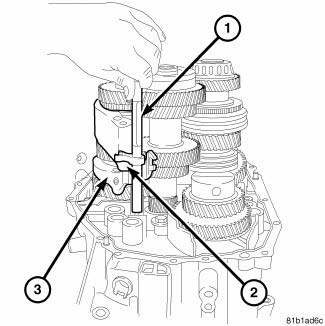
Fig. 95: Pivot Shaft
36. Install the pivot shaft (1) into the case.
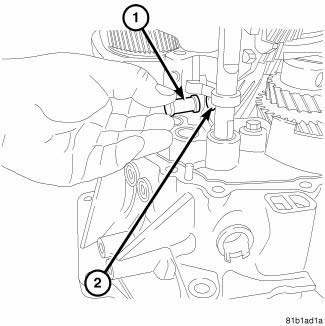
Fig. 96: Shift Rail Pin
37. Install the shift rail bracket pivot pin (1) and the new pivot pin E-clip (2).
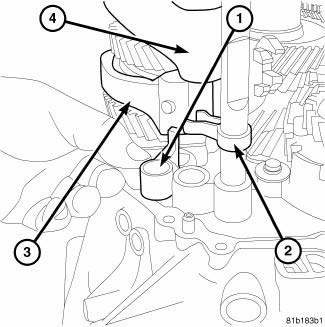
Fig. 97: Third & Fourth Gear Shift Bracket
38. Install the third and fourth gear shift bracket (1).
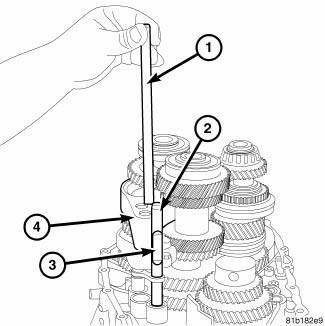
Fig. 98: Third & Fourth Gear Shift Rail
39. Install the third and fourth gear shift rail (1) into the case and shift fork (4).

Fig. 99: Roll Pin At Third & Fourth Gear Shift Rail
40. Install the new roll pin at the third and fourth gear shift rail.
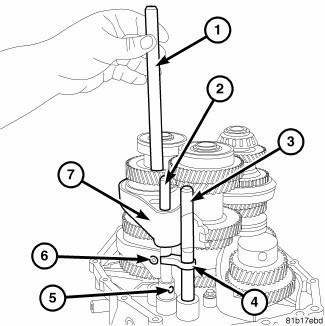
Fig. 100: First & Second Gear Shift Rail
41. Install the first and second gear shift rail (1).
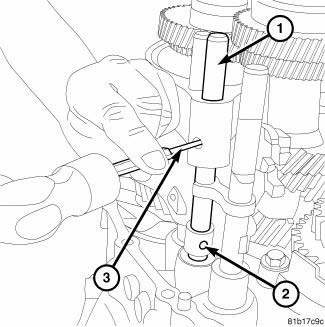
Fig. 101: Roll Pin At Third & Fourth Gear Shift Fork To Rail
42. Install the new roll pin at the third and fourth gear shift fork to rail (1).
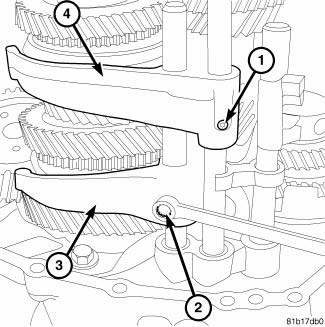
Fig. 102: First & Second Gear Shift Fork To Rail Bolt
43. Install the new bolt (2) holding the first and second gear shift fork (3) to the rail and tighten to 20 N.m (177 in. lbs.).
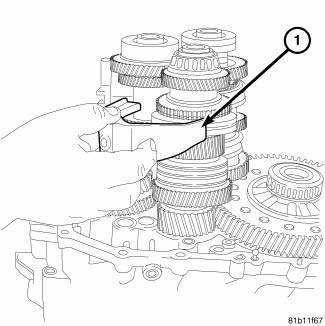
Fig. 103: Fifth & Sixth Gear Shift Fork
44. Install the fifth and sixth gear shift fork (2).
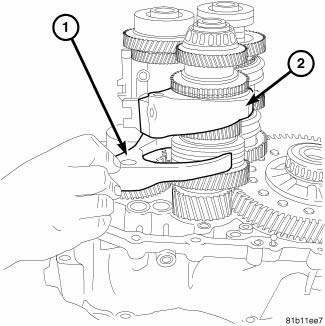
Fig. 104: Reverse Gear Shift Fork
45. Install the reverse gear shift fork (1).
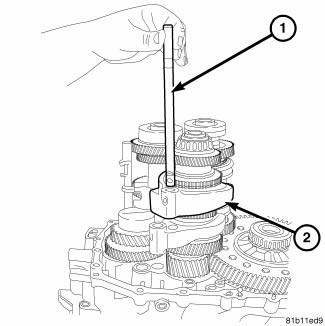
Fig. 105: Fifth & Sixth Gear Shift Rail
46. Install the fifth and sixth gear shift rail (1) into the case and shift fork (2).
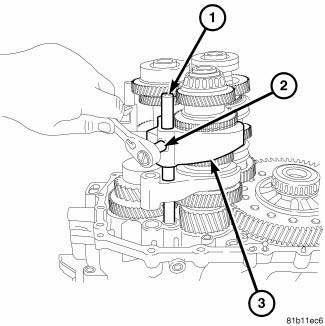
Fig. 106: Fifth & Sixth Gear Shift Fork & Shift Rail Bolt
47. Install the new bolt (2) holding the fifth and sixth gear shift fork (3) to the fifth and sixth gear shift rail (1) and tighten to 20 N.m (177 in. lbs.).
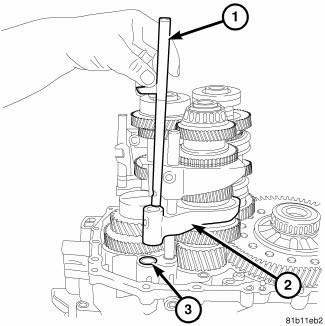
Fig. 107: Reverse Shift Rail
48. Install the reverse shift rail (1) into the case (3) and shift fork (2).
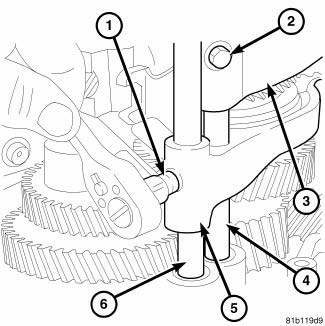
Fig. 108: Reverse Shift Fork To Shift Rail Bolt
49. Install the new bolt (1) holding the reverse shift fork (5) to the reverse shift rail (6) and tighten to 20 N.m (177 in. lbs.).
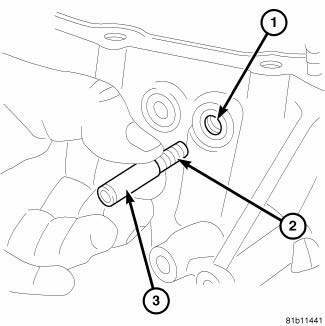
Fig. 109: Third & Fourth Gear Shift Rail Detent Spacer & Spring
50. Install third and fourth gear shift rail detent ball.
51. Install third and fourth gear shift rail detent spacer (3) and spring (2).
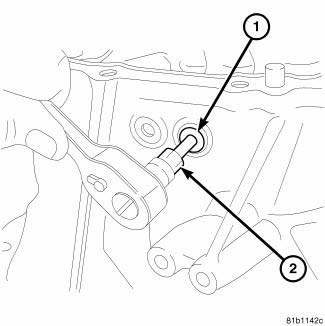
Fig. 110: Third & Fourth Gear Shift Rail Detent Plug
52. Install a new third and fourth gear shift rail detent plug (1) and tighten to 22 N.m (195 in. lbs.).
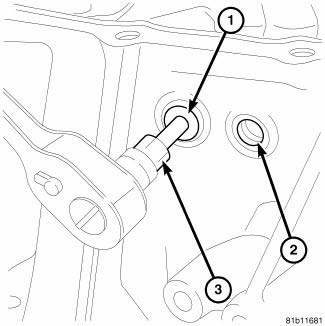
Fig. 111: First & Second Gear Shift Rail Detent Spacer & Spring
53. Install first and second gear shift rail detent ball.
54. Install first and second gear shift rail detent spacer and spring.
55. Install a new first and second gear shift rail detent plug (1) and tighten to 22 N.m (195 in. lbs.).
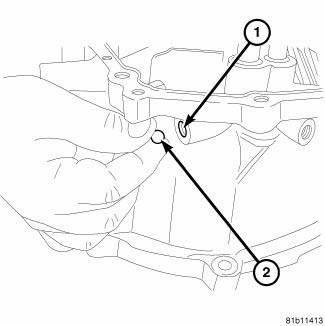
Fig. 112: Reverse Shift Rail Detent Ball
56. Install the reverse shift rail detent ball (2).
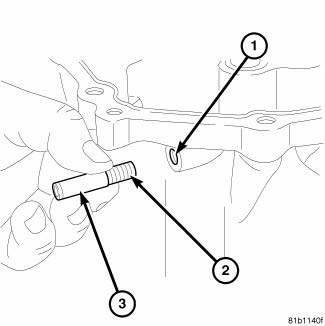
Fig. 113: Reverse Shift Rail Detent Spacer & Spring
57. Install the reverse shift rail detent spacer (3) and spring (2).
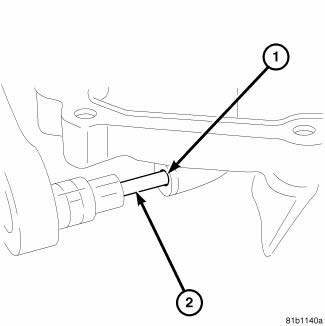
Fig. 114: Reverse Shift Rail Detent Plug
58. Install a new reverse shift rail detent plug (1) and tighten to 22 N.m (195 in. lbs.).

Fig. 115: Fifth & Sixth Gear Shift Rail Detent Ball
59. Install fifth and sixth gear shift rail detent ball (2).
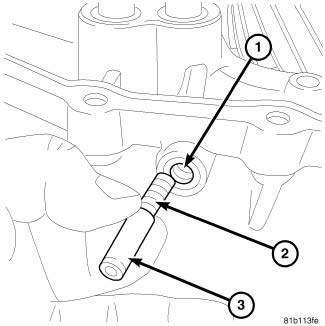
Fig. 116: Fifth & Sixth Gear Shift Rail Detent Spacer & Spring
60. Install fifth and sixth gear shift rail detent spacer (3) and spring (2).
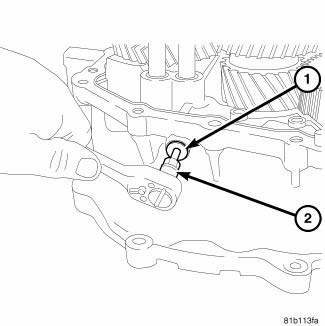
Fig. 117: Fifth & Sixth Gear Shift Rail Detent Plug
61. Install a new fifth and sixth gear shift rail detent plug (1) and tighten to 22 N.m (195 in. lbs.).
Fig. 118: Flat Surface Of Case Mating Flange
62. If this is the final assembly draw a bead (1) of MOPAR Gasket Maker, Loctite 518, or equivalent, on the flat surface of the case mating flange (2).
Fig. 119: Transmission Case Half & Clutch Housing
63. Install the transmission case half (1) onto the clutch housing (2).
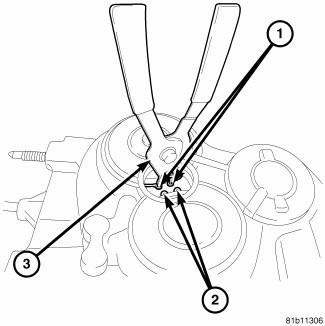
Fig. 120: Snap Rings At Rear Of Transmission Case
CAUTION: Insure snap rings are fully seated in bearings before installing case bolts.
64. Using suitable snap-ring pliers (3), expand the transmission shaft bearing snap-rings (1, 2) at the rear of the transmission case to allow the bearings fall into place.
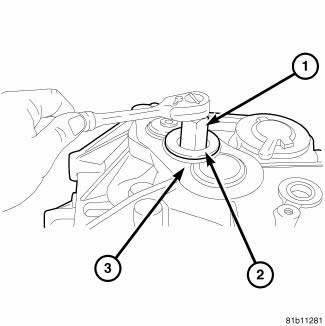
Fig. 121: 27 MM Hex Adapter For Shaft Plug
NOTE: Always use a new washer anti-rotation bolt.
NOTE: Add MOPAR Gasket Maker, Loctite 518, or equivalent around inside flat of plug.
65. Install the new 27 mm the shaft plug (2) into the rear of the case.
66. Install a 27 mm (1 1/16 in.) hex adapter (1) into the shaft plug (2) at the rear of the transmission case (3) and tighten to 55 N.m (41 ft. lbs.).
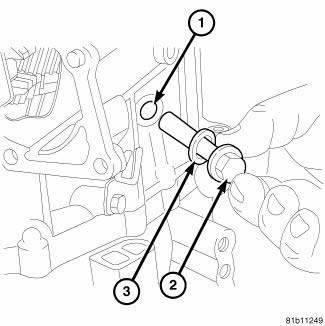
Fig. 122: Idler Shaft Anti-Rotation Bolt
NOTE: Always use a new washer anti-rotation bolt.
NOTE: Next step only to be used on final assembly.
67. Install anti-rotation bolt (2) and washer (3) tighten to 80 N.m (59 ft. lbs.).
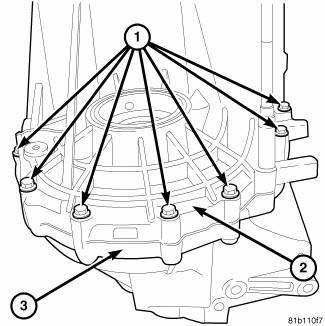
Fig. 123: Transmission Case To Clutch Housing Bolts (Transmission Case Side)
68. Install the bolts (1) holding the transmission case (2) to the clutch housing (3) on the transmission case side and tighten to 29 N.m (257 in. lbs.).

Fig. 124: Transmission Case To Clutch Housing Bolts (Inside Clutch Housing)
69. Install the bolts (1) holding the transmission case to the clutch housing on the inside of the clutch housing and tighten to 29 N.m (257 in. lbs.).
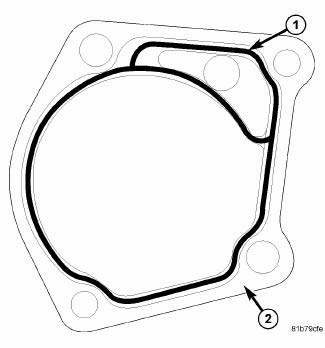
Fig. 125: Sealer
70. Add MOPAR Gasket Maker, Loctite 518, or equivalent around inside of all holes and on mating flange.
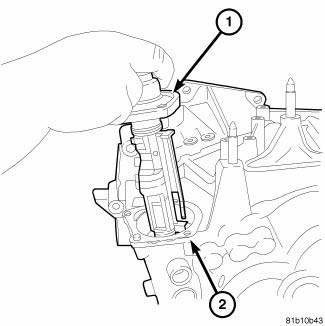
Fig. 126: Shift Lever Assembly
71. Install the shift lever assembly (1) into the transmission case (2).
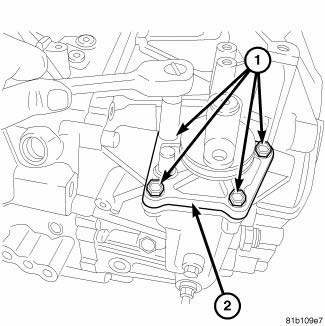
Fig. 127: Shift Lever Assembly Bolts
72. Install the new bolts (1) holding the shift lever assembly (2) to the transmission and tighten to 19 N.m (168 in. lbs.)
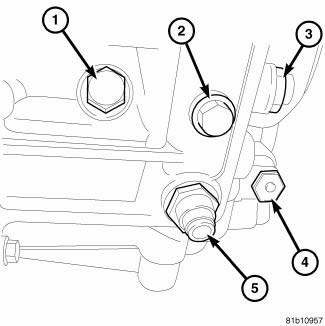
Fig. 128: Anti-Rotation Bolt
73. Install new shift tower lock ball for shift detent (5) and tighten to 29 N.m (277 in. lbs.).
74. Install new shift lock ball for the select detent (3) and tighten to 39 N.m (29 ft. lbs.).
75. Install new shift tower shift guide pin (2) and tighten to 30 N.m (257 in. lbs.).
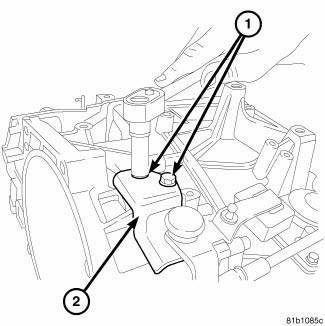
Fig. 129: Crossover Bracket
76. Install the shift bracket (2) and bolts, tighten to 19 N.m (168 in. lbs.)
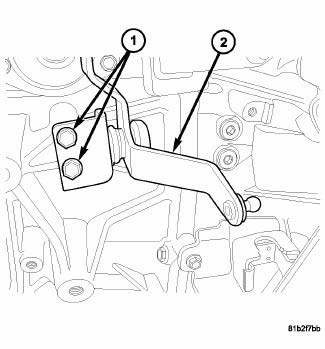
Fig. 130: Crossover Bellcrank
77. Install the crossover (1) onto the transmission.
78. Install the crossover bolts (1) and tighten to 19 N.m (168 in. lbs.)
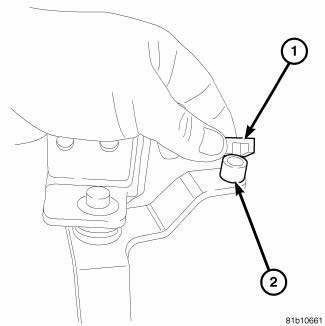
Fig. 131: Bell Crank Bushing
79. Apply a light coating of white grease on crossover bushing (1).
80. Install the crossover bushing (1) onto the crossover shaft (2).
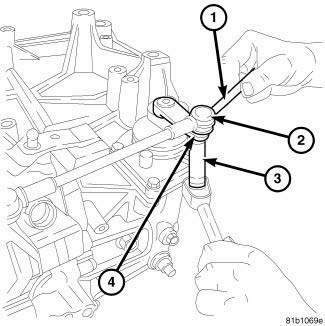
Fig. 132: Nut Crossover Rod To Shift Lever
81. Install the nut (4) holding the crossover rod (2) to the shift lever. Be sure to use a wrench (1) to hold the ball stud to prevent it from rotating in the shift lever tighten to 12 N.m (106 in. lbs.).
Fig. 133: Shift Cable Bracket
CAUTION: Be sure to verify bracket position after installation.
82. Install the shift cable bracket (1) to the transmission case.
83. Install the bolts (2) holding the shift cable bracket (1) to the transmission case and tighten to 19 N.m (168 in. lbs.).
Fig. 134: Back-Up Lamp Switch
84. Install the backup lamp switch (1) with a new washer and tighten to 40 N.m (29 ft. lbs.).
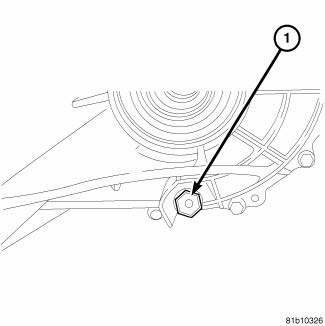
Fig. 135: Drain Plug
85. Install the drain plug (1) with a new gasket and tighten to 39 N.m (29 ft. lbs.).
BEARING ADJUSTMENT PROCEDURE
1. Use extreme care when removing and installing bearing cups and cones. Use only an arbor press for installation, as a hammer may not properly align the bearing cup or cone. Burrs or nicks on the bearing seat gives a false end-play reading while gauging for proper shims. Improperly seated bearing cups and cones are subject to low mileage failures.
2. Bearing cups and cones should be replaced if they show signs of pitting or heat distress. If distress is seen on either the cup or bearing rollers, both cup and cone must be replaced.
3. Bearing preload and drag torque specifications must be maintained to avoid premature bearing failures.
Used (original) bearings may lose up to 50% of the original drag torque after break-in. All bearing adjustments must be made with no other component interference or gear intermesh.
4. Replace bearings as a pair: If one differential bearing is defective, replace both differential bearings, if one input shaft bearing is defective, replace both input shaft bearings.
5. Bearing cones must not be reused if removed.
6. Turning torque readings should be obtained while smoothly rotating in either direction.
DIFFERENTIAL BEARING PRELOAD ADJUSTMENT
NOTE: True bearing turning torque readings can be obtained only with the geartrain removed from the case.
1. Remove bearing cup and existing shim from clutch bellhousing case.
2. Press in new bearing cup into bellhousing case (or use a cup that has been ground down on the outer edge for ease of measurement).
3. Press in new bearing cup into gear case side.
4. Oil differential bearings with transmission fluid. Install differential assembly in transaxle gear case.
Install clutch bellhousing over gear case. Install and tighten case bolts to 29 N.m (257 in. lbs.).
5. Position transaxle with bellhousing facing down on workbench with C-clamps. Position dial indicator.
NOTE: The dial indicator should be parallel to T-Handle to obtain the most accurate reading.
6. Apply a medium load to differential with Torque Tool C-4995A (3) and a T-handle, in the downward direction. Roll differential assembly back and forth a number of times. This will settle the bearings. Zero the dial indicator (2). To obtain end play readings, apply a medium load in an upward direction while rolling differential assembly back and forth. Record end play.
7. The shim required for proper bearing preload is the total of end play, plus (constant) preload of 0.18 mm (0.007 in.). Never combine shims to obtain the required preload.
8. Remove case bolts. Remove clutch bellhousing differential bearing cup. Install shim(s) selected, then press the bearing cup into clutch bellhousing.
9. Install clutch bellhousing. Install and tighten case bolts to 29 N.m (257 in. lbs.).
10. Using Torque Tool C-4995A (2) and an inch-pound torque wrench (1), check turning torque of the differential assembly. The turning torque should be 1 to 3 N.m (9 to 22 in. lbs.) If the turning torque is too high, install a 0.05 mm (0.002 inch) thinner shim. If the turning torque is too low, install a 0.05 mm (0.002 inch) thicker shim.
11. Recheck turning torque (1). Repeat until the proper turning torque is obtained.
12. Once proper turning torque has been established for the differential separate case halves, install output shaft # 2 assembly into case with the differential and recheck differential turning torque. The turning torque should be 4 to 6 N.m (37 to 52 in. lbs.) If the turning torque is too high, install a 0.05 mm (0.002 inch) thinner shim. If the turning torque is too low, install a 0.05 mm (0.002 inch) thicker shim.
13. Recheck total turning torque (1). Repeat until the proper turning torque is obtained.
Once proper turning torque has been established, place gear case on the end plate. Draw a bead of MOPAR Gasket Maker, Loctite 518, or equivalent, on the flat surface of the case mating flange.
Install clutch bellhousing onto gear case. Install and tighten case bolts to 29 N.m (257 in. lbs.).
14. Install axle seal (case side) on Seal Installer 9928 and Handle C-4171 and insert into axle shaft seal bore.
15. Tap seal into position until seated against transaxle case.
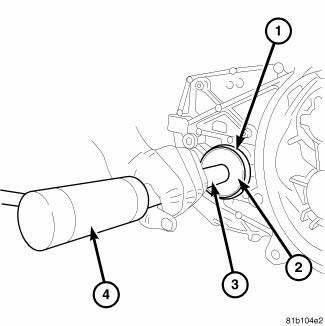
Fig. 136: Aligning Axle Shaft Seal With Axle Shaft Seal Bore
16. Install axle seal (bellhousing side) on Seal Installer 9928 and Handle C-4171 and insert into axle shaft seal bore.
17. Tap seal into position until seated against transaxle case.
 Disassembly
Fig. 10: Drain Plug
1. Remove drain plug (1) and allow transmission oil to drain.
Fig. 11: Back-Up Lamp Switch
2. Remove backup lamp switch (1).
Fig. 12: Shift Cable Bracket
3. Remove the b ...
 Installation
Fig. 137: Rear Mount Bracket
1. If transmission brackets were removed or transmission was replaced install
the rear mount bracket and
tighten (1) to 100 N.m (74 ft. lbs.).
Fig. 138: Front Mou ...
See also:
Schematics and diagrams
40/41TE - WITH VARIABLE LINE PRESSURE
Fig. 181: Identifying Line Pressure - Park & Neutral
Fig. 182: Identifying Line Pressure - Reverse
Fig. 183: Identifying Line Pressure - First Gear ( ...
Operation
The instrument cluster contains the necessary hardware and software to serve
as the vehicle's electronic body
control module and is commonly referred to as the Cab Compartment Node (CCN).
The fol ...
Monitor, media system
REMOVAL
Fig. 14: Removing / Installing Mounting Fasteners
1. Disconnect and isolate the battery negative cable.
2. Open the video screen to access the mounting fasteners.
3. Remove the mount ...
