Dodge Journey: Removal
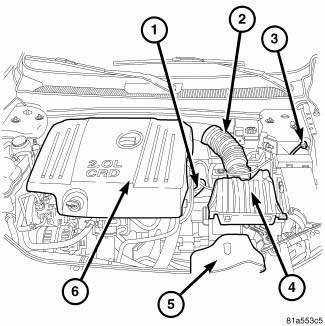
Fig. 2: Engine Cover
Remove the engine cover.
1. Disconnect battery negative cable.
2. Remove air inlet tube (2) and air cleaner assembly (4).
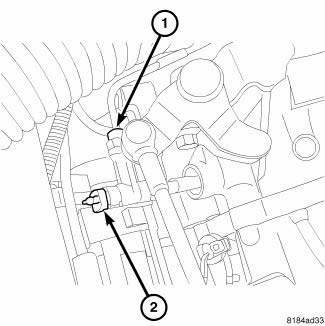
Fig. 3: Bleeder At Slave Cylinder
3. Remove hydraulic line (1) and the bleed adaptor (2) at the slave cylinder.
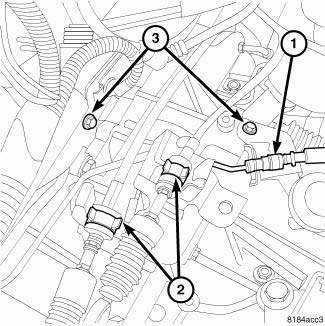
Fig. 4: Hydraulic Line
NOTE: Do not remove the shifter cable brackets from the transmission or loosen the bolts.
4. Remove clip (1) to the hydraulic clutch slave cylinder.
5. Release clips (2) at the shift cables and lift cables out of bracket slot.
6. Remove the bolts (3) at the clutch hydraulic line and move the line out of the way.
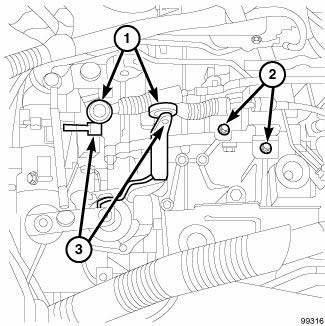
Fig. 5: Shift Cables & Bracket
NOTE: Never loosen the shift cable bracket bolts (2) for just removal. If the transmission is disassembled, see Adjustments.
CAUTION: Insure the shift levers are not deformed when removing cables.
7. Remove shift cables from shift levers (3) by tilting cable and prying from beneath with screwdriver tip.
8. Unplug connectors and move wiring harness at the top of the transmission out of the way.
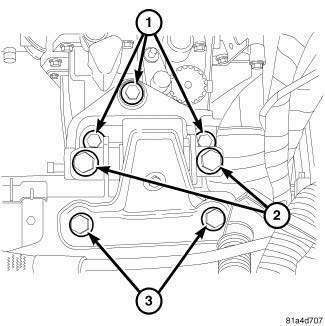
Fig. 6: Left Bracket To Transmission Bolts
9. Support transmission with a jack.
10. Remove the bolts at the upper transmission mount (2).
11. Remove the upper bell housing bolts.
12. Remove the Jack from the transmission.
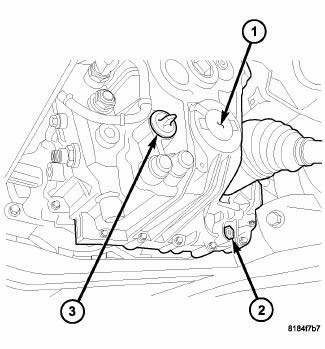
Fig. 7: Drain Plug
13. Raise the vehicle on the hoist.
14. Remove left front and lower splash shields.
15. Remove the drain plug (2) and drain the transmission fluid.
16. Remove both front wheels.
17. Remove the right and left halfshafts.
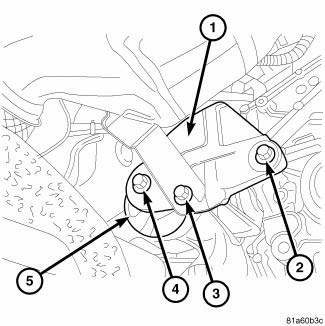
Fig. 8: Rear Mount
18. Remove the bolt at the catalytic converter support bracket (3).
19. Support engine and transmission with a jack.
20. Support the transmission with a transmission jack and raise to gain access to mount (5).
21. Remove rear transmission mount through bolt (4).
22. Remove the front transmission mount through bolt.
23. Remove the transmission crossmember bolts.
24. Remove the starter.
25. Remove the rear transmission mount retaining bolts from the cradle.
26. Remove the rear transmission mount bracket from cradle.
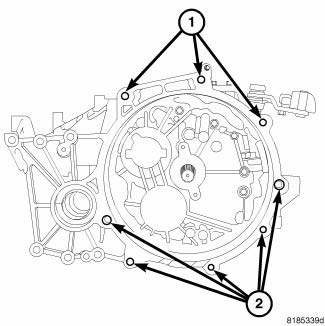
Fig. 9: Bellhousing Bolts
27. Remove the lower transmission bellhousing bolts (2).
28. Lower the transmission.
 Diagnosis and testing
COMMON PROBLEM CAUSES
The majority of transaxle malfunctions are a result of:
Insufficient lubrication
Incorrect lubricant
Misassembled or damaged internal components
Improper operation
...
 Disassembly
Fig. 10: Drain Plug
1. Remove drain plug (1) and allow transmission oil to drain.
Fig. 11: Back-Up Lamp Switch
2. Remove backup lamp switch (1).
Fig. 12: Shift Cable Bracket
3. Remove the b ...
See also:
ENGINE COMPARTMENT — 2.4L
ENGINE COMPARTMENT — 2.4L
1 — Engine Coolant Reservoir.
7 — Totally Integrated Power Module (TIPM).
2 — Power Steering Fluid Reservoir.
8 — Automatic Transmission Dipstick.
3 — Engi ...
REMOTE KEYLESS ENTRY (RKE)
This system allows you to lock or unlock the doors and
liftgate or activate the Panic Alarm from distances up to
approximately 66 ft (20 m) using a hand-held Key Fob
with Remote Keyless Entry (RKE) ...
Disassembly
Fig. 200: Snap Ring At Output Shaft Case Bearing
1. Remove the snap ring (2) from the output shaft.
Fig. 201: Output Shaft Case Bearing And Gear
2. Use Bearing Splitter P-334 (3), Cage 8925-3 ( ...
