Dodge Journey: Pump, transmission oil
DESCRIPTION
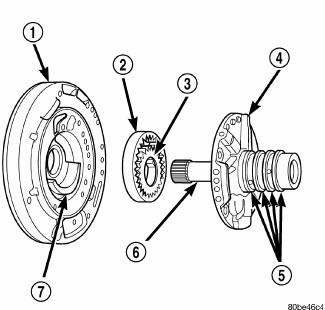
Fig. 359: Identifying Transmission Oil Pump Assembly
- - PUMP HOUSING
- - OUTER PUMP GEAR
- - INNER PUMP GEAR
- - REACTION SHAFT SUPPORT
- - SEAL RINGS (4)
- - REACTION SHAFT
- - CRESCENT
The oil pump is located in the pump housing inside the bell housing of the transmission case. The oil pump assembly consists of an inner (3) and outer (2) gear, a housing (1), and a cover that also serves as the reaction shaft support (6).
OPERATION
As the torque converter rotates, the converter hub rotates the inner and outer gears. As the gears rotate, the clearance between the gear teeth increases in the crescent area, and creates a suction at the inlet side of the pump. This suction draws fluid through the pump inlet from the oil pan. As the clearance between the gear teeth in the crescent area decreases, it forces pressurized fluid into the pump outlet and to the valve body.
STANDARD PROCEDURE
OIL PUMP VOLUME CHECK
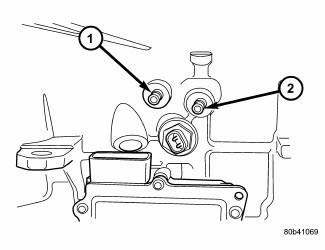
Fig. 360: Identifying Transmission Oil Cooler Ports
- - FROM COOLER
- - TO COOLER
Measuring oil pump output volume will determine if sufficient flow to the transmission oil cooler exists, and whether or not an internal transmission failure is present.
Verify that transmission fluid is at the proper level. If adding fluid is necessary, fill to the proper level with Mopar ATF+4 (Automatic Transmission Fluid-Type 9602). The following procedure is to check oil pump output volume:
1. Using hose cutters or a suitable blade, cut the "to cooler" line off flush with the cooler inlet fitting and place a collection container under the open line.
CAUTION: With the fluid set at the proper level, fluid collection should not exceed (1) quart or internal damage to the transmission may occur.
2. Start engine and run at curb idle speed , with the shift selector in neutral.
3. If one quart of ATF is collected in 20 seconds or less, flow is within acceptable limits. If fluid flow is intermittent or it takes more than 20 seconds to collect one quart of ATF.
4. Inspect the cooler hose for damage. Replace if necessary.
5. Re-connect the to cooler line to the transmission using a service splice kit. Refer to instructions included with the kit.
6. Refill the transaxle to proper level with Mopar ATF+4 (Automatic Transmission Fluid-Type 9602).
DISASSEMBLY
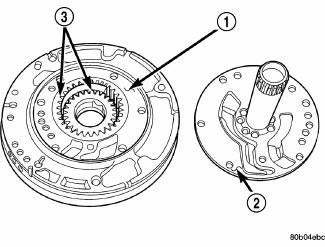
Fig. 361: Removing/Installing Reaction Shaft Support
- - PUMP HOUSING
- - REACTION SHAFT SUPPORT
- - PUMP GEARS
1. Remove the reaction shaft support bolts.
2. Remove the reaction shaft support (2) from the pump housing (1).

Fig. 362: Identifying Oil Pump Gears & Housing
- - PUMP HOUSING
- - OUTER PUMP GEAR
- - INNER PUMP GEAR
- - REACTION SHAFT SUPPORT
- - SEAL RINGS (4)
- - REACTION SHAFT
- - CRESCENT
3. Remove the pump gears (2, 3) and check for wear and damage on pump housing (1) and gears (2, 3).
CLEANING
Clean pump and support components with solvent and dry them with compressed air.
INSPECTION
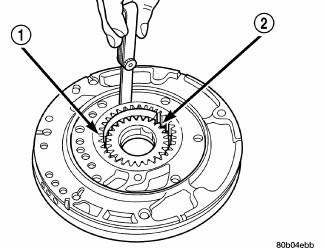
Fig. 363: Measuring Gear Clearances Between Pump Socket & Crescent
- - OUTER GEAR
1. Re-install the gears and check clearances.
2. Measure the clearance between the outer gear (1) and the pump pocket (2) . Clearance should be 0.089- 0.202 mm (0.0035-0.0079 in.).
3. Measure clearance between outer gear and crescent. Clearance should be 0.060-0.298 mm (0.0023-0.0117 in.).
4. Measure clearance between inner gear and crescent. Clearance should be 0.093-0.385 mm (0.0036-0.0151 in.).
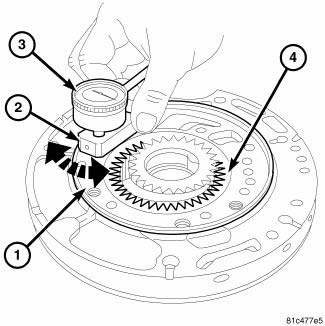
Fig. 364: Measuring Gear Height To Pump Housing Case Clearance
- - OIL PUMP HOUSING FLAT SURFACE
- - SCOOTER BLOCK D-115-2A
- - 9524 90º DIAL INDICATOR or C-3339A DIAL INDICATOR
- - PUMP GEAR
5. Install the 9524 90º or the C-3339A Dial indicator (3) into the Scooter Block D-115-2A (2).
6. Zero the Dial Indicator (3) in the scooter block assembly on a flat surface (1) of the pump housing.
7. While applying slight downward pressure rotate the front of the scooter block side ways onto the outer gear (4).
8. Measure and record the gear height to the pump housing case clearance.
9. The clearance should be 0.020-0.046 mm (0.0008-0.0018 in.). If not replace the oil pump assembly.
ASSEMBLY

Fig. 365: Identifying Transmission Oil Pump Components
- - PUMP HOUSING
- - OUTER PUMP GEAR
- - INNER PUMP GEAR
- - REACTION SHAFT SUPPORT
- - SEAL RINGS (4)
- - REACTION SHAFT
- - CRESCENT
1. Assemble oil pump as shown in Fig. 365 .
2. Install and torque reaction shaft support-to-oil pump housing bolts to 28 N.m (250 in. lbs.) torque.
 Knob, gearshift
REMOVAL
Fig. 357: Removing/Installing Gearshift Knob
1. Loosen the set screw (3) on the shift knob (2).
2. Hold in the shift knob button (1).
3. Pull up on the shift knob (2) while holding t ...
 Relay, transmission control
DESCRIPTION
Fig. 366: Locating Transmission Control Relay
- TRANSMISSION CONTROL RELAY
- POWER DISTRIBUTION CENTER
The transmission control relay (1) is located in the Power Distribution
...
See also:
MAINTENANCE SCHEDULE
The oil change indicator system will remind you that it is
time to take your vehicle in for scheduled maintenance.
On Electronic Vehicle Information Center (EVIC)
equipped vehicles “Oil Change Re ...
Uconnect™ Multimedia (SATELLITE RADIO) — IF EQUIPPED
(REN/REQ/RER/RES/REU/RBZ RADIOS ONLY)
Satellite radio uses direct satellite-to-receiver broadcasting
technology to provide clear digital sound, coast to
coast. The subscription service provider is Sirius Satellite
Radio. This service o ...
Belt, serpentine
Description
Fig. 15: ACCESSORY DRIVE BELT - WORLD ENGINE
- POWER STEERING PUMP
- ACCESSORY DRIVE BELT
- GENERATOR
- CRANKSHAFT PULLEY
- LOWER IDLER PULLEY
- CRANKSHAFT PULLEY
- WATE ...
