Dodge Journey: Disassembly
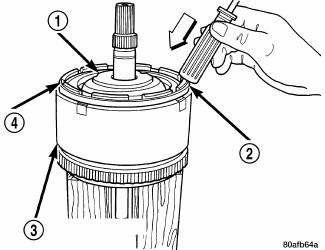
Fig. 241: Tapping Down Reverse Clutch Reaction Plate
- - #4 THRUST PLATE (SELECT)
- - TAP DOWN REVERSE CLUTCH REACTION PLATE TO REMOVE OR INSTALL SNAP RING
- - INPUT SHAFT CLUTCHES RETAINER ASSEMBLY
- - REVERSE CLUTCH REACTION PLATE
1. Mount input clutch assembly (3) to Input Clutch Pressure Fixture Tool 8391.
2. Tap down reverse clutch reaction plate (4) to release pressure from snap ring (2).
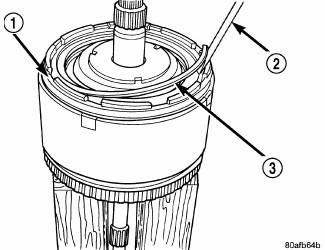
Fig. 242: Removing Reverse Clutch Snap Ring
- - REACTION PLATE
- - SCREWDRIVER
- - REVERSE CLUTCH SNAP RING (SELECT)
3. Remove reverse clutch snap ring (3) .

Fig. 243: Removing Reverse Clutch Reaction Plate
- - REVERSE CLUTCH REACTION PLATE
- - SCREWDRIVER
- - SCREWDRIVER
4. Pry up and remove reverse clutch reaction plate (1) .
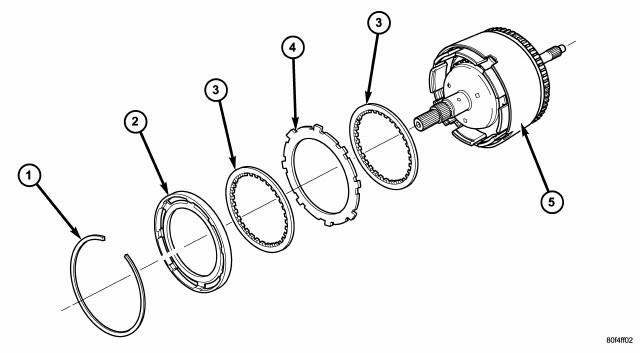
Fig. 244: Removing/Installing Reverse Clutch Pack
- - SNAP RING
- - REACTION PLATE
- - CLUTCH DISC (2)
- - CLUTCH PLATE (1)
- - INPUT CLUTCH ASSEMBLY
5. Remove reverse clutch pack (3,4) . Tag components for assembly identification.
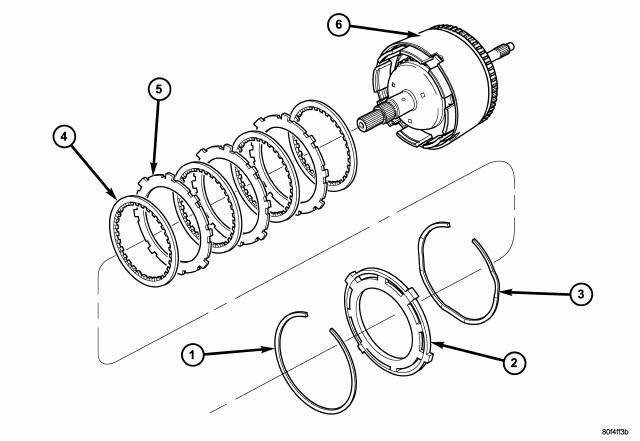
Fig. 245: Removing/Installing OD/Reverse Pressure Plate Snap Ring
- - SNAP RING
- - OD/REVERSE PRESSURE PLATE
- - SNAP RING (WAVE)
- - CLUTCH DISC (4)
- - CLUTCH STEEL (3)
- - INPUT CLUTCH ASSEMBLY
6. Remove the OD/Reverse pressure plate snap ring (1) .
7. Remove OD/Reverse pressure plate (2).
8. Remove OD/Reverse pressure plate wave snap ring (3).
9. Remove OD clutch pack (4,5). Tag components for assembly identification.
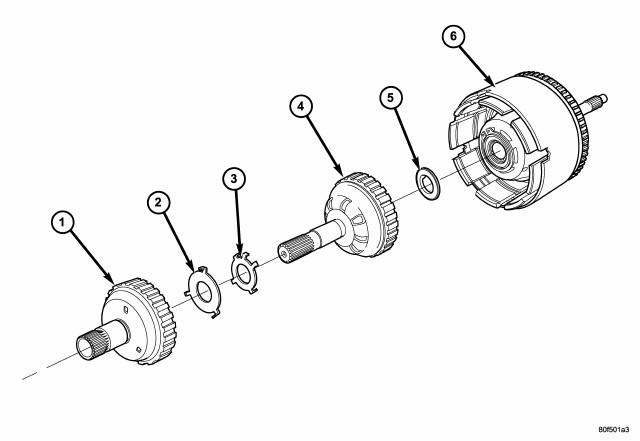
Fig. 246: Removing/Installing OD & UD Shafts, Thrust Washer & Plate, & #2
Needle Bearing
- - OVERDRIVE SHAFT
- - #3 THRUST PLATE (3 TABS)
- - #3 THRUST WASHER (5 TABS)
- - UNDERDRIVE SHAFT
- - #2 NEEDLE BEARING (3 TABS)
- - INPUT CLUTCH ASSEMBLY
10. Remove and inspect OD (1) and UD Shafts (4), as well as #3 thrust washer and plate (2, 3), and #2 needle bearing (5).
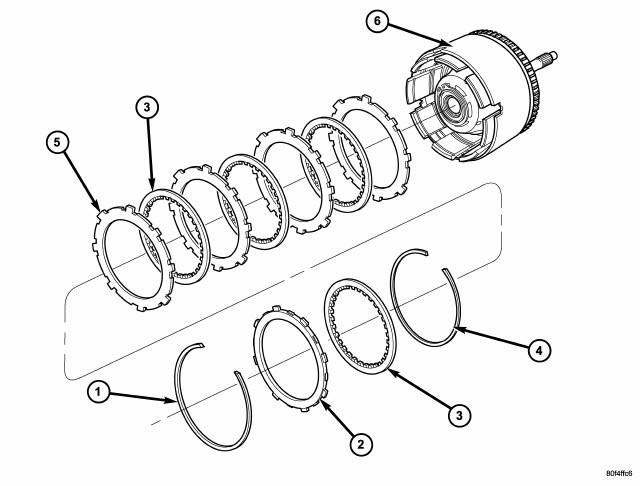
Fig. 247: Removing/Installing OD/UD Reaction Plate Tapered Snap Ring, Clutch
Plate, & First
Clutch Disc
- - SNAP RING (TAPERED)
- - OD/UD REACTION PLATE
- - CLUTCH DISC
- - SNAP RING (FLAT)
- - CLUTCH PLATE
- - INPUT CLUTCH ASSEMBLY
11. Remove the OD/UD reaction plate tapered snap ring (1) , clutch plate (5), and first clutch disc (3).
12. Remove the UD clutch flat snap ring (4) and rest of the input clutch assembly (6). Tag clutch pack for assembly identification.
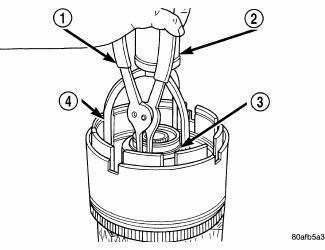
Fig. 248: Compressing UD Clutch Piston/Spring Enough To Remove Snap Ring
- - SNAP RING PLIERS
- - ARBOR PRESS RAM
- - SNAP RING
- - COMPRESSOR 5059-A
CAUTION: Compress return spring just enough to remove or install snap ring.
13. Using compressor 5059-A (4) and an arbor press (2), compress UD clutch piston/spring enough to remove snap ring (3).
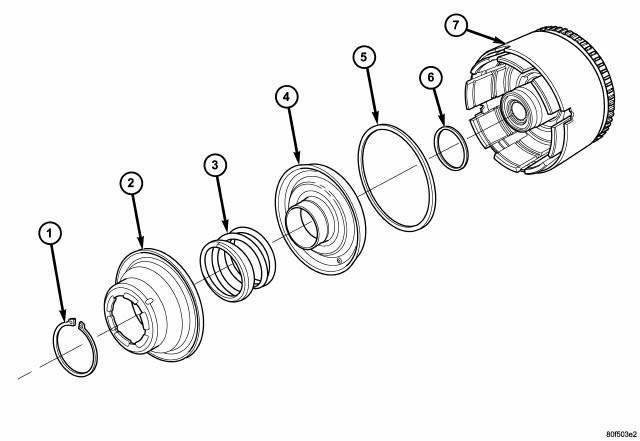
Fig. 249: Removing/Installing Underdrive Clutch Piston, Spring & Retainer
- - SNAP RING
- - SPRING RETAINER
- - SPRING
- - UD CLUTCH PISTON
- - SEAL, OUTER
- - SEAL, INNER
- - INPUT CLUTCH ASSEMBLY
14. Refer to Fig. 249 as necessary when performing the following steps
15. Remove spring retainer (2) , spring (3), and UD clutch piston (4).

Fig. 250: Removing Input Hub Tapered Snap Ring
- - INPUT SHAFT
- - INPUT HUB SNAP RING (TAPERED SIDE UP WITH TABS IN CAVITY)
- - SNAP RING PLIERS
16. Remove input hub tapered snap ring (2) .
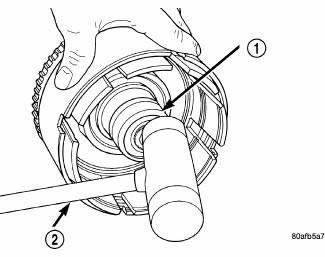
Fig. 251: Tapping On Input Hub With Soft Faced Hammer
- - INPUT SHAFT AND HUB ASSEMBLY
- - SOFT FACED HAMMER
17. Tap on input hub with soft faced hammer (2) and separate input hub from OD/Reverse piston and clutch retainer.
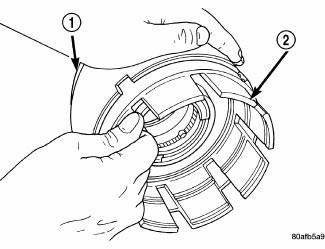
Fig. 252: Identifying Clutch Retainer & OD/Reverse Piston
- - OVERDRIVE/REVERSE PISTON
- - INPUT CLUTCHES RETAINER
18. Separate clutch retainer (2) from OD/Reverse piston (1).
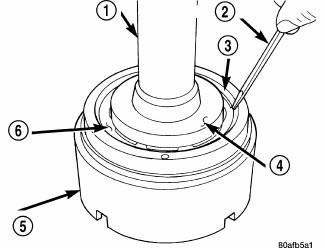
Fig. 253: Compressing Return OD/Reverse Piston Return Spring To Remove Snap Ring
- - ARBOR PRESS RAM (COMPRESS RETURN SPRING JUST ENOUGH TO REMOVE OR INSTALL SNAP RING)
- - SCREWDRIVER
- - SNAP RING
- - Disk 6057
- - OD/REVERSE PISTON
- - RETURN SPRING
19. Using Disk 6057 (4) and an arbor press (1), compress return OD/Reverse piston return spring just enough to remove snap ring (3).

Fig. 254: Removing Input Shaft-To-Input Clutch Hub Snap Ring
- - INPUT SHAFT
- - SHARP-POINTED TOOL
- - SNAP RING
- - O-RINGS
- - SEALS
20. Remove input shaft to input clutch hub snap ring (3) .
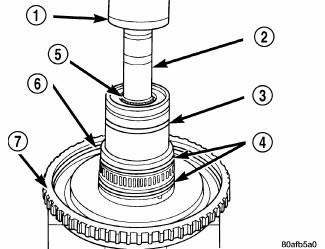
Fig. 255: Removing Input Shaft
- - ARBOR PRESS RAM
- - SOCKET
- - SEAL
- - O-RINGS
- - INPUT SHAFT
- - SEAL
- - INPUT SHAFT HUB ASSEMBLY
21. Using a suitably sized socket (2) and an arbor press (1), remove input shaft (5) from input shaft hub (7).

Fig. 256: Identifying Input Clutch Hub, Retainer, & OD/Reverse Piston
- - SNAP RING (INPUT SHAFT)
- - SNAP RING
- - CLUTCH RETAINER
- - SEAL, OUTER
- - SEAL, INNER
- - OD/REVERSE PISTON
- - SEAL, INPUT SHAFT
- - SHAFT, INPUT
- - HUB
- - SEAL
- - SNAP RING
- - BELLEVILLE SPRING
22. Refer to Fig. 256 as necessary when performing the above steps

 Assembly
Fig. 257: Installing Input Shaft
- INPUT SHAFT
- ARBOR PRESS
- INPUT SHAFT HUB ASSEMBLY
Use petrolatum on all seals to ease assembly of components.
1. Using an arbor press (2), install ...
See also:
Inspection
CLUTCH INSPECTION - FIXED DISPLACEMENT A/C COMPRESSOR
Fig. 212: Identifying Compressor Shaft, Clutch Plate & Shim
Examine the friction surfaces of the pulley and the clutch plate (2) for
wea ...
Cover, structural dust
Removal
Fig. 172: Belly Pan
1. Raise and secure the vehicle on a hoist.
2. Remove the belly pan (2), if equipped.
Fig. 173: Front Engine Mount Through Bolt
3. Remove the fore/aft crossmemb ...
Actuator, mode door, rear
DESCRIPTION
Fig. 51: Rear Actuator Description
The mode door actuator (1) for the rear heater-A/C system is a reversible, 12
volt direct current (DC), servo
motor. The rear mode door actuator i ...
