Dodge Journey: Clutch air pressure tests
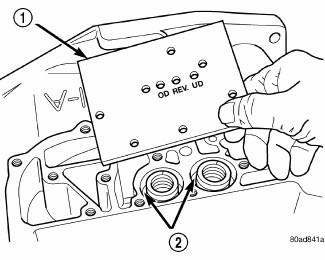
Fig. 6: Identifying Air Pressure Test Plate Tool 6056
- - AIR PRESSURE TEST PLATE TOOL 6056
- - ACCUMULATORS
Inoperative clutches can be located using a series of tests by substituting air pressure for fluid pressure using Air Pressure Test Plate 6056 (1) .
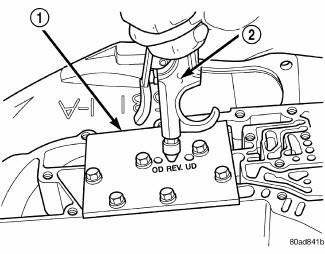
Fig. 7: Testing Clutches Using Air Pressure Test Plate 6056
- - AIR PRESSURE TEST PLATE 6056
- - AIR NOZZLE
The clutches may be tested by applying air pressure (2) to their respective passages. The valve body must be removed and Air Pressure Test Plate 6056 (1) installed. To make air pressure tests, proceed as follows:
NOTE: The compressed air supply must be free of all dirt and moisture. Use a pressure of 30 psi.
Remove oil pan and valve body.
OVERDRIVE CLUTCH
Apply air pressure to the overdrive clutch apply passage and watch for the push/pull piston to move forward.
The piston should return to its starting position when the air pressure is removed.
REVERSE CLUTCH
Apply air pressure to the reverse clutch apply passage and watch for the push/pull piston to move rearward. The piston should return to its starting position when the air pressure is removed.
2/4 CLUTCH
Apply air pressure to the feed hole located on the 2/4 clutch retainer. Look in the area where the 2/4 piston contacts the first separator plate and watch carefully for the 2/4 piston to move rearward. The piston should return to its original position after the air pressure is removed.
LOW/REVERSE CLUTCH
Apply air pressure to the low/reverse clutch feed hole (rear of case, between 2 bolt holes). Then, look in the area where the low/reverse piston contacts the first separator plate. Watch carefully for the piston to move forward.
The piston should return to its original position after the air pressure is removed.
UNDERDRIVE CLUTCH
Because this clutch piston cannot be seen, its operation is checked by function. Air pressure is applied to the low/reverse and the 2/4 clutches. This locks the output shaft. Use a piece of rubber hose wrapped around the input shaft and a pair of clamp-on pliers to turn the input shaft. Next apply air pressure to the underdrive clutch.
The input shaft should not rotate with hand torque. Release the air pressure and confirm that the input shaft will rotate.
TORQUE CONVERTER HOUSING FLUID LEAKAGE
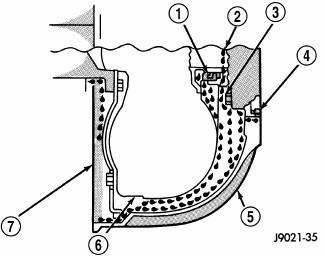
Fig. 8: Identifying Converter Housing Leak Paths
- - PUMP SEAL
- - PUMP VENT
- - PUMP BOLT
- - PUMP GASKET
- - CONVERTER HOUSING
- - CONVERTER
- - REAR MAIN SEAL LEAK
When diagnosing converter housing fluid leaks, three actions must be taken before repair:
1. Verify proper transmission fluid level.
2. Verify that the leak originates from the converter housing area and is transmission fluid.
3. Determine the true source of the leak.
Fluid leakage at or around the torque converter area may originate from an engine oil leak. The area should be examined closely. Factory fill fluid is red and, therefore, can be distinguished from engine oil.
Some suspected converter housing fluid leaks may not be leaks at all. They may only be the result of residual fluid in the converter housing, or excess fluid spilled during factory fill, or fill after repair. Converter housing leaks have several potential sources inspect pump seal (1), pump vent (2), pump bolts (3), pump gasket (4), converter housing (5), converter (6) and a rear main seal leak (7). Through careful observation, a leak source can be identified before removing the transmission for repair.
Pump seal leaks tend to move along the drive hub and onto the rear of the converter. Pump O-ring or pump body leaks follow the same path as a seal leak. Pump attaching bolt leaks are generally deposited on the inside of the converter housing and not on the converter itself. Pump seal or gasket leaks usually travel down the inside of the converter housing.
TORQUE CONVERTER LEAKAGE
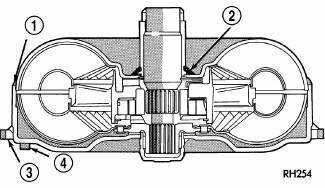
Fig. 9: Identifying Torque Converter Leak Points
- - OUTSIDE DIAMETER WELD
- - TORQUE CONVERTER HUB WELD
- - STARTER RING GEAR
- - LUG
Possible sources of torque converter leakage are:
- Torque converter weld leaks at the outside diameter weld (1) .
- Torque converter hub weld (2).
 Hydraulic pressure tests
Fig. 4: Identifying Transmission Electrical Connectors
NOTE: Before preforming the hydraulic pressure tests be certain to
disconnect the
Variable Line Pressure (VLP) electrical connector (2 ...
 Removal
Fig. 10: Identifying Battery Cables
NOTE: If transaxle assembly is being replaced or overhauled (clutch
and/or seal
replacement), it is necessary to perform the "Quick-Learn" Proc ...
See also:
Removal, Installation
REMOVAL
WARNING: Disable the airbag system before attempting any steering
wheel, steering
column, or instrument panel component diagnosis or service. Disconnect
and isolate the negat ...
Sensor, exhaust temperature
REMOVAL
EXHAUST TEMPERATURE SENSOR
Fig. 44: Exhaust Temperature Sensor
- DPF TEMPERATURE SENSOR ELECTRICAL CONNECTOR
- DPF TEMPERATURE SENSOR
1. Remove engine cover.
2. Disconnect and ...
ILLUMINATED ENTRY
The interior lights will turn on when you press the
UNLOCK button on the Remote Keyless Entry (RKE)
transmitter or open a door or the liftgate.
This feature also turns on the approach lighting (if
...
