Dodge Journey: Installation
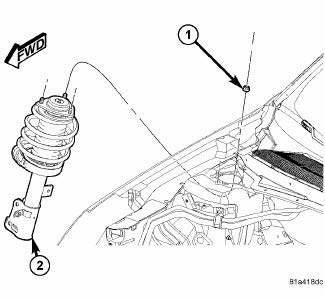
Fig. 97: Strut Upper Mounting Nuts
1. Raise the strut assembly (2) into the strut tower, aligning the three studs on the strut assembly upper mount with the holes in strut tower. Install the three mounting nuts (1) on the studs. Tighten the three nuts to 55 N.m (41 ft. lbs.).
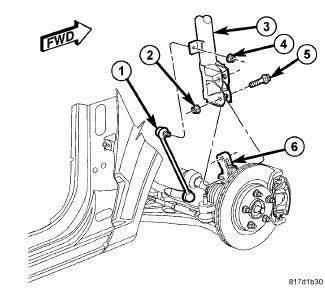
Fig. 98: Strut Mounting To Knuckle
CAUTION: The strut clevis-to-knuckle bolts (5) are serrated and must not be turned during installation. Install the nuts while holding the bolts stationary in the knuckle.
2. Position the lower end of the strut assembly (3) in line with the upper end of the knuckle (6), aligning the mounting holes. Install the two attaching bolts (5). Install the nuts (2). While holding the bolts in place, tighten the nuts to 140 N.m (103 ft. lbs.).
3. Attach the stabilizer bar link (1) to the strut (3). Install and tighten the nut (4) while holding the stabilizer bar link stud stationary. Tighten the nut to 48 N.m (35 ft. lbs.).
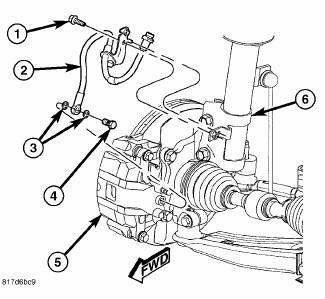
Fig. 99: Brake Hose Mounting To Strut
4. Secure the flex hose (2) routing bracket to the strut (6) with the mounting screw (1). Tighten the mounting screw to 13 N.m (120 in. lbs.).
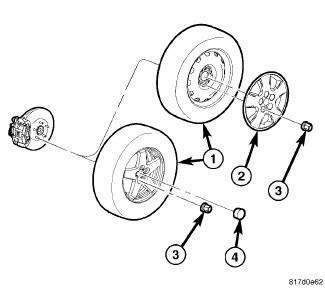
Fig. 100: TIRE AND WHEEL MOUNTING
5. Install tire and wheel assembly (1). Install and tighten wheel mounting nuts (3) to 135 N.m (100 ft. lbs.).
6. Lower the vehicle.
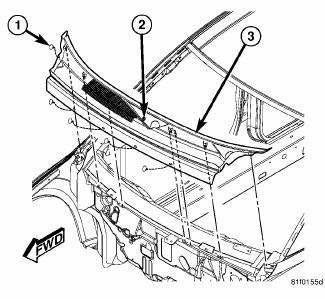
Fig. 101: Cowl Screen
7. Install the cowl screen. Install the push-pins (1) securing the cowl screen to the wheelhouse brace and cowl. Rotate the screw (2) in the center of the cowl screen 90º counterclockwise to lock the screen in place.
8. Install the wiper arms.
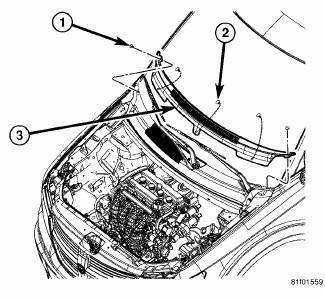
Fig. 102: Cowl Top Screen
9. Install the cowl top screen (3). Install the two push-pins (1) securing the cowl top screen at the ends.
Install the remaining push-pins (2).
10. Install the engine appearance cover.
 Assembly
NOTE: If the coil spring has been removed from the spring compressor,
proceed with
the next step, otherwise, proceed with 3.
NOTE: To determine the flat coil end of the coil spring for the ...
 Wheel alignment
...
See also:
UNIVERSAL CONSUMER INTERFACE (UCI) 0.5 — IF EQUIPPED
NOTE: This section is for sales code RES/REL and
REQ/RET radios only with uconnect . For sales code
RBZ/REN/REZ touch screen radio and REU/REX/RE1
radio, refer to the separate User’s Manual.
Thi ...
Removal
WARNING: Refer to the applicable warnings and cautions for this
system before
performing the following operation. Failure to follow the warnings and
cautions may result in possible se ...
Adjustments
NOTE: Perform all differential bearing preload measurements with the
transfer shaft
and gear removed.
DIFFERENTIAL BEARING PRELOAD ADJUSTMENT USING EXISTING SHIM
Fig. 348: Installing Too ...
