Dodge Journey: Installation
CAUTION: To prevent damage to the plastic evaporator tube bracket, carefully guide the heater core tubes past the bracket during installation of the heater core.
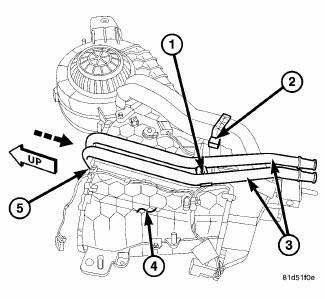
Fig. 278: Rear Heater Core Install
1. Carefully install the rear heater core (5) into the rear heater-A/C housing (4). Guide the heater core tubes past the plastic evaporator tube bracket (2). Make sure that the foam seals are properly installed.
2. Install the screw (1) that secures the rear heater core tubes (3) to the outboard side of the rear heater-A/C housing. Tighten the screw to 1.2 N.m (10 in. lbs.).
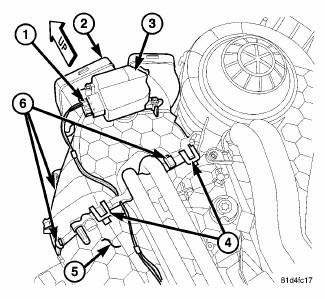
Fig. 279: Rear Distribution Housing Removal/Installation
3. Position the rear heater-A/C distribution housing (2) to the rear heater-A/C housing (5) and engage the five plastic retaining tabs (4). Make sure the retaining tabs are fully engaged.
4. Install the three metal retaining clips (6) that secure the rear distribution housing to the rear heater-A/C housing.
5. Connect the wire harness connector (1) to the rear mode door actuator (3).
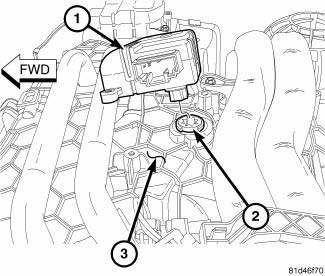
Fig. 280: Rear Blend Door Actuator Align
6. Position the rear blend door actuator (1) onto the rear heater-A/C housing (3). If necessary, rotate the actuator slightly to align the splines on the actuator output shaft with those on the rear blend-air door pivot shaft (2).
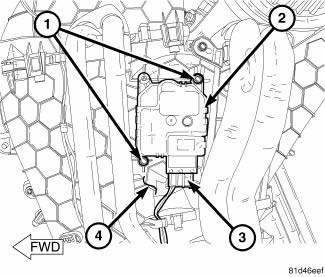
Fig. 281: Rear Blend Door Actuator Removal/Installation
7. Install the two screws (1) that secure the rear blend door actuator (2) to the rear heater-A/C housing (4).
Tighten the screws to 1.2 N.m (10 in. lbs.).
8. Connect the wire harness connector (3) to the rear blend door actuator.
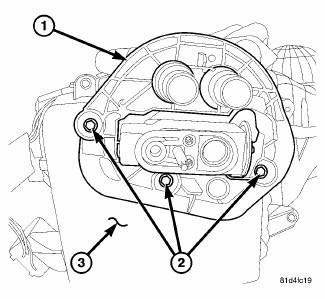
Fig. 282: Rear Housing Flange
9. Position the flange (1) to the bottom of the rear heater-A/C housing (3) and install the three retaining screws (2). Tighten the screws to 1.2 N.m (10 in. lbs.).
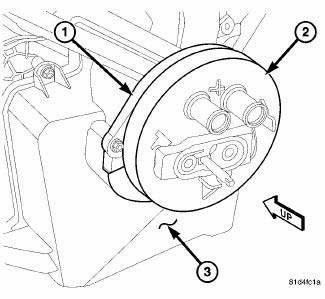
Fig. 283: Rear Housing Flange Seal
10. Install the foam seal (2) onto the flange (1) at the bottom of the rear heater-A/C housing (3). Make sure that the foam seal is properly installed.
11. Install the rear heater-A/C housing.
12. Reconnect the negative battery cable.
13. If the rear heater core is being replaced, flush the cooling system.
14. Refill the engine cooling system.
15. Evacuate and charge the refrigerant system.
 Removal
WARNING: Refer to the applicable warnings and cautions for this
system before
performing the following operation. Failure to follow these instructions
may result in serious or fatal ...
 Evaporator, A/C
...
See also:
REPLACEMENT BULBS
All the inside bulbs are brass or glass wedge base.
Aluminum base bulbs are not approved and should not
be used for replacement.
LIGHT BULBS – Interior Bulb Number
Courtesy/Reading Lamps (Incand ...
ELECTRONIC SPEED CONTROL — IF EQUIPPED
When engaged, the Electronic Speed Control takes over
the accelerator operation at speeds greater than 25 mph
(40 km/h).
The Electronic Speed Control lever is located on the right
side of the stee ...
Converter, catalytic
DESCRIPTION
WARNING: The normal operating temperature of the exhaust system is
very high.
Therefore, never work around or attempt to service any part of the
exhaust system until it ...
