Dodge Journey: Installation
CAUTION: Be certain to adjust the refrigerant oil level when servicing the A/C refrigerant system. Failure to properly adjust the refrigerant oil level will prevent the A/C system from operating as designed and can cause serious A/C compressor damage.
NOTE: When replacing multiple A/C system components, refer to the REFRIGERANT OIL CAPACITIES to determine how much oil should be added to the refrigerant system. NOTE: Replacement of the refrigerant line O-ring seals and gaskets is required anytime a refrigerant line is disconnected. Failure to replace the rubber O-ring seals and metal gaskets could result in a refrigerant system leak.
NOTE: LHD model shown in illustrations. RHD model similar.
Upper A/C Suction Line
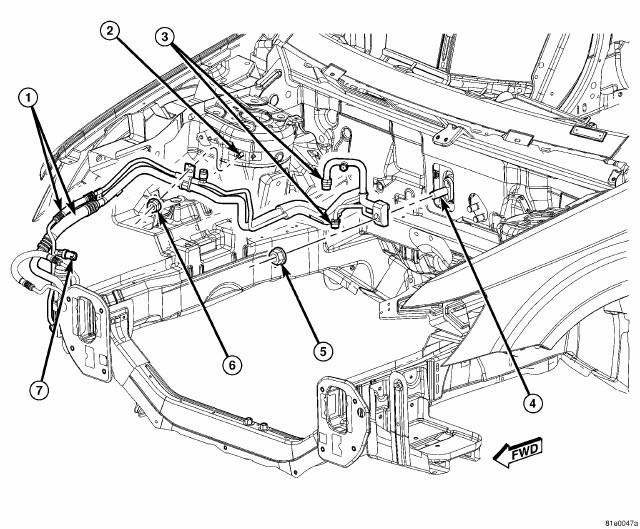
Fig. 259: Liquid & Suction Line Assembly Removal/Installation
1. Remove the tape or plugs from all of the opened refrigerant line fittings and the expansion valve and receiver/drier ports.
2. Lubricate new rubber O-rings with clean refrigerant oil and install them and new gaskets onto the liquid and suction line fittings. Use only the specified O-ring seals as they are made of special materials compatible to the R-134a system. Use only refrigerant oil of the type recommended for the A/C compressor in the vehicle.
3. Position the A/C liquid and suction line assembly (1) into the engine compartment.
4. Connect the A/C liquid and suction line assembly to the A/C expansion valve (4).
CAUTION: Use care when installing the A/C lines to the A/C expansion valve.
Carefully align the tube ends with the valve prior to tightening the A/C line retaining nut or damage to the sealing rings and tube ends may occur.
5. Install the nut (5) that secures the A/C liquid and suction line assembly to the A/C expansion valve.
Tighten the nut to 20 N.m (15 ft. lbs.).
6. Install the nut (6) that secures the refrigerant line retaining bracket to the stud (2) located on the right front strut tower. Tighten the nut securely.
7. If equipped with rear A/C, connect the rear A/C extension lines to the fittings (3) located on the A/C liquid and suction line assembly. 8. If removed, lubricate a new rubber O-ring seal with clean refrigerant oil and install it onto the fitting for the A/C pressure transducer (7) located on the A/C liquid line and install the pressure transducer. Tighten the A/C pressure transducer to 5.6 N.m (50 in. lbs.).
9. Connect the wire harness connector to the A/C pressure transducer.
10. If equipped with ABS, install the ABS control module and pump assembly.
11. Install the power steering fluid reservoir.
12. Install the engine coolant reservoir.
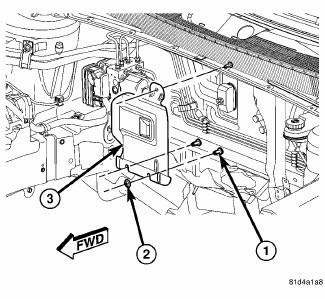
Fig. 260: Heat Shield - Unified Line
13. If equipped, position the heat shield (3) onto the three studs (1) located on the dash panel in the engine compartment and install the three retaining nuts (2). Tighten the nuts to 1 N.m (10 in. lbs.).

Fig. 261: Liquid Line to Receiver/Drier
NOTE: Illustration shown with front fascia and headlamp removed for clarity.
14. Raise and support the vehicle.
15. Install the bolt (3) that secures the upper portion of the A/C suction line (2) to the right front frame rail.
Tighten the bolt securely 16. Connect the lower portion of the A/C suction line to the A/C liquid and suction line assembly.
17. Connect the rear section of the A/C liquid line (1) to the A/C receiver/drier (4).
18. Install the nut (5) that secures the rear section of the A/C liquid line (1) to the A/C receiver/drier (4).
Tighten the nut to 20 N.m (15 ft. lbs.).
19. Reposition the right front wheel house splash shield to the body.
20. Lower the vehicle.
21. Reconnect the negative battery cable.
22. If equipped with ABS, bleed the brake system.
CAUTION: Do NOT run the engine with a vacuum pump in operation or with a vacuum present within the A/C system when equipped with the Denso 6SEU16 variable displacement compressor. Failure to follow this caution will result in serious A/C compressor damage.
23. Evacuate the refrigerant system.
24. Adjust the refrigerant oil level.
25. Charge the A/C system.
Lower A/C Suction Line
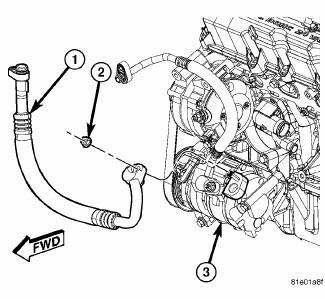
Fig. 262: Lower Suction Line to Compressor
NOTE: 2.7L shown. Other engines similar.
1. Position the lower A/C suction line (1) into the engine compartment.
2. Remove the tape or plugs from the suction line fittings and the compressor port.
3. Lubricate new rubber O-ring seals with clean refrigerant oil and install them and new gaskets onto the suction line fittings. Use only the specified O-rings as they are made of a special material for the R-134a system. Use only refrigerant oil of the type recommended for the A/C compressor in the vehicle.
4. Connect the lower A/C suction line to the A/C compressor (3).
5. Install the nut (2) that secures the lower A/C suction line to the A/C compressor. Tighten the nut to 20 N.m (15 ft. lbs.).
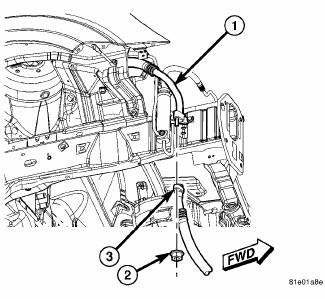
Fig. 263: Lower to Upper Suction Line
NOTE: Illustration shown with front fascia and headlamp removed for clarity.
6. Connect the lower portion of the A/C suction line (3) to the upper suction line (1)
7. Install the nut (2) that secures the lower portion of the A/C suction line to the upper suction line. Tighten the nut to 20 N.m (15 ft. lbs.).
8. Reposition the right front wheel house splash shield to the body.
9. Lower the vehicle.
10. Reconnect the negative battery cable.
CAUTION: Do NOT run the engine with a vacuum pump in operation or with a vacuum present within the A/C system when equipped with the Denso 6SEU16 variable displacement compressor. Failure to follow this caution will result in serious A/C compressor damage.
11. Evacuate the refrigerant system.
12. Adjust the refrigerant oil level.
13. Charge the A/C system.
 Removal
WARNING: Review safety precautions and warnings in this part
before performing
this procedure. See Heating and Air Conditioning/Plumbing - Warning
and. Failure to
follow the warnin ...
 Oil, refrigerant
...
See also:
Description, Operation
DESCRIPTION
The refrigerant oil used in R-134a refrigerant systems is a synthetic-based,
polyalkylene glycol (PAG), wax-free
lubricant. Mineral-based R-12 refrigerant oils are not compatible with ...
Installation
CAUTION: Be certain to adjust the refrigerant oil level when
servicing the A/C
refrigerant system. Failure to properly adjust the refrigerant
oil level will prevent the A/C system fro ...
Solenoid, pressure control
DESCRIPTION
Fig. 415: Identifying Variable Line Pressure Components
- PRESSURE CONTROL SOLENOID
- LINE PRESSURE SENSOR
- SHOULDER SCREW
- VARIABLE LINE PRESSURE HEADER
- MANUAL SHAFT
...
