Dodge Journey: Installation
CAUTION: Be certain to adjust the refrigerant oil level when servicing the A/C refrigerant system. Failure to properly adjust the refrigerant oil level will prevent the A/C system from operating as designed and can cause serious A/C compressor damage.
CAUTION: The A/C receiver/drier must be replaced if an internal failure of the A/C compressor has occurred. Failure to replace the A/C Receiver Drier can cause serious damage to the replacement A/C compressor.
NOTE: If only the A/C receiver/drier is being replaced, add 30 milliliters (1 fluid ounce) of refrigerant oil to the refrigerant system. Use only refrigerant oil of the type recommended for the A/C compressor in the vehicle.
NOTE: When replacing multiple A/C system components, refer to the REFRIGERANT OIL CAPACITIES to determine how much oil should be added to the refrigerant system. NOTE: Replacement of the refrigerant line O-ring seals and gaskets is required anytime a refrigerant line is disconnected. Failure to replace the rubber O-ring seals and metal gaskets could result in a refrigerant system leak.
NOTE: LHD model shown in illustrations. RHD model similar.
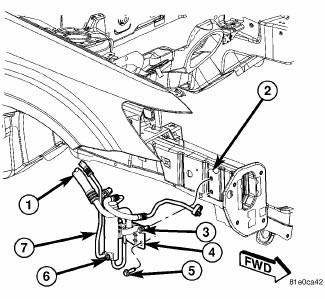
Fig. 235: Receiver/Drier Removal/Installation
NOTE: Illustration shown with front fascia and headlamp removed for clarity.
1. Position the A/C receiver/drier (4) to the right front frame rail (2) and loosely install the lower retaining bolt (5).
2. Install the bolt (3) that secures the upper portion of the A/C suction line (1) to the right front frame rail.
Tighten both bolts securely.
3. Remove the tape or plugs from the opened refrigerant line fittings and the receiver/drier port.
4. Lubricate new O-ring seals with clean refrigerant oil and install them and new gaskets onto the refrigerant line fittings. Use only the specified O-ring seals as they are made of a special material for the R-134a system. Use only refrigerant oil of the type recommended for the A/C compressor in the vehicle.
5. Connect the rear section of the A/C liquid line (7) to the A/C receiver/drier.
6. Install the nut (6) that secures the rear section of the A/C liquid line to the A/C receiver/drier. Tighten the nut to 20 N.m (15 ft. lbs.).
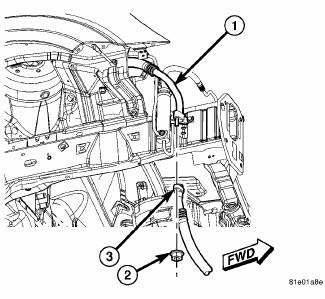
Fig. 236: Lower to Upper Suction Line
7. Connect the lower portion of the A/C suction line (3) to the upper suction line (1)
8. Install the nut (2) that secures the lower portion of the A/C suction line to the upper suction line. Tighten the nut to 20 N.m (15 ft. lbs.).
9. Reposition the right front wheel house splash shield to the body.
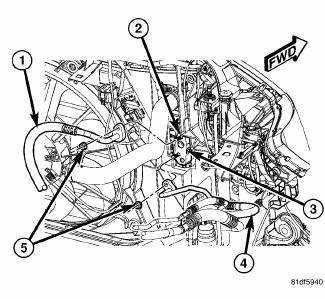
Fig. 237: Refrigerant Lines to Condenser Tapping Block
10. Lower the vehicle.
11. Remove the tape or plug from the opened refrigerant line fitting and condenser ports.
12. Lubricate a new rubber O-ring seal with clean refrigerant oil and install it and a new gaskets onto the refrigerant line fitting. Use only the specified O-rings as they are made of a special material for the R- 134a system. Use only refrigerant oil of the type recommended for the A/C compressor in the vehicle.
13. Connect the A/C liquid line (4) to the tapping block (2) and install the retaining nut (5). Tighten the nut to 20 N.m (15 ft. lbs.).
14. Reconnect the negative battery cable.
CAUTION: Do NOT run the engine with a vacuum pump in operation or with a vacuum present within the A/C system when equipped with the Denso 6SEU16 variable displacement compressor. Failure to follow this caution will result in serious A/C compressor damage.
15. Evacuate the refrigerant system.
16. If the A/C condenser is being replaced, add 10 milliliters (0.3 fluid ounce) of refrigerant oil to the refrigerant system. When replacing multiple A/C system components, refer to the REFRIGERANT OIL CAPACITIES to determine how much oil should be added to the refrigerant system. Use only refrigerant oil of the type recommended for the A/C compressor in the vehicle.
17. Charge the A/C system.
 Removal
WARNING: Review safety precautions and warnings in this part
before performing
this procedure. Failure to
follow the warnings and cautions could result in possible serious or
fata ...

See also:
Removal, Installation
REMOVAL
WARNING: To avoid serious or fatal injury on vehicles equipped
with airbags, disable
the Supplemental Restraint System (SRS) before attempting any steering
wheel, steering co ...
Diagnosis and Testing
BRAKE LAMP SWITCH
WARNING: To avoid serious or fatal injury on vehicles equipped
with airbags, disable
the Supplemental Restraint System (SRS) before attempting any steering
wheel, s ...
Removal, Installation
REMOVAL
WARNING: To protect the hands from battery acid, a suitable pair
of heavy duty
rubber gloves should be worn when removing or servicing a battery.
Safety glasses also should ...
