Dodge Journey: Installation
BEVERAGE COOLER
NOTE: LHD model shown in illustrations. RHD model similar.
OUTLET
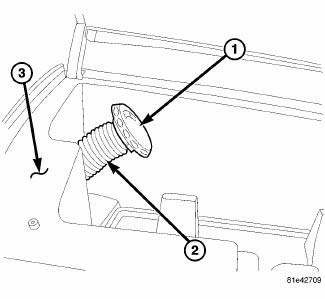
Fig. 149: Beverage Cooler Outlet & Hose
NOTE: If the beverage cooler cold air supply hose falls back into the instrument panel during outlet installation, the beverage cooler bin may need to be removed from the instrument panel and the hose rerouted through the opening in the bin.
1. Position the beverage cooler outlet (1) to the beverage cooler bin (3) and connect the cold air supply hose (2) to the outlet.

Fig. 150: Beverage Cooler Outlet Install
2. Feed the cold air supply hose through the opening in the side of the beverage cooler bin (1) and align and install the beverage cooler outlet (2) onto the bin. Make sure the three retaining tabs on the outlet are fully engaged to the bin.
COLD AIR SUPPLY HOSE

Fig. 151: Beverage Cooler Supply Hose
NOTE: Illustration shown with instrument panel removed for clarity.
1. Working through the beverage cooler bin opening in the instrument panel, feed the cold air supply hose (1) into the instrument panel. Note the routing of the hose and the instrument panel wiring.
2. Reach up underneath the instrument panel and connect the cold air supply hose to the passenger side of the air distribution housing (3).
3. Working through the beverage cooler bin opening in the instrument panel, engage the cold air supply hose to the bracket (4) located on the air inlet housing (2).
4. Position the beverage cooler bin to the instrument panel and route the cold air supply hose through the beverage cooler outlet opening.
5. Install the beverage cooler bin.
6. Install the beverage cooler outlet.
7. Install the instrument panel center bezel.
8. Install the outer passenger side instrument panel air outlet.
9. Install the glove box bin.
10. If equipped, install the silencer trim panel underneath the passenger side of the instrument panel.
11. Reconnect the negative battery cable.
DEMISTER OUTLETS
NOTE: Right side demister outlet shown. Left side outlet similar.
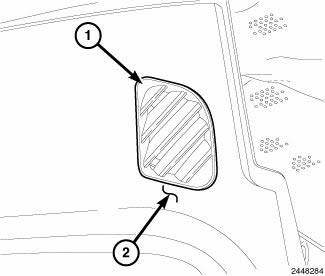
Fig. 152: Demister Outlet
1. Position the demister air outlet (1) to the opening in the instrument panel cover (2) and engage the three retaining tabs. Make sure the retaining tabs are fully engaged.
AIR OUTLETS
OUTBOARD OUTLETS
NOTE: Right side air outlet shown. Left side outlet similar.
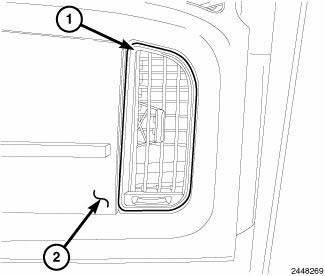
Fig. 153: Outboard Instrumental Panel Outlets
1. Position the air outlet (1) to the opening in the instrument panel cover (2) and align the outlet to the instrument panel duct.
NOTE: Make sure that the air outlet(s) are properly aligned to the instrument panel duct(s).
2. Engage the four retaining tabs that secure each instrument panel outlet to the instrument panel cover.
Make sure the retaining tabs are fully engaged.
CENTER OUTLETS
NOTE: Take the proper precautions to protect the front face of the center bezel from cosmetic damage while performing this procedure.

Fig. 154: Center Instrumental Panel Outlets
1. Position the air outlets (1) to the back of the center bezel (3) and install the four retaining screws (2 and 4). Tighten the screws to 1.2 N.m (10 in. lbs.).
NOTE: Make sure that the air outlets are properly aligned to the instrument panel center duct.
2. Install the center bezel.
 Removal
BEVERAGE COOLER
WARNING: Disable the airbag system before attempting any steering
wheel, steering
column, or instrument panel component diagnosis or service. Disconnect
and isolate t ...

See also:
Specifications
BATTERY
The battery Group Size number, the Cold Cranking Amperage (CCA) rating, and
the Reserve Capacity (RC)
rating or Ampere-Hours (AH) rating can be found on the original equipment
battery la ...
Removal, Installation
REMOVAL
1. Remove transmission and torque converter from vehicle.
2. Place a suitable drain pan under the converter housing end of the
transmission.
CAUTION: Verify that transmission is ...
Removal
LEFT-HAND-DRIVE
CAUTION: The vacuum in the power brake booster must be depleted
before removing
the master cylinder to avoid damaging the master cylinder and to prevent
inhalation of ...
